# WattDee Bilingual User Manual (TH + EN) # คู่มือการใช้งานระบบ WattDee (ภาษาไทย) ## คู่มือการใช้งาน WattDee (ภาษาไทย) Source: https://docs.wattdee.com/th/ ::: warning การอัปเดต UAT คู่มือนี้อธิบายระบบรุ่นที่จะอัปเดต หน้าจอหรือการทำงานบางส่วนอาจแตกต่างจากระบบ UAT ปัจจุบัน :::
WattDee LogoWattDee Operations Manual

คู่มือการใช้งานระบบ WattDee ฉบับภาษาไทย

คู่มือปฏิบัติการสำหรับผู้ดูแลแพลตฟอร์ม ผู้พัฒนาโครงการ ทีม O&M ฝ่ายบัญชี และลูกค้าผู้รับซื้อไฟฟ้า ครอบคลุมตั้งแต่การตั้งค่ามิเตอร์ DLMS/COSEM ตรวจข้อมูลโหลดโปรไฟล์ 15 นาที ซ่อมแซม VEE จนถึงการออกบิล PEA TOU และอนุมัติ 3 ขั้นตอน

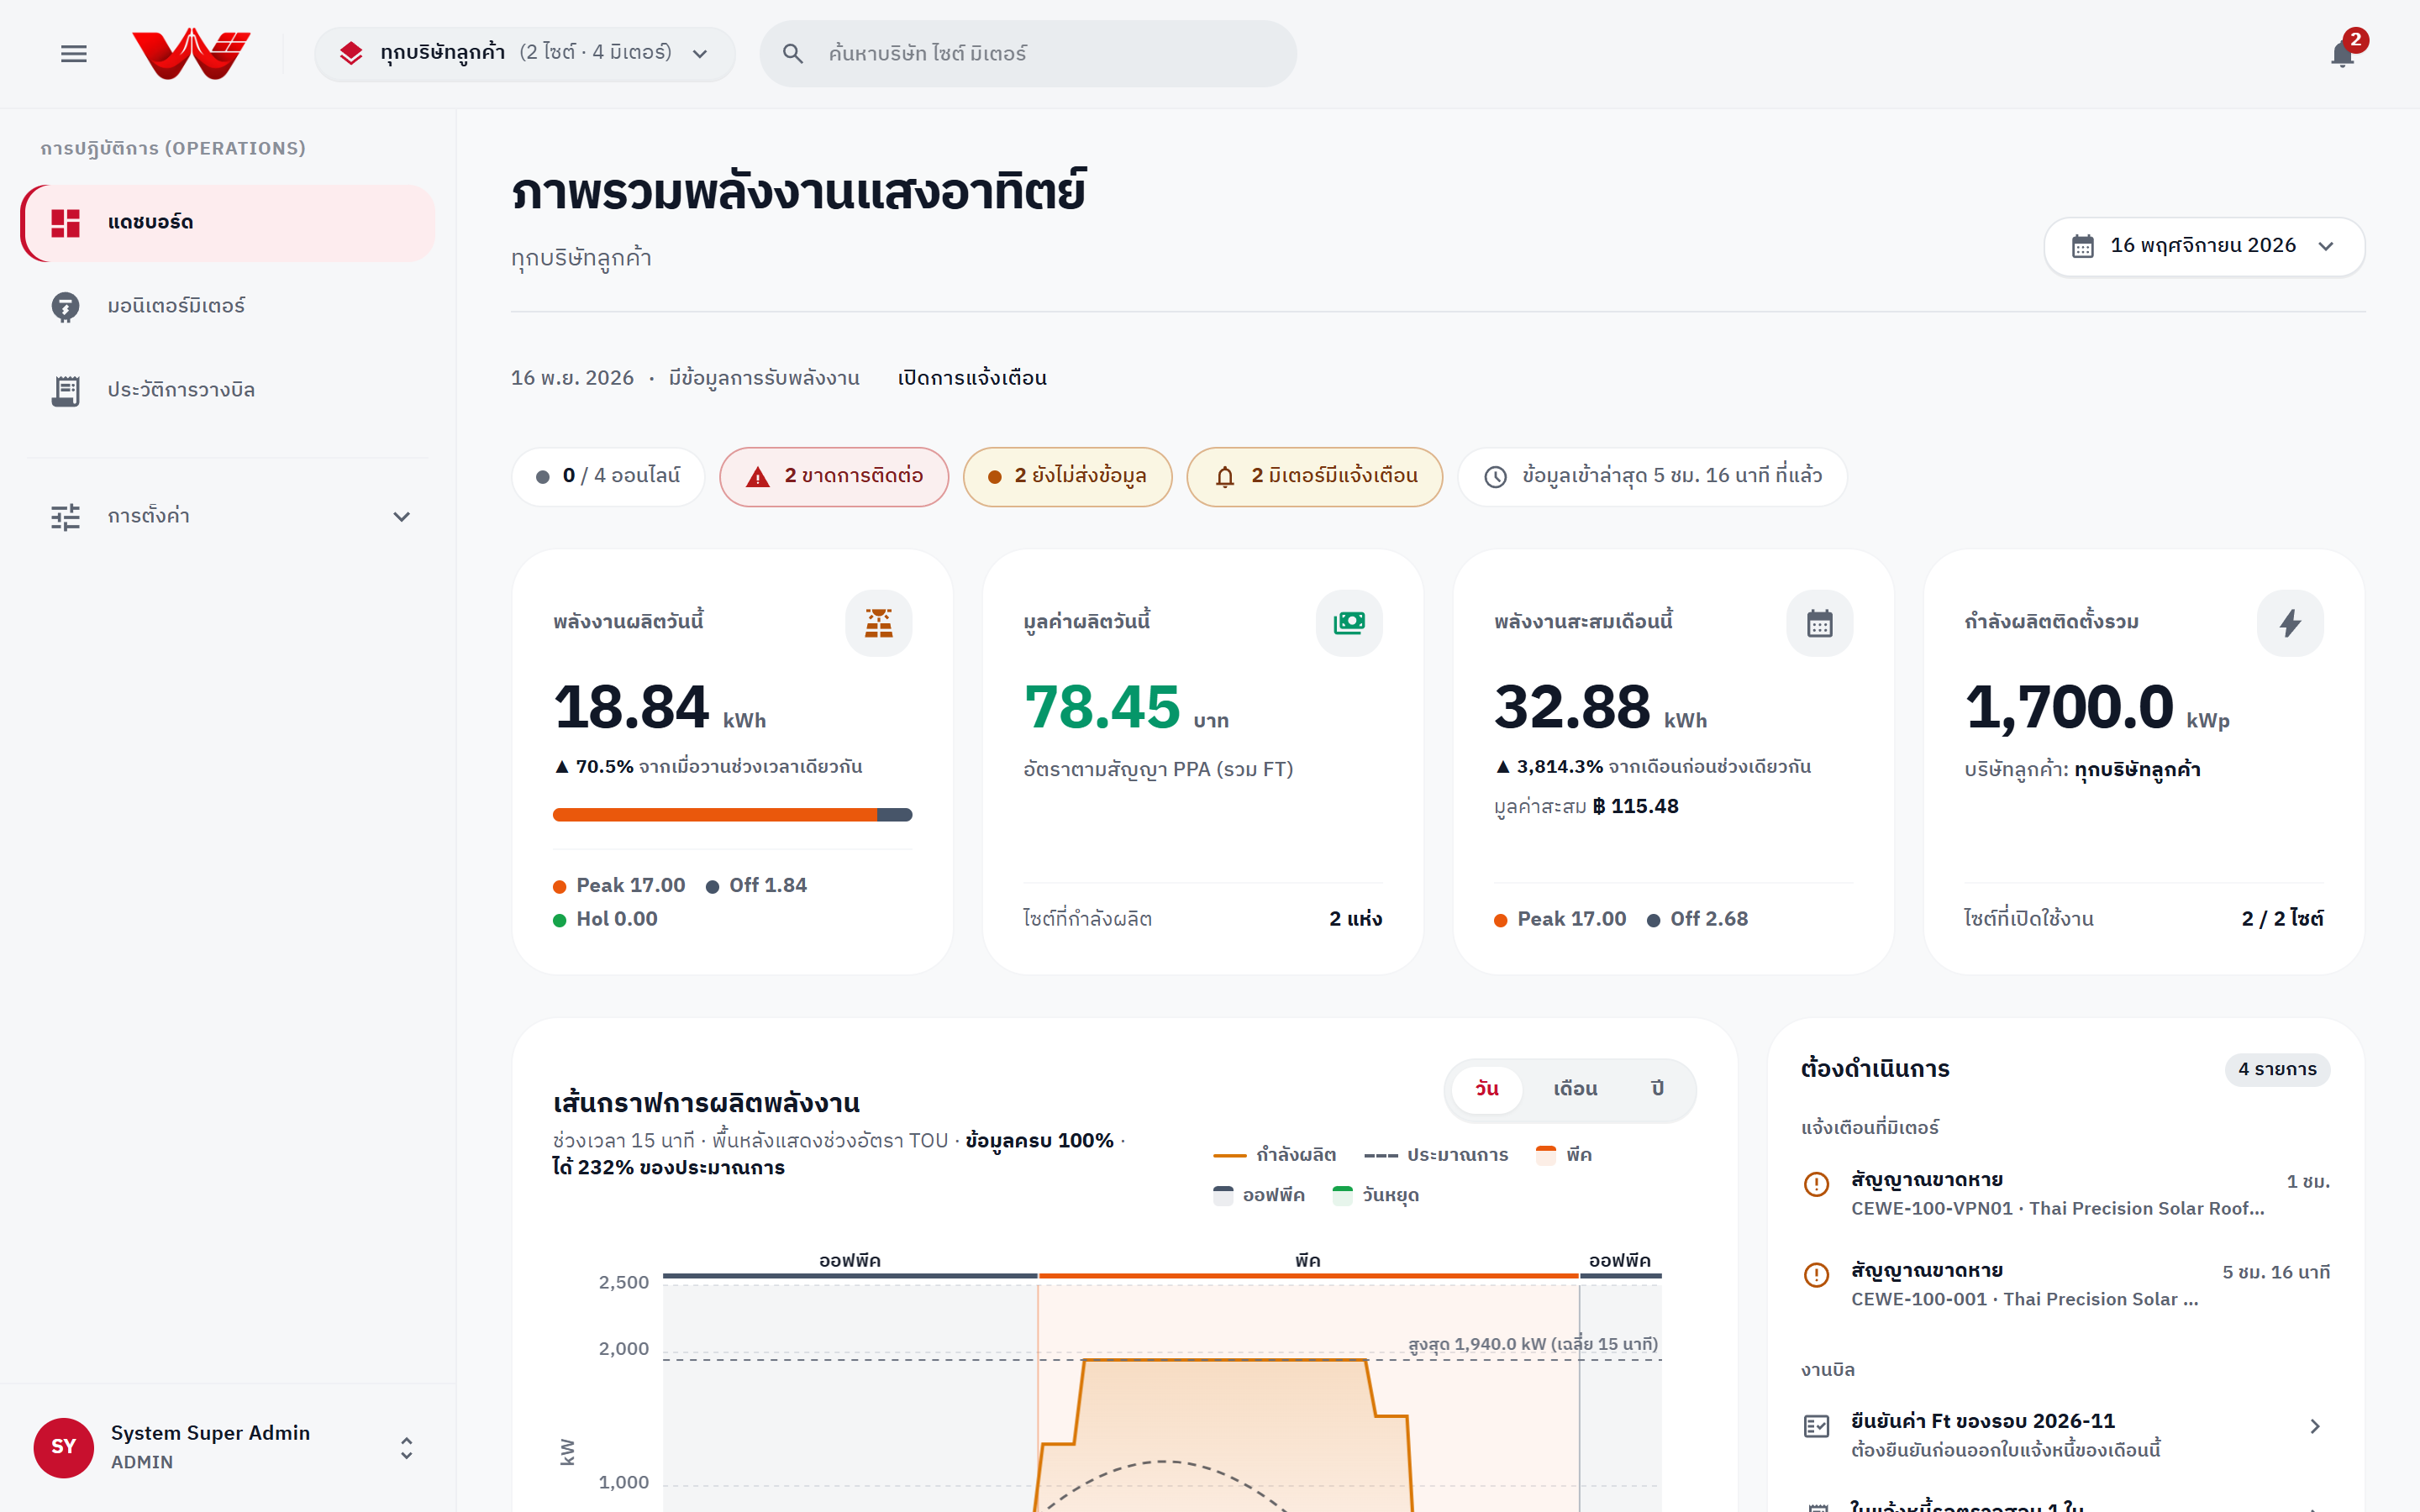
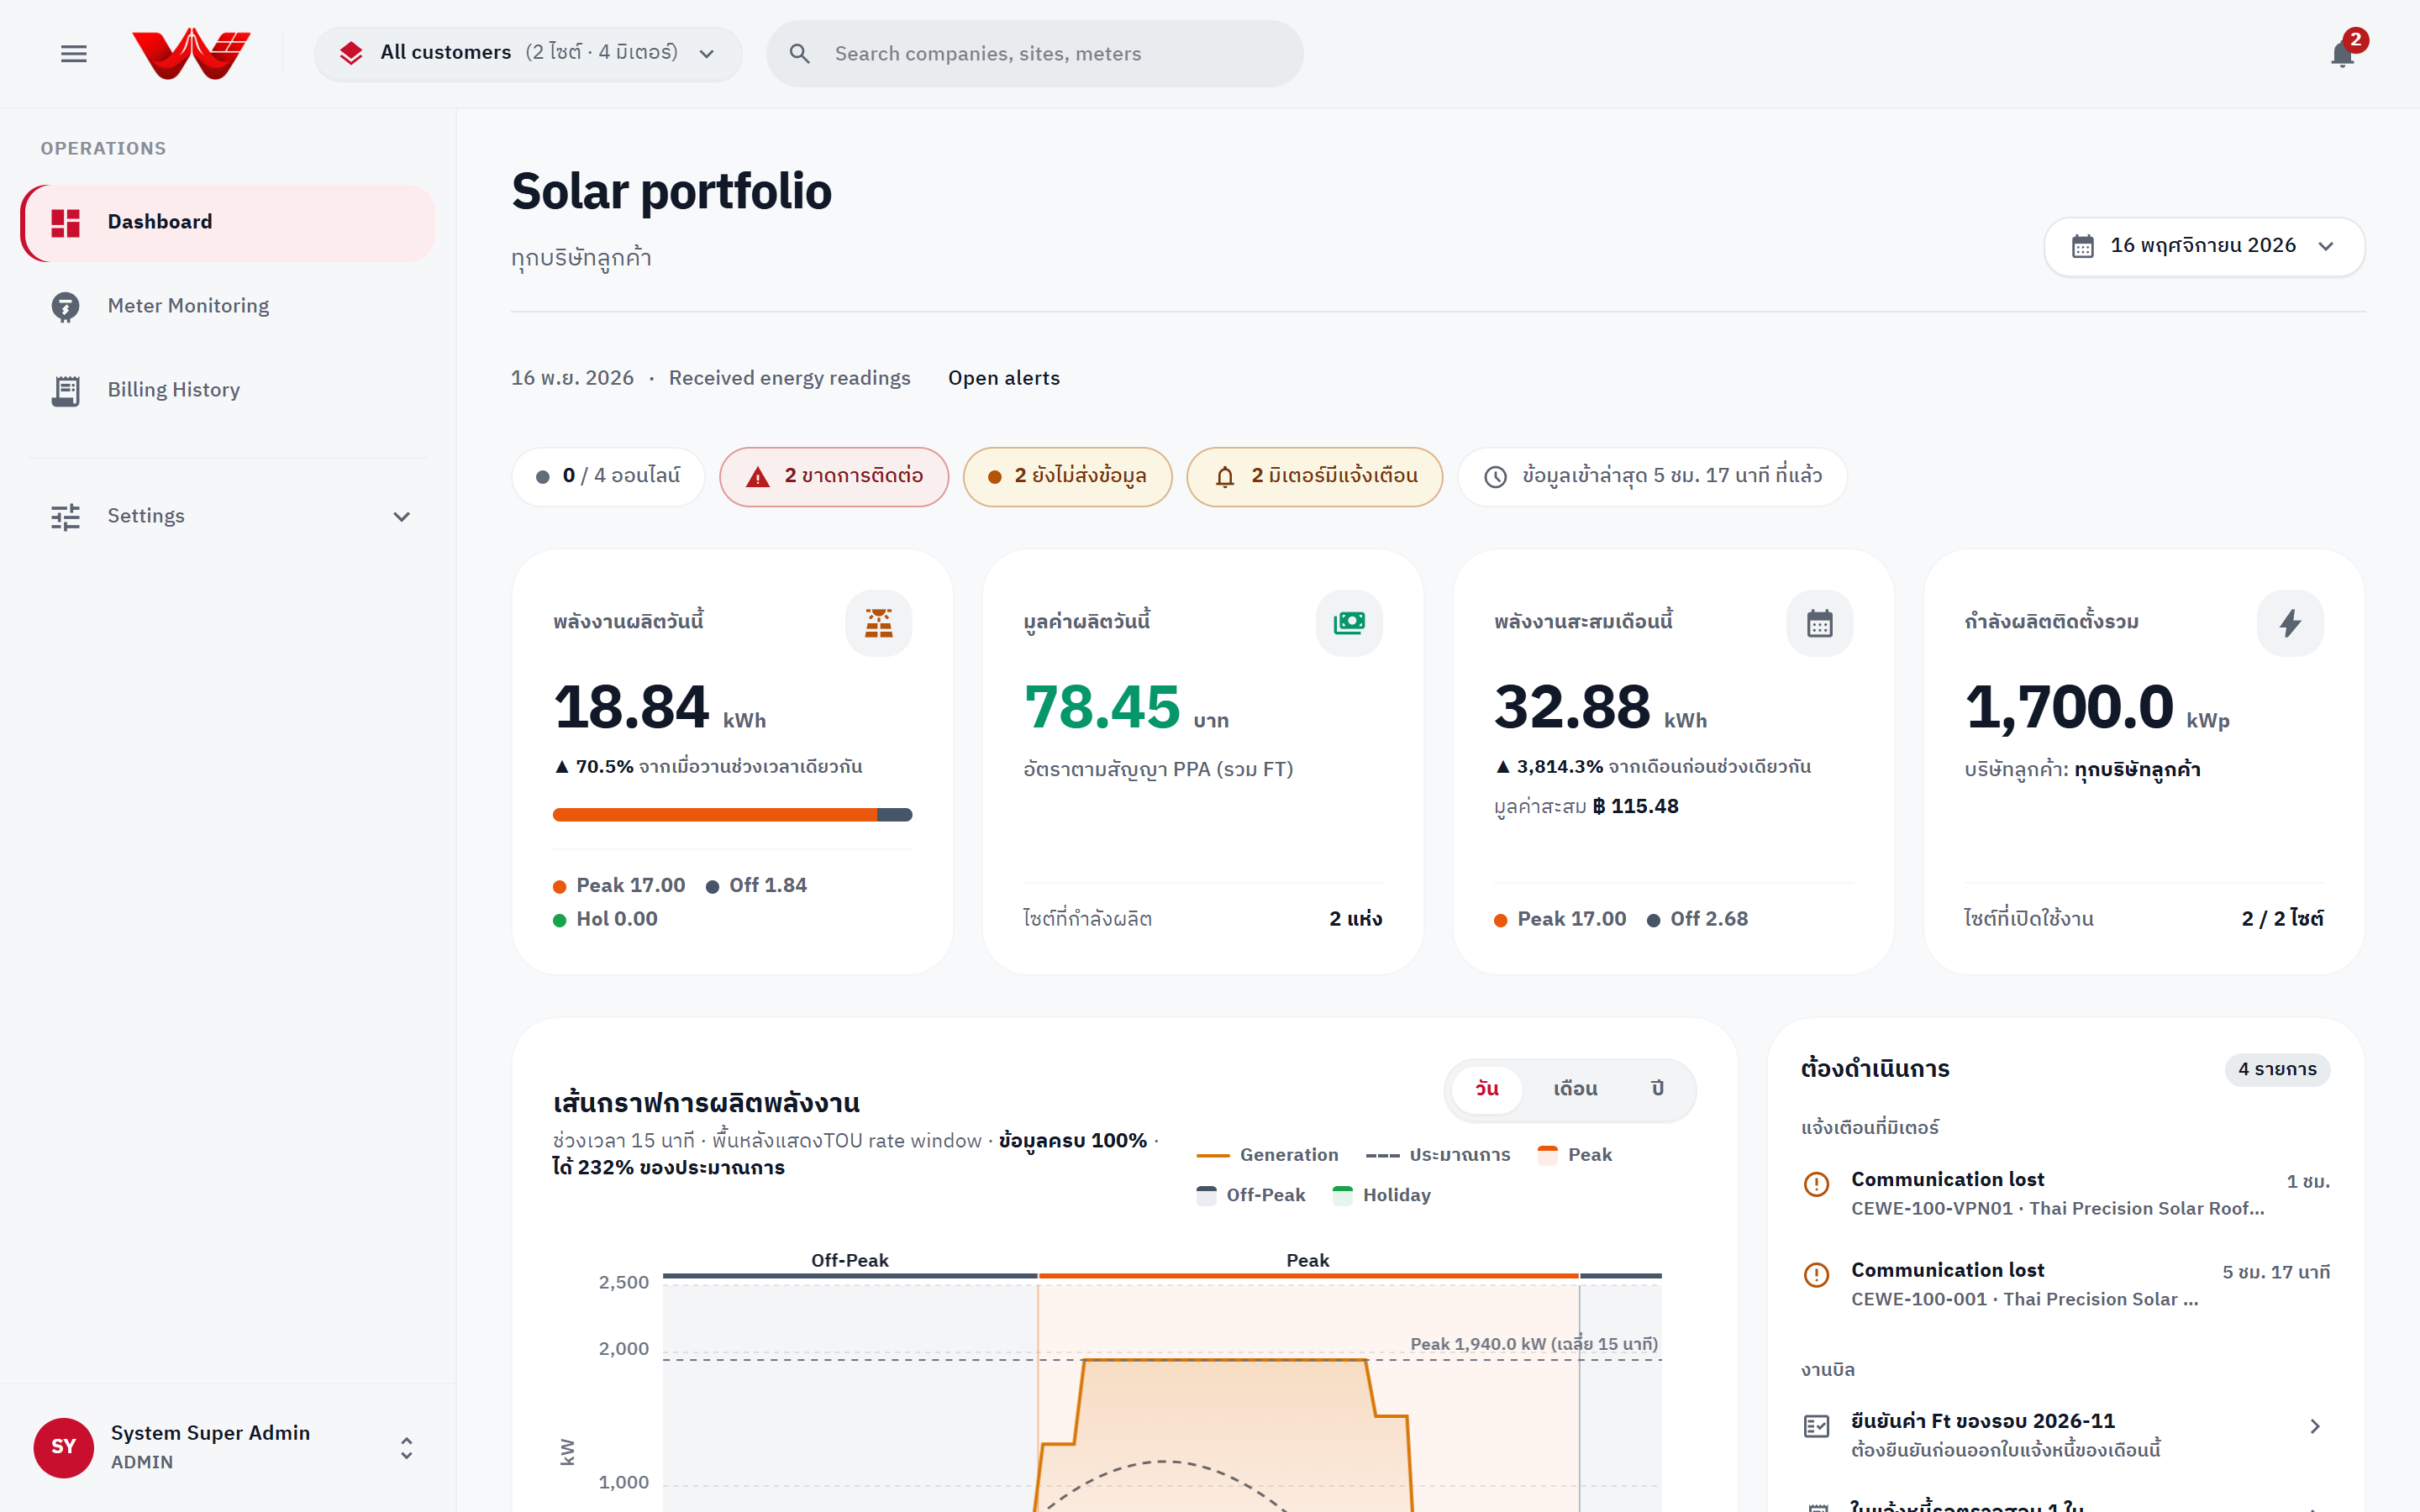
หน้าแดชบอร์ดภาพรวมพลังงาน แถบสุขภาพมิเตอร์ กราฟ TOU และคิวงานในระบบ WattDee
01 DLMS Meter & VPN ลงทะเบียนมิเตอร์แบบ US-1.19 ให้ HES อ่าน Serial จากเครื่องจริง ตั้งค่า CT/VT และผูกโปรไฟล์ VPN
02 15-Minute VEE Profile ติดตามโหลดโปรไฟล์ราย 15 นาทีตามเวลาไทย ไม่ใส่เลข 0 ปลอม ซ่อมแซมช่องว่าง VEE และดึงข้อมูลย้อนหลัง
03 3-Stage TOU Invoice ออกบิล PEA TOU ตามค่า Ft ประจำเดือนที่ยืนยันแล้ว ผ่านขั้นตอน DRAFT → CHECKED → APPROVED
04 Off-Taker Countersign ลูกค้าผู้รับซื้อไฟฟ้าเข้าดูกราฟพลังงานและลงนามรับทราบใบแจ้งหนี้สถานะ APPROVED ในพอร์ทัลลูกค้า
## ทางลัดตามบทบาท (Quick Role Lookup) เลือกคู่มือให้ตรงกับหน้าที่ของคุณในองค์กร: | บทบาทในระบบ | หน้าที่และงานหลัก | คู่มือที่เกี่ยวข้อง | | :--- | :--- | :--- | | **Platform Admin** (ผู้ดูแลแพลตฟอร์ม) | ภาพรวมพอร์ตโฟลิโอทุกผู้พัฒนา สร้างบริษัทผู้พัฒนา ตั้งค่าอัตราค่าไฟฟ้า TOU ค่า Ft รายเดือน บัญชีธนาคาร วันหยุด สุขภาพฐานข้อมูล และ Audit Log | [คู่มือผู้ดูแลแพลตฟอร์ม](./03-platform-admin-guide) | | **Solar Developer** (ผู้ดูแลบริษัทผู้พัฒนา) | แก้ไขโปรไฟล์และลายเซ็นบริษัท เพิ่มบริษัทลูกค้า (Off-taker) สร้างไซต์และสัญญา PPA ลงทะเบียนมิเตอร์แบบ US-1.19 ประสานผู้ดูแลแพลตฟอร์มเพื่อตั้งค่า VPN และสร้างบัญชีทีมงาน | [คู่มือผู้พัฒนาโครงการ](./04-developer-admin-guide) | | **Service & Operator** (ทีมปฏิบัติการ / O&M / ผู้ควบคุม) | มอนิเตอร์สถานะมิเตอร์ทั่วพอร์ต ทดสอบการเชื่อมต่อ HES สับเปลี่ยนมิเตอร์ วิเคราะห์ข้อมูล 15 นาที เติมข้อมูล VEE ดึงข้อมูลย้อนหลัง (Backfill) และเทียบช่วงเวลา | [คู่มือมิเตอร์และข้อมูลพลังงาน](./05-meter-and-telemetry-guide) | | **Accounting** (ฝ่ายบัญชี) | คำนวณและออกใบแจ้งหนี้ TOU PPA ตามรอบบิล กระบวนการตรวจสอบและอนุมัติ 3 ขั้นตอน การจัดการข้อมูลล่าช้า และการส่งออก PDF/Excel | [คู่มือการวางบิลและอนุมัติ](./06-billing-and-approval-guide) | | **Customer Off-taker** (ลูกค้าผู้รับซื้อไฟฟ้า) | เข้าสู่ระบบ ดูภาพรวมพลังงานของไซต์ตนเอง อ่านกราฟ TOU จัดการผู้ใช้ฝั่งลูกค้า และลงนามรับทราบใบแจ้งหนี้ที่อนุมัติแล้ว | [คู่มือพอร์ทัลลูกค้า](./07-customer-portal-guide) · [บทบาทและสิทธิ์](./01-roles-and-permissions) | | **Troubleshooting & AI** (แก้ไขปัญหาและ AI) | แก้ปัญหา Error ค่า Ft 422, รอบบิลล็อก, AccessDenied, Rate Limit 429, มิเตอร์ขาดการติดต่อ และการใช้งาน `llms.txt` / MCP | [การแก้ไขปัญหาและคำถามที่พบบ่อย](./08-troubleshooting-faq) | ## ลำดับหัวข้อในคู่มือทั้ง 8 บท
บทที่ 01 บทบาทและสิทธิ์การใช้งาน ทำความเข้าใจโครงสร้าง ประเภทองค์กร × บทบาท และวิธีดูตารางสิทธิ์แบบอ่านอย่างเดียวในระบบ บทที่ 02 การเข้าสู่ระบบและจัดการบัญชีผู้ใช้ การลงชื่อเข้าใช้ ตัวสลับบริษัทลูกค้า ค้นหาด่วน ศูนย์การแจ้งเตือน ภาษา/ธีม และการเปลี่ยนรหัสผ่าน บทที่ 03 คู่มือผู้ดูแลแพลตฟอร์ม (Platform Admin) แดชบอร์ดภาพรวม การสร้างบริษัทผู้พัฒนา อัตราค่าไฟและค่า Ft บัญชีธนาคาร วันหยุด สุขภาพฐานข้อมูล และ Audit Log บทที่ 04 คู่มือผู้ดูแลบริษัทผู้พัฒนา (Developer Admin) โปรไฟล์และลายเซ็นบริษัท การเพิ่มลูกค้า ไซต์และสัญญา PPA การลงทะเบียนมิเตอร์ การจัดการ VPN และผู้ใช้ บทที่ 05 คู่มือมิเตอร์และข้อมูลพลังงาน (Meter & Telemetry) มอนิเตอร์มิเตอร์ การวินิจฉัย HES การสับเปลี่ยนมิเตอร์ กราฟและตาราง 15 นาที VEE Backfill และเปรียบเทียบช่วงเวลา บทที่ 06 คู่มือการวางบิลและอนุมัติ 3 ขั้นตอน การออกใบแจ้งหนี้ TOU การตรวจสอบทางเทคนิค การอนุมัติ การลงนามฝั่งลูกค้า และการจัดการรอบบิล บทที่ 07 คู่มือพอร์ทัลลูกค้า (Customer Portal) ประสบการณ์การใช้งานฝั่งผู้รับซื้อไฟฟ้า การดูกราฟพลังงาน การตรวจสอบเอกสารที่อนุมัติแล้ว และการลงนามรับทราบ (Countersign) บทที่ 08 การแก้ไขปัญหา คำถามที่พบบ่อย และการเชื่อมต่อ AI แนวทางแก้ Error ยอดนิยม (เช่น ค่า Ft 422, รหัสผ่าน, มิเตอร์) และการใช้ llms.txt / MCP ร่วมกับ AI
::: info หมายเหตุสำหรับผู้ใช้ AI Assistant และ MCP สามารถเข้าถึงดัชนีเอกสารแบบข้อความล้วนได้ที่ /llms.txt ไฟล์รวมภาษาไทยฉบับเต็มได้ที่ /th/llms-full.txt หรือเปิดใช้ MCP Server ด้วยคำสั่ง `bun run docs:mcp` หากต้องการอ่านคู่มือฉบับภาษาอังกฤษให้เปิดที่ [English Manual (`/en/`)](/en/) :::
--- ## บทบาทและสิทธิ์การใช้งาน Source: https://docs.wattdee.com/th/01-roles-and-permissions ::: warning การอัปเดต UAT คู่มือนี้อธิบายระบบรุ่นที่จะอัปเดต หน้าจอหรือการทำงานบางส่วนอาจแตกต่างจากระบบ UAT ปัจจุบัน ::: # บทบาทและสิทธิ์การใช้งาน (Roles & Permissions) **ผู้ที่เกี่ยวข้อง:** ทุกบทบาท ผู้ดูแลแพลตฟอร์ม ผู้ดูแลบริษัทผู้พัฒนา ผู้ดูแลฝั่งลูกค้า **สิ่งที่ต้องเตรียมก่อนเริ่ม:** - มีบัญชีผู้ใช้ที่ผู้ดูแลระบบสร้างให้แล้ว (ระบบปิดการสมัครสมาชิกด้วยตนเองเพื่อความปลอดภัย) - หากต้องการเปิดดูตารางสิทธิ์ภายในระบบ ต้องมีสิทธิ์ผู้ดูแล (`ผู้ดูแลแพลตฟอร์ม`, `ผู้ดูแลบริษัท` หรือ `ผู้ดูแลฝั่งลูกค้า`) --- ## หลักการทำงานของสิทธิ์: ประเภทบริษัท × บทบาท ในระบบ WattDee **ไม่มีการกำหนดสิทธิ์แยกรายไซต์** สิทธิ์ของทุกคนเกิดจาก 2 ปัจจัยร่วมกันเสมอ คือ: 1. **ประเภทองค์กร (Organization Tier)** ที่บัญชีนั้นสังกัดอยู่: กำหนด **ขอบเขตบริษัทและไซต์** ที่มองเห็นได้ 2. **บทบาทในองค์กร (Role)**: กำหนด **การทำงาน** ที่ทำได้ภายในขอบเขตนั้น ::: warning ข้อควรระวังสำคัญเกี่ยวกับชื่อบทบาท ชื่อบทบาท `ADMIN` ในแต่ละระดับองค์กร **มีสิทธิ์ไม่เท่ากัน** - `ADMIN` ของ **เจ้าของแพลตฟอร์ม** คือ **ผู้ดูแลแพลตฟอร์ม** (ควบคุมทุกบริษัท ทุกไซต์ และค่าอ้างอิงทั้งระบบ) - `ADMIN` ของ **บริษัทผู้พัฒนา** คือ **ผู้ดูแลบริษัท** (จัดการทีมงาน ลูกค้า ไซต์ และมิเตอร์เฉพาะของบริษัทตนเอง) - `ADMIN` ของ **บริษัทลูกค้า** คือ **ผู้ดูแลฝั่งลูกค้า** (จัดการพนักงานในบริษัทตนเอง และลงนามรับใบแจ้งหนี้เท่านั้น ไม่สามารถแก้ไขมิเตอร์ สัญญา หรือออกบิลได้) ::: --- ## ขอบเขตการเข้าถึงตามประเภทองค์กร (3 ระดับ) | ประเภทองค์กรในระบบ | ชื่อที่แสดงในหน้าจอ | ไซต์ที่เข้าถึงได้ | หน้าที่หลักในแพลตฟอร์ม | | :--- | :--- | :--- | :--- | | **Platform Owner** (`SUPER_ADMIN`) | **เจ้าของแพลตฟอร์ม** | **ทุกบริษัทลูกค้าและทุกไซต์ในระบบ** | บริหารผู้พัฒนาทั้งหมด ตั้งค่าอัตราค่าไฟ/Ft วันหยุด บัญชีธนาคาร โปรไฟล์ VPN และดูแลระบบส่วนกลาง | | **Solar Developer** (`DEVELOPER`) | **ผู้พัฒนาโครงการ** | **เฉพาะไซต์ที่บริษัทตนเป็นผู้พัฒนา** และบริษัทลูกค้าของตนเอง | เพิ่มลูกค้า สร้างไซต์ กำหนดสัญญา PPA ลงทะเบียนมิเตอร์ ดูแล O&M และออก/ตรวจสอบ/อนุมัติใบแจ้งหนี้ | | **Customer Company** (`OFFTAKER`) | **บริษัทลูกค้า** | **เฉพาะไซต์ที่บริษัทตนเป็นผู้รับซื้อไฟฟ้า** | ติดตามพลังงานแสงอาทิตย์ ตรวจสอบใบแจ้งหนี้ที่อนุมัติแล้ว และลงนามรับใบแจ้งหนี้ | --- ## ตารางบทบาททั้งหมดแยกตามประเภทองค์กร ### 1. องค์กรระดับเจ้าของแพลตฟอร์ม (Platform Owner) | บทบาท (รหัส) | ชื่อบทบาทในหน้าจอ | ระดับสิทธิ์ | สิ่งที่ทำได้ | | :--- | :--- | :--- | :--- | | `ADMIN` | **ผู้ดูแลแพลตฟอร์ม** | ผู้ดูแล (`Manage`) | สิทธิ์สูงสุดทั้งระบบ: สร้าง/ลบ/เปลี่ยนประเภทบริษัท กำหนดขีดจำกัดมิเตอร์ จัดการผู้ใช้ทุกองค์กร ตั้งค่าอัตราค่าไฟฟ้า ประกาศค่า Ft รายเดือน แก้ไขปฏิทินวันหยุด จัดการบัญชีธนาคาร สร้าง/ผูกโปรไฟล์ VPN แก้ไข Serial มิเตอร์และยืนยันการสับเปลี่ยนมิเตอร์ ออกบิลก่อนสิ้นรอบ ตรวจสอบสุขภาพฐานข้อมูล และดูประวัติระบบ (Audit Log) | | `SERVICE` | **ทีมปฏิบัติการส่วนกลาง** | ปฏิบัติการ (`Operate`) | ดูแลมิเตอร์และการสื่อสารของ **ทุกไซต์ในระบบ**: ลงทะเบียน/แก้ไข/สับเปลี่ยนมิเตอร์ ทดสอบการเชื่อมต่อและสั่งอ่านค่าทันที ดู IP/พอร์ต/ซิม ประมวลผลข้อมูลโหลดย้อนหลัง ดูสาเหตุคุณภาพข้อมูล 15 นาที รับทราบ/เลื่อน/มอบหมายการแจ้งเตือน ดูรายงานเทียบบิลคู่ขนาน และดูอัตรา Ft/วันหยุด *(ไม่สามารถจัดการผู้ใช้ แก้ไขค่าอ้างอิง หรืออนุมัติใบแจ้งหนี้)* | ### 2. องค์กรระดับผู้พัฒนาโครงการโซลาร์ (Solar Developer) | บทบาท (รหัส) | ชื่อบทบาทในหน้าจอ | ระดับสิทธิ์ | สิ่งที่ทำได้ | | :--- | :--- | :--- | :--- | | `ADMIN` | **ผู้ดูแลบริษัท** | ผู้ดูแล (`Manage`) | แก้ไขข้อมูลบริษัท อัปโหลดโลโก้และลายเซ็น เพิ่ม/แก้ไข/ลบบริษัทลูกค้าและผู้ใช้ของลูกค้า จัดการทีมงานภายในบริษัทตนเอง สร้าง/แก้ไขไซต์และสัญญา PPA จัดการมิเตอร์และแก้ไขข้อมูลโหลดย้อนหลัง จัดการแจ้งเตือน และทำรายการใบแจ้งหนี้ได้ครบทุกขั้นตอน รวมถึงออกบิลก่อนสิ้นรอบ *(ยกเว้นงานส่วนกลาง เช่น สร้างบริษัทผู้พัฒนา ตั้งค่า Ft/วันหยุด/บัญชีธนาคาร จัดการ VPN และแก้ Serial มิเตอร์ที่ต้องให้ผู้ดูแลแพลตฟอร์มดำเนินการ)* | | `SERVICE` | **วิศวกร O&M** | ปฏิบัติการ (`Operate`) | ลงทะเบียน/แก้ไข/สับเปลี่ยนมิเตอร์ ทดสอบการเชื่อมต่อและสั่งอ่านค่าทันที ดู IP/พอร์ต/ซิม ประมวลผลและเติมข้อมูลโหลดย้อนหลัง (VEE/CSV) ดูสาเหตุคุณภาพข้อมูล รับทราบ/มอบหมายแจ้งเตือน และทำหน้าที่ **ตรวจสอบทางเทคนิคใบแจ้งหนี้ (ขั้นที่ 2)** รวมถึงดูรายงานเทียบบิลคู่ขนาน *(ไม่สามารถสร้างหรืออนุมัติใบแจ้งหนี้)* | | `ACCOUNTING` | **ฝ่ายบัญชี** | บิลและรายงาน (`Billing`) | ดูใบแจ้งหนี้ฉบับร่างและฉบับอนุมัติ สร้างและคำนวณบิลใหม่ **อนุมัติใบแจ้งหนี้ (ขั้นที่ 3)** ยกเลิกใบแจ้งหนี้พร้อมเหตุผล ลบใบแจ้งหนี้ฉบับร่าง ดูรายงานเทียบบิลคู่ขนาน ดูอัตรา Ft/วันหยุด และดูบัญชีธนาคารรับชำระ *(ตามกฎการอนุมัติ 3 ขั้นตอน ผู้ตรวจสอบขั้นที่ 2 และผู้อนุมัติขั้นที่ 3 ต้องไม่ใช่บุคคลเดียวกัน)* | | `OPERATOR` | **ผู้ควบคุมระบบ** | ปฏิบัติการ (`Operate`) | ตรวจสอบมิเตอร์และกราฟการผลิต ทดสอบการเชื่อมต่อและสั่งอ่านค่าทันที ดู IP/พอร์ต/ซิม ดูสาเหตุคุณภาพข้อมูล 15 นาที ส่งและรับทราบ/เลื่อน/มอบหมายการแจ้งเตือน และดูอัตรา Ft/วันหยุด *(ไม่สามารถเพิ่ม/แก้ไข/ลบมิเตอร์ หรือแก้ไข/นำเข้าข้อมูล 15 นาที)* | ### 3. องค์กรระดับบริษัทลูกค้าผู้รับซื้อไฟฟ้า (Customer Company / Off-taker) | บทบาท (รหัส) | ชื่อบทบาทในหน้าจอ | ระดับสิทธิ์ | สิ่งที่ทำได้ | | :--- | :--- | :--- | :--- | | `ADMIN` | **ผู้ดูแลฝั่งลูกค้า** | ผู้ดูแล (`Manage`) | แก้ไขข้อมูลบริษัทของตนเอง อัปโหลดโลโก้และลายเซ็นฝั่งลูกค้า เพิ่ม/แก้ไข/ระงับผู้ใช้ภายในบริษัทลูกค้าของตนเอง ดูอีเมลและบทบาทของเพื่อนร่วมงาน ดูตารางสิทธิ์ และดูใบแจ้งหนี้ที่ **อนุมัติแล้ว (APPROVED)** พร้อมลงนามรับใบแจ้งหนี้ในนามลูกค้า *(ไม่เห็นใบแจ้งหนี้ฉบับร่างก่อนอนุมัติ)* | | `CUSTOMER` | **ตัวแทนลูกค้า** | บิลและรายงาน (`Billing`) | ดูใบแจ้งหนี้ที่ **อนุมัติแล้ว (APPROVED)** และลงนามรับใบแจ้งหนี้ในนามลูกค้า ดูภาพรวมไซต์และกราฟพลังงานของบริษัท *(ไม่เห็นเมนูการตั้งค่าและไม่เห็นอีเมล/บทบาทของเพื่อนร่วมงาน)* | | `READER` | **ดูอย่างเดียว** | ดูอย่างเดียว (`Read only`) | ดูแดชบอร์ด มอนิเตอร์มิเตอร์ และดูข้อมูล/กราฟ 15 นาทีของไซต์บริษัทตนเองเท่านั้น *(ไม่มีเมนูประวัติการวางบิล ไม่มีเมนูการตั้งค่า และแก้ไขข้อมูลใดๆ ไม่ได้)* | --- ## วิธีเปิดดูตารางสิทธิ์ตามบทบาทในระบบ ผู้ดูแลระบบทุกองค์กรสามารถตรวจสอบตารางสิทธิ์แบบละเอียดได้ตลอดเวลาจากหน้า **สิทธิ์ตามบทบาท** ซึ่งดึงข้อมูลตรงจากนโยบายความปลอดภัยของเซิร์ฟเวอร์ (ไม่สามารถแก้ไขจากหน้าเว็บได้ เพื่อป้องกันการกำหนดสิทธิ์คลาดเคลื่อน): 1. คลิกเมนู **การตั้งค่า (Settings)** ในแถบนำทางด้านซ้าย 2. เลือกบริษัทที่ต้องการตรวจสอบ (หากคุณเป็นผู้ดูแลบริษัทผู้พัฒนา ระบบจะเปิดหน้าบริษัทของคุณให้อัตโนมัติ) 3. คลิกแท็บ **ผู้ใช้และสิทธิ์ (People & access)** 4. ที่ปุ่มสลับด้านบน ให้คลิก **สิทธิ์ตามบทบาท (Role permissions)** 5. ระบบจะแสดงตารางสิทธิ์แบ่งตามหมวดหมู่ (**บุคคลและองค์กร**, **ไซต์และมิเตอร์**, **บิลและใบแจ้งหนี้**, **ข้อมูลอ้างอิงทั้งระบบ**) พร้อมไฮไลต์คอลัมน์ **บทบาทของคุณ** และสรุปจำนวนสิทธิ์ที่แต่ละบทบาทได้รับ (เช่น `26 / 26` หรือ `7 / 26`) ![ตารางสิทธิ์ตามบทบาทในหน้าการตั้งค่า](/screenshots/th/27-settings-permission-matrix.png) *ภาพที่ 1: หน้าจอตารางสิทธิ์ตามบทบาท (Role permissions) แบบอ่านอย่างเดียว แยกตามประเภทบริษัท* ::: tip สิ่งที่ถูกซ่อนจากองค์กรระดับผู้พัฒนาและลูกค้า ในแท็บสิทธิ์ตามบทบาทของบริษัทผู้พัฒนาและบริษัทลูกค้า สิทธิ์ส่วนกลางอย่างการสร้างบริษัทผู้พัฒนา การประกาศอัตรา Ft การแก้ปฏิทินวันหยุด และบัญชีธนาคาร จะไม่แสดงในตาราง โดยมีข้อความแจ้งด้านล่างว่าเป็นสิทธิ์เฉพาะ **ผู้ดูแลแพลตฟอร์ม** เท่านั้น ::: --- ## ขั้นตอนถัดไป - [การเข้าสู่ระบบ การนำทาง และบัญชีผู้ใช้](./02-login-and-account) - [คู่มือผู้ดูแลแพลตฟอร์ม (Platform Admin)](./03-platform-admin-guide) - [คู่มือผู้ดูแลบริษัทผู้พัฒนา (Developer Admin)](./04-developer-admin-guide) --- ## การเข้าสู่ระบบและจัดการบัญชีผู้ใช้ Source: https://docs.wattdee.com/th/02-login-and-account ::: warning การอัปเดต UAT คู่มือนี้อธิบายระบบรุ่นที่จะอัปเดต หน้าจอหรือการทำงานบางส่วนอาจแตกต่างจากระบบ UAT ปัจจุบัน ::: # การเข้าสู่ระบบ การนำทาง และบัญชีผู้ใช้ **ผู้ที่เกี่ยวข้อง:** ทุกบทบาท ผู้ดูแลแพลตฟอร์ม ผู้ดูแลบริษัทผู้พัฒนา ทีมปฏิบัติการ ฝ่ายบัญชี ลูกค้าผู้รับซื้อไฟฟ้า **สิ่งที่ต้องเตรียมก่อนเริ่ม:** - อีเมลสำหรับเข้าสู่ระบบ และรหัสผ่านเริ่มต้น (หรือรหัสผ่านชั่วคราว) ที่ผู้ดูแลบริษัทหรือผู้ดูแลแพลตฟอร์มส่งให้ - เบราว์เซอร์สมัยใหม่ที่เปิดใช้งาน Cookie และ JavaScript --- ## 1. การเข้าสู่ระบบ (Sign In) ระบบ WattDee ปิดการสมัครสมาชิกด้วยตนเองเพื่อความปลอดภัย บัญชีผู้ใช้ทุกบัญชีจะต้องถูกสร้างโดยผู้ดูแลระบบที่ได้รับสิทธิ์เท่านั้น 1. เปิดหน้าเว็บไซต์ระบบ WattDee (หากเปิดผ่านลิงก์เฉพาะ เช่น หน้าบิลหรือหน้ามิเตอร์ ระบบจะพาคุณกลับไปยังหน้านั้นทันทีหลังเข้าสู่ระบบสำเร็จ) 2. ที่มุมขวาบนของหน้าเข้าสู่ระบบ คุณสามารถคลิก **English / ไทย** เพื่อสลับภาษา หรือคลิกไอคอนพระจันทร์/พระอาทิตย์ เพื่อสลับ **โหมดสว่าง / โหมดมืด** ได้ก่อนเข้าสู่ระบบ 3. กรอก **อีเมล (Email)** และ **รหัสผ่าน (Password)** ของบัญชีบริษัทคุณ (กดไอคอนรูปตาด้านขวาเพื่อแสดงหรือซ่อนรหัสผ่าน) 4. คลิกปุ่ม **เข้าสู่ระบบ (Sign in)** ![หน้าจอเข้าสู่ระบบ WattDee](/screenshots/th/01-login-page.png) *ภาพที่ 1: หน้าจอเข้าสู่ระบบ WattDee พร้อมปุ่มเปลี่ยนภาษาและโหมดแสดงผล* ::: warning ข้อควรทราบด้านความปลอดภัยของเซสชัน (Session & Rate Limit) - **อายุเซสชัน 12 ชั่วโมง:** การเข้าสู่ระบบ 1 ครั้งมีอายุใช้งาน **12 ชั่วโมง** (ระบบต่ออายุให้อัตโนมัติระหว่างที่ใช้งานอยู่) หากครบกำหนดหรือออกจากระบบ จะต้องเข้าสู่ระบบใหม่อีกครั้ง - **การจำกัดความถี่ในการเข้าสู่ระบบ (Rate Limit):** หากกรอกรหัสผ่านผิดหรือส่งคำขอเข้าสู่ระบบซ้ำติดกันหลายครั้งในช่วงเวลาสั้นๆ ระบบจะระงับการเข้าสู่ระบบชั่วคราวและแจ้งเตือน `มีการเข้าสู่ระบบหลายครั้งเกินไป กรุณาลองใหม่ภายหลัง` ให้รอสักครู่แล้วลองใหม่อีกครั้ง - **บัญชีที่ถูกระงับ (Suspended):** หากผู้ดูแลระงับบัญชีของคุณ ระบบจะตัดเซสชันทันทีและไม่อนุญาตให้เข้าสู่ระบบจนกว่าจะถูกเปิดใช้งานอีกครั้ง ::: --- ## 2. การใช้งานแถบด้านบน: ตัวสลับบริษัทและค้นหาด่วน แถบด้านบน (Top Navigation Bar) ช่วยให้คุณกำหนดขอบเขตข้อมูลที่กำลังดู และกระโดดไปยังบริษัท ไซต์ หรือมิเตอร์ที่ต้องการได้อย่างรวดเร็ว ### ตัวสลับกลุ่มบริษัท / ผู้พัฒนาโครงการ (Portfolio Switcher) 1. คลิกปุ่มตัวเลือกบริเวณมุมซ้ายบนของแถบด้านบน (ข้างโลโก้ WattDee): - **ผู้ดูแลแพลตฟอร์ม / ทีมส่วนกลาง:** จะเห็นตัวเลือก **ทุกผู้พัฒนาโครงการ (All developers)** หรือรายชื่อบริษัทผู้พัฒนาโครงการเพื่อกรองข้อมูลทั้งระบบ - **ผู้พัฒนาโครงการ:** จะเห็นตัวเลือก **ทุกบริษัทลูกค้า (All customers)** หรือรายชื่อบริษัทลูกค้าแต่ละราย พร้อมจำนวน `(X ไซต์ · Y มิเตอร์)` - **ลูกค้าที่มีบริษัทเดียว:** จะแสดงชื่อบริษัท จำนวนไซต์/มิเตอร์ และจุดสีเขียวแบบอ่านอย่างเดียว (ไม่ต้องสลับ) 2. หากรายการมีมากกว่า 8 บริษัท จะมีช่อง **ค้นหา (Search)** ภายในเมนูดรอปดาวน์ให้พิมพ์กรองได้ทันที 3. การเปลี่ยนตัวเลือกในแถบนี้จะอัปเดตขอบเขตของหน้า **แดชบอร์ด** และ **มอนิเตอร์มิเตอร์** ไปพร้อมกัน *(เมื่ออยู่ในหน้า **การตั้งค่า** แถบนี้จะแสดงลิงก์กลับไปยังรายชื่อ **บริษัท** แทน)* ### ช่องค้นหาด่วน (Global Search) 1. คลิกที่ช่อง **ค้นหาบริษัท ไซต์ มิเตอร์ (Search companies, sites, meters)** บนแถบด้านบน 2. พิมพ์ชื่อบริษัท ชื่อไซต์ รหัสไซต์ หรือหมายเลข Serial ของมิเตอร์ 3. ระบบจะจัดกลุ่มผลลัพธ์แบบลำดับชั้น (**บริษัท > ไซต์ > มิเตอร์**) เฉพาะรายการที่คุณมีสิทธิ์เข้าถึง 4. ใช้ปุ่มลูกศรขึ้น/ลงแล้วกด `Enter` หรือคลิกที่รายการเพื่อเปิดหน้านั้นทันที *(หากเปิดค้นหาขณะอยู่ในหน้า **การตั้งค่า** การคลิกผลลัพธ์จะเปิดหน้าตั้งค่าของรายการนั้นโดยตรง)* ![แถบนำทางด้านบน ตัวสลับกลุ่มลูกค้า และช่องค้นหาด่วน](/screenshots/th/03-navbar-group-search.png) *ภาพที่ 2: แถบด้านบนแสดงปุ่มย่อแถบนำทาง ตัวสลับบริษัทลูกค้า และช่องค้นหาบริษัท/ไซต์/มิเตอร์* --- ## 3. ศูนย์การแจ้งเตือน (Notification Center) ไอคอนรูปกระดิ่งบริเวณมุมขวาบนจะแสดงตัวเลขจำนวนการแจ้งเตือนที่ยังไม่ได้แก้ไข (แสดง `9+` หากมีมากกว่า 9 รายการ) 1. คลิกไอคอน **กระดิ่ง (การแจ้งเตือน)** เพื่อเปิดหน้าต่างแจ้งเตือน 2. ใช้แท็บกรอง 3 มุมมอง: - **ใหม่ (New):** การแจ้งเตือนที่ยังเปิดอยู่ - **วิกฤต (Critical):** เฉพาะเหตุการณ์ระดับวิกฤตที่ควรตรวจก่อน - **ทั้งหมด (All):** รวมรายการที่รับทราบหรือเลื่อนการแจ้งเตือนไว้แล้ว 3. ในแต่ละรายการ คุณสามารถคลิก **ดูมิเตอร์ (View meter)** เพื่อเปิดดูมิเตอร์ต้นทาง หรือคลิก **เปิดศูนย์การแจ้งเตือน (Open alert workspace)** ด้านล่างเพื่อเข้าสู่หน้าประวัติและการจัดการแจ้งเตือนเต็มรูปแบบ 4. สำหรับบทบาทที่มีสิทธิ์จัดการแจ้งเตือน (`alert.manage` เช่น ผู้ดูแล, วิศวกร O&M, ผู้ควบคุมระบบ): - คลิก **รับทราบ (Acknowledge)** เพื่อบันทึกว่ามีผู้รับเรื่องแล้ว หรือคลิก **รับทราบทั้งหมด (Acknowledge all)** ด้านบน - คลิก **จัดการ (Manage)** เพื่อ **เลื่อนการแจ้งเตือน (Snooze)** ได้ `1 ชม.`, `8 ชม.` หรือ `24 ชม.`, **มอบหมายให้ (Assign to)** เพื่อนร่วมงานในองค์กรเดียวกัน และเขียน **บันทึก (Note)** ความคืบหน้า (ไม่เกิน 500 ตัวอักษร) แล้วกด **บันทึก** ![ศูนย์การแจ้งเตือนในแถบด้านบน](/screenshots/th/04-notification-center.png) *ภาพที่ 3: ศูนย์การแจ้งเตือน แสดงตัวกรอง ใหม่/วิกฤต/ทั้งหมด ปุ่มรับทราบ การเลื่อน และมอบหมายงาน* --- ## 4. แถบนำทางด้านซ้ายและเมนูบัญชีผู้ใช้ (User Menu) ### แถบนำทางด้านซ้าย (Sidebar) - กลุ่ม **การปฏิบัติการ (Operations)** ประกอบด้วย: - **แดชบอร์ด (Dashboard):** ภาพรวมพลังงาน แถบสุขภาพมิเตอร์ และงานที่ต้องดำเนินการ - **มอนิเตอร์มิเตอร์ (Meter Monitoring):** ตารางสถานะมิเตอร์ พื้นที่ งานซ่อมบำรุง และศูนย์แจ้งเตือน - **ประวัติการวางบิล (Billing History):** *(แสดงเฉพาะบทบาทที่มีสิทธิ์ดูใบแจ้งหนี้ เช่น ฝ่ายบัญชี, วิศวกร O&M, ผู้ดูแล และตัวแทนลูกค้า; บทบาท `ดูอย่างเดียว` จะไม่เห็นเมนูนี้)* - ส่วน **การตั้งค่า (Settings):** *(แสดงเฉพาะผู้ที่มีสิทธิ์เข้าถึงการตั้งค่า)* คลิกเพื่อกางเมนูย่อย เช่น **บริษัท**, **การคิดบิล/อัตรา**, **ธนาคาร**, **วันหยุด**, **ฐานข้อมูล/ระบบ**, **ประวัติระบบ** (เฉพาะเมนูที่บทบาทของคุณมีสิทธิ์) - คุณสามารถคลิกปุ่มขีดสามขีดบนแถบด้านบนเพื่อ **ย่อ / ขยายแถบนำทาง** ได้ตลอดเวลา ### เมนูบัญชีผู้ใช้ (ด้านล่างของแถบนำทาง) คลิกที่ชื่อและบทบาทของคุณบริเวณมุมซ้ายล่างของแถบนำทางเพื่อเปิดเมนูบัญชีผู้ใช้: 1. ตรวจสอบข้อมูลยืนยันตัวตน: ชื่อ-นามสกุล, อีเมล, ป้ายบทบาท, รหัสบัญชี, องค์กร และขอบเขตบริษัทลูกค้าที่กำลังดู 2. เปลี่ยน **ภาษา (Language)** ระหว่าง **ไทย** และ **English** ได้ทันทีโดยไม่ต้องออกจากระบบ 3. เปลี่ยน **ธีม (Theme)** ระหว่าง **สว่าง (Light)**, **มืด (Dark)** และ **ตามระบบ (System)** 4. ใช้ทางลัด **ภาพรวมบริษัทของฉัน** (สำหรับผู้ใช้ทั่วไปที่ไม่มีเมนูการตั้งค่า) หรือ **การตั้งค่า** 5. คลิก **เปลี่ยนรหัสผ่าน (Change password)** หรือ **ออกจากระบบ (Sign out)** --- ## 5. การเปลี่ยนรหัสผ่านด้วยตนเอง (Change Password) คุณสามารถเปลี่ยนรหัสผ่านของตนเองได้ตลอดเวลา และควรเปลี่ยนทันทีเมื่อได้รับรหัสผ่านชั่วคราวครั้งแรก 1. คลิกชื่อบัญชีของคุณที่มุมซ้ายล่างของแถบนำทาง แล้วเลือก **เปลี่ยนรหัสผ่าน** 2. กรอก **รหัสผ่านปัจจุบัน** 3. กรอก **รหัสผ่านใหม่** และ **ยืนยันรหัสผ่านใหม่** 4. ตรวจสอบรายการ **เกณฑ์ความปลอดภัยมาตรฐาน** ด้านล่างให้ขึ้นเครื่องหมายถูกสีเขียวครบทั้ง 5 ข้อ: - ความยาวอย่างน้อย 8 ตัวอักษร - มีตัวพิมพ์ใหญ่อย่างน้อย 1 ตัว (`A–Z`) - มีตัวพิมพ์เล็กอย่างน้อย 1 ตัว (`a–z`) - มีตัวเลขอย่างน้อย 1 ตัว (`0–9`) - มีสัญลักษณ์หรืออักขระพิเศษอย่างน้อย 1 ตัว (`!@#$%^&*` ฯลฯ) - รหัสผ่านใหม่ต้องไม่ซ้ำกับรหัสผ่านปัจจุบัน และช่องยืนยันต้องตรงกัน 5. คลิกปุ่ม **ยืนยันเปลี่ยนรหัสผ่าน** ![เมนูบัญชีผู้ใช้และหน้าต่างเปลี่ยนรหัสผ่าน](/screenshots/th/05-user-menu-password.png) *ภาพที่ 4: เมนูบัญชีผู้ใช้ที่ด้านล่างแถบนำทาง พร้อมตัวเลือกภาษา ธีม และการเปลี่ยนรหัสผ่าน* ::: warning ผลต่ออุปกรณ์อื่นเมื่อเปลี่ยนหรือรีเซ็ตรหัสผ่าน - **เมื่อคุณเปลี่ยนรหัสผ่านเอง:** ระบบจะยังคงเซสชันบนเบราว์เซอร์ปัจจุบันไว้ให้ใช้งานต่อได้ทันที แต่จะ **บังคับออกจากระบบบนอุปกรณ์และเบราว์เซอร์อื่นทั้งหมด** โดยอัตโนมัติ เพื่อป้องกันกรณีสงสัยว่าบัญชีรั่วไหล - **เมื่อผู้ดูแลระบบกดรีเซ็ตรหัสผ่านให้คุณ (Admin Password Reset):** ระบบจะ **ยกเลิกเซสชันของคุณบนทุกอุปกรณ์ทันที** คุณต้องนำรหัสผ่านใหม่หรือรหัสผ่านชั่วคราวที่ได้รับมาเข้าสู่ระบบใหม่ แล้วเปลี่ยนรหัสผ่านเป็นของตนเองทันที ::: --- ## ขั้นตอนถัดไป - [ดูรายละเอียดสิทธิ์ของแต่ละบทบาท](./01-roles-and-permissions) - [สำหรับผู้ดูแลแพลตฟอร์ม: คู่มือการตั้งค่าระบบส่วนกลาง](./03-platform-admin-guide) - [สำหรับผู้ดูแลบริษัทผู้พัฒนา: คู่มือตั้งค่าลูกค้า ไซต์ และมิเตอร์](./04-developer-admin-guide) - [สำหรับทีมปฏิบัติการ: คู่มือมอนิเตอร์มิเตอร์และวิเคราะห์ข้อมูล](./05-meter-and-telemetry-guide) --- ## คู่มือผู้ดูแลแพลตฟอร์ม (Platform Admin) Source: https://docs.wattdee.com/th/03-platform-admin-guide ::: warning การอัปเดต UAT คู่มือนี้อธิบายระบบรุ่นที่จะอัปเดต หน้าจอหรือการทำงานบางส่วนอาจแตกต่างจากระบบ UAT ปัจจุบัน ::: # คู่มือผู้ดูแลแพลตฟอร์ม (Platform Admin Guide) **ผู้ที่เกี่ยวข้อง:** ผู้ดูแลแพลตฟอร์ม (Platform ADMIN) ทีมปฏิบัติการส่วนกลาง (Platform SERVICE - เฉพาะส่วนที่ได้รับสิทธิ์) **สิ่งที่ต้องเตรียมก่อนเริ่ม:** - บัญชีผู้ใช้สังกัดองค์กรเจ้าของแพลตฟอร์ม (`Advanced Grid Co., Ltd.`) ในบทบาท **ผู้ดูแลแพลตฟอร์ม** - ข้อมูลบริษัทผู้พัฒนาโครงการ (ชื่อไทย/อังกฤษ, เลขผู้เสียภาษี 13 หลัก) และประกาศอัตราค่า Ft / วันหยุดราชการประจำปี --- ## 1. แดชบอร์ดภาพรวมทั้งพอร์ตโฟลิโอ (Solar Portfolio) เมื่อเข้าสู่ระบบ หน้าแรกคือ **แดชบอร์ด (Dashboard)** ซึ่งรวบรวมสถานะของทุกผู้พัฒนาและทุกไซต์ไว้ในหน้าเดียว: 1. **เลือกขอบเขตที่แถบด้านบน:** ใช้ตัวสลับ **ทุกผู้พัฒนาโครงการ (All developers)** เพื่อดูภาพรวมทั้งหมด หรือเลือกเฉพาะบริษัทผู้พัฒนาโครงการที่ต้องการตรวจสอบ 2. **ตรวจสอบแถบสุขภาพมิเตอร์และระบบ (Health Strip):** ดูสัดส่วนมิเตอร์ `ออนไลน์`, `ขาดการติดต่อ`, `ยังไม่ส่งข้อมูล`, `มิเตอร์มีแจ้งเตือน` และสถานะความล่าช้าของการประมวลผลข้อมูล HES (คลิกแต่ละป้ายเพื่อเปิดรายการมิเตอร์ที่มีปัญหาได้ทันที) 3. **อ่านการ์ด KPI 4 ช่อง:** - **พลังงานผลิตวันนี้ (kWh)** พร้อมสัดส่วน Peak / Off-Peak / Holiday และเปอร์เซ็นต์เทียบกับเมื่อวานในช่วงเวลาเดียวกัน - **มูลค่าผลิตวันนี้ (บาท)** *(หมายเหตุ: หากขอบเขตที่เลือกมีหลายไซต์ที่ใช้อัตราค่าไฟต่างกัน ระบบจะแสดง `-` เพื่อไม่ให้ตัวเลขคลาดเคลื่อนจากการเฉลี่ย)* - **พลังงานสะสมเดือนนี้ (kWh)** และมูลค่าสะสม - **กำลังผลิตติดตั้งรวม (kWp)** และจำนวนไซต์ที่เปิดใช้งาน 4. **ตรวจคิวงานด้านขวา (ต้องดำเนินการ / Action Queue):** - หากรอบเดือนปัจจุบันยังไม่มีการยืนยันอัตรา **ค่า Ft** ระบบจะแสดงรายการ **ยืนยันค่า Ft ของรอบ YYYY-MM** ให้คลิกเพื่อกรอกและยืนยันอัตราได้ทันทีจากหน้าแดชบอร์ด - แสดงการแจ้งเตือนมิเตอร์ล่าสุด ใบแจ้งหนี้ที่รอตรวจสอบ/รออนุมัติ และพลังงานที่เข้ามาหลังปิดรอบบิล 5. **วิเคราะห์กราฟการผลิตพลังงานและรายชื่อไซต์:** สลับมุมมองกราฟได้ทั้ง **วัน** (เส้นโหลด 15 นาที เทียบเส้นประ **ประมาณการ** ท้องฟ้าโปร่ง), **เดือน** (แท่งรายวัน) และ **ปี** (แท่งรายเดือน) พร้อมคลิกที่แท่งกราฟเพื่อเจาะลึก (Drill-down) และกด **ดูตารางสรุป TOU วัน/เดือน** หรือสลับตารางไซต์ระหว่าง **ตาราง** กับ **การ์ด** ![หน้าแดชบอร์ดภาพรวมพอร์ตโฟลิโอของผู้ดูแลแพลตฟอร์ม](/screenshots/th/02-dashboard-overview.png) *ภาพที่ 1: แดชบอร์ดภาพรวมพลังงาน แถบสุขภาพมิเตอร์ กราฟ TOU และคิวงานที่ต้องดำเนินการ* --- ## 2. การจัดการรายชื่อบริษัทและการสร้างบริษัทผู้พัฒนา ผู้ดูแลแพลตฟอร์มเป็นบทบาทเดียวที่สามารถสร้างบริษัทผู้พัฒนาโครงการ ลบบริษัท เปลี่ยนประเภทองค์กร และกำหนดขีดจำกัดจำนวนมิเตอร์ได้ ### การค้นหาและเปิดดูรายชื่อบริษัท 1. คลิก **การตั้งค่า (Settings)** > **บริษัท (Companies)** ในแถบนำทางด้านซ้าย 2. ใช้ช่อง **ค้นหาบริษัท (Search companies)** เพื่อกรองตามชื่อหรือรหัสบริษัท 3. รายชื่อบริษัทจะแบ่งเป็น 3 กลุ่มหลัก: - **ผู้ดูแลแพลตฟอร์ม (Platform administration)** - **บริษัทผู้พัฒนา (Developer companies)** - **ลูกค้าที่ยังไม่มีผู้ดูแล (Unassigned customers)** ![หน้ารายชื่อบริษัทในเมนูการตั้งค่า](/screenshots/th/20-settings-companies-directory.png) *ภาพที่ 2: หน้าจัดการรายชื่อบริษัท แยกตามระดับองค์กร พร้อมปุ่มเพิ่มบริษัทผู้พัฒนา* ### ขั้นตอนการสร้างบริษัทผู้พัฒนาโครงการใหม่ 1. ในหน้า **การตั้งค่า > บริษัท** คลิกปุ่ม **เพิ่มบริษัทผู้พัฒนา (Add developer company)** 2. กรอก **ชื่อบริษัท (ภาษาไทย)** และ **ชื่อบริษัท (ภาษาอังกฤษ)** *(จำเป็น)* 3. ตรวจสอบ **ประเภทองค์กร (Organization type)** ให้เป็น **ผู้พัฒนาโครงการโซลาร์ (Solar developer)** 4. กรอกข้อมูลสำหรับใบกำกับภาษีและใบแจ้งหนี้: **เลขประจำตัวผู้เสียภาษี (13 หลัก)**, **เบอร์โทรศัพท์**, **อีเมลสำหรับวางบิล** และ **ที่อยู่สำนักงานใหญ่** 5. หากมีข้อมูลแล้ว สามารถกรอก **ชื่อ-นามสกุลผู้มีอำนาจลงนาม**, **ตำแหน่งผู้ลงนาม** และอัปโหลด **ภาพลายเซ็น (PNG พื้นหลังโปร่งใส)** กับ **โลโก้บริษัท** ได้ทันที 6. คลิก **เพิ่มบริษัท (Add company)** เพื่อบันทึก ![หน้าต่างสร้างบริษัทผู้พัฒนาใหม่](/screenshots/th/21-settings-create-developer-modal.png) *ภาพที่ 3: แบบฟอร์มสร้างบริษัทผู้พัฒนาใหม่ พร้อมช่องข้อมูลภาษีและลายเซ็นดิจิทัล* ### การตั้งค่าขีดจำกัดมิเตอร์ (Meter Limit) และสร้างผู้ดูแลคนแรกให้บริษัท 1. คลิกเข้าไปที่บริษัทผู้พัฒนาที่สร้างไว้ แล้วเปิดแท็บ **ข้อมูลบริษัท (Company information)** > คลิก **แก้ไขข้อมูลบริษัท (Edit company profile)** 2. ปรับ **ขีดจำกัดมิเตอร์ที่ใช้งาน (Active meter limit)** (ค่าเริ่มต้น `100,000` มิเตอร์ต่อบริษัท; ไม่นับรวมมิเตอร์ที่ปิดใช้งาน) แล้วกด **บันทึกข้อมูล** 3. ไปที่แท็บ **ผู้ใช้และสิทธิ์ (People & access)** ของบริษัทผู้พัฒนานั้น แล้วคลิก **เพิ่มผู้ใช้ (Add user)** เพื่อสร้างบัญชี **ผู้ดูแลบริษัท (Company administrator)** คนแรกให้ทีมผู้พัฒนาสามารถเข้าไปจัดการลูกค้า ไซต์ และพนักงานของตนเองได้ ::: tip การลบบริษัทและข้อมูลใบแจ้งหนี้ หากจำเป็นต้องกด **ลบบริษัท (Delete company)** ใบแจ้งหนี้ที่เคยออกไปแล้วจะยังคงถูกเก็บรักษาไว้ไม่เปลี่ยนแปลง ::: --- ## 3. การจัดการโครงสร้างอัตราค่าไฟฟ้าและอัตราค่า Ft รายเดือน เฉพาะ **ผู้ดูแลแพลตฟอร์ม** เท่านั้นที่ประกาศ/แก้ไขอัตราค่า Ft รายเดือนได้ (สิทธิ์ `ftrate.write`) 1. ในแถบนำทางด้านซ้าย ภายใต้ **การตั้งค่า** คลิก **การคิดบิล/อัตรา (Billing & tariffs)** ### แท็บที่ 1: โครงสร้างอัตราค่าไฟฟ้า (Tariffs) 1. ตรวจสอบแถบ **กติกาการคำนวณบิลที่ใช้อยู่ปัจจุบัน** (วันตัดรอบบิล ทศนิยมหน่วยไฟ/อัตรา/จำนวนเงิน และค่าปรับ Power Factor) 2. คลิก **เพิ่มอัตรา (Add tariff)** หรือคลิก **แก้ไข (Edit)** บนอัตราที่ต้องการ (เช่น อัตรา PEA TOU) 3. กำหนด **ประเภทอัตรา (Tariff Category)**, **วันที่เริ่มต้น/สิ้นสุด**, อัตรา **Peak / Off-Peak / วันหยุด**, **ค่าบริการ**, และ **ประเภทบิล** (`รวมค่า Ft` หรือ `ไม่รวมค่า Ft`) 4. คลิก **ตั้งค่าการคำนวณบิลขั้นสูง** เพื่อปรับค่าสำหรับสัญญาที่ใช้อัตรานี้: - **วันตัดรอบบิล (1–28)** *(เช่น `25` หมายถึงรอบวันที่ 25 ถึง 24 ของเดือนถัดไป)* - **ครบกำหนดชำระ (0–120 วันหลังตัดรอบ)** - **ทศนิยมหน่วยไฟ (`0–4`) / อัตรา (`2–6`) / จำนวนเงิน (`0–4`)** - **ค่าปรับ Power Factor (กฟภ.)**: เปิด/ปิด เกณฑ์ขั้นต่ำ (มาตรฐาน `0.85`) และอัตราค่าปรับ (มาตรฐาน `56.07` บาท/kVAR) 5. คลิก **บันทึก** หรือกด **CSV** เพื่อส่งออกตารางอัตราค่าไฟทั้งหมด ::: warning วันตัดรอบบิลจะถูกล็อกเมื่อไซต์มีใบแจ้งหนี้แล้ว ไซต์ที่เคยออกใบแจ้งหนี้แล้ว (ยกเว้นใบที่ถูกตีกลับ `REJECTED`) จะไม่สามารถเปลี่ยน **วันตัดรอบบิล** ได้ เพื่อป้องกันงวดบิลซ้อนทับหรือขาดช่วง โดยระบบจะยังคงอัปเดตเงื่อนไขอื่นให้และแจ้งเตือนรายชื่อไซต์ที่คงวันตัดรอบเดิมไว้ ::: ### แท็บที่ 2: อัตราค่า Ft รายเดือน (Monthly Ft rates) 1. สลับไปยังแท็บ **อัตราค่า Ft รายเดือน** 2. คลิกปุ่ม **ประกาศอัตราค่า Ft (Publish Ft rate)** (หรือกด **แก้ไข** ในแถวเดือนที่ต้องการ) 3. ระบุ **รอบบิล (Billing Month)** ในรูปแบบ `YYYY-MM` เช่น `2026-10` 4. กรอก **อัตราค่า Ft (บาท/kWh)** (รองรับค่าตั้งแต่ `-2.0000` ถึง `10.0000` เช่น `0.3972`) 5. คลิก **บันทึกอัตราค่า Ft (Save Ft rate)** ![หน้าตั้งค่าโครงสร้างอัตราค่าไฟฟ้าและอัตราค่า Ft รายเดือน](/screenshots/th/29-settings-tariff-ft-rates.png) *ภาพที่ 4: หน้าการคิดบิล/อัตรา แสดงแท็บโครงสร้างอัตราค่าไฟฟ้าและแท็บอัตราค่า Ft รายเดือน* ::: warning ห้ามออกใบแจ้งหนี้โดยไม่มีอัตราค่า Ft ระบบจะ **ปฏิเสธการคำนวณใบแจ้งหนี้ (Error 422)** สำหรับเดือนที่ยังไม่ได้ประกาศอัตราค่า Ft โดยเด็ดขาด ผู้ดูแลแพลตฟอร์มควรประกาศหรือยืนยันค่า Ft ประจำเดือนล่วงหน้าก่อนวันตัดรอบบิล ::: --- ## 4. บัญชีธนาคาร ปฏิทินวันหยุด สุขภาพฐานข้อมูล และประวัติระบบ ### การตั้งค่าบัญชีธนาคารรับชำระ (`การตั้งค่า > ธนาคาร`) 1. คลิก **ธนาคาร (Bank accounts)** ใต้เมนูการตั้งค่า 2. คลิก **เพิ่มบัญชีธนาคาร (Add bank account)** (หรือ **แก้ไข** รายการเดิม) 3. กรอก **ชื่อธนาคาร**, **สาขา**, เลือก **ผู้ขาย (Seller)** (*ส่วนกลางใช้ร่วมทุกผู้ขาย* หรือระบุบริษัทผู้พัฒนาเฉพาะราย เพื่อให้ใบแจ้งหนี้พิมพ์บัญชีของบริษัทผู้ขายรายนั้นโดยตรง), **ชื่อบัญชี**, **เลขที่บัญชี** และ **เลขพร้อมเพย์ / QR** 4. กด **เพิ่มบัญชี / บันทึก** ### ปฏิทินวันหยุดราชการ (`การตั้งค่า > วันหยุด`) พลังงานไฟฟ้าที่ผลิตได้ในวันหยุดเสาร์-อาทิตย์ และวันที่อยู่ในปฏิทินวันหยุดนี้จะถูกจัดเข้า **อัตรา C (วันหยุด / Holiday Rate)** โดยอัตโนมัติ 1. คลิก **วันหยุด (Holidays)** ใต้เมนูการตั้งค่า 2. **วิธีเพิ่มอัตโนมัติรายปี:** เลือกปีที่ช่อง **เติมวันหยุดราชการประจำปีอัตโนมัติ (ตามประกาศ กฟภ./กฟน.)** แล้วคลิก **เติมวันหยุดประจำปีอัตโนมัติ** (รองรับปี 2025–2027) 3. **วิธีเพิ่มเฉพาะวัน:** เลือก **วันที่วันหยุด (YYYY-MM-DD)** กรอกชื่อวันหยุด (ไม่บังคับ) แล้วคลิก **เพิ่มวันหยุด** ### สุขภาพฐานข้อมูลและระบบ (`การตั้งค่า > ฐานข้อมูล/ระบบ`) *(เข้าดูได้ทั้ง `ผู้ดูแลแพลตฟอร์ม` และ `ทีมปฏิบัติการส่วนกลาง` หรือบทบาทที่มีสิทธิ์ `meter.network.read`)* 1. คลิก **ฐานข้อมูล/ระบบ (Database & system)** เพื่อตรวจสอบ: - **ขนาดฐานข้อมูลรวม** และเวอร์ชัน PostgreSQL - **ตารางเก็บข้อมูลรายเดือน (Monthly partitions)**: สถานะ `พร้อมใช้งาน` หรือ `ต้องขยายพาร์ทิชัน` พร้อมขนาดและจำนวนแถวของแต่ละตารางรายเดือน - **การซิงค์ข้อมูลจากมิเตอร์ (HES)**: ความล่าช้าในการประมวลผล (`วินาที`) และจำนวนมิเตอร์ที่รอซิงค์เกิน 1 ชั่วโมง - **จำนวนข้อมูลในระบบทั้งหมด**: โครงการ มิเตอร์ ใบแจ้งหนี้ และประวัติระบบ 2. คลิก **รีเฟรชสถานะ** เพื่อดึงข้อมูลล่าสุด ### ประวัติการใช้งานและแก้ไขระบบ (`การตั้งค่า > ประวัติระบบ`) *(สงวนสิทธิ์เฉพาะ **ผู้ดูแลแพลตฟอร์ม** ที่มีสิทธิ์ `org.admin`)* 1. คลิก **ประวัติระบบ (Audit log)** ใต้เมนูการตั้งค่า 2. กรองข้อมูลได้ตามต้องการ: - ช่อง **ค้นหาประวัติการใช้งาน** (กิจกรรม รหัส หรือรายละเอียด) - ช่อง **กรองตามอีเมลผู้ดำเนินการ** - **หมวดหมู่:** `ทุกหมวดหมู่`, `ข้อมูลมิเตอร์`, `ใบแจ้งหนี้`, `สัญญา PPA`, `อุปกรณ์มิเตอร์` - ช่วงวันที่ **ตั้งแต่** – **ถึง** 3. คลิก **ส่งออกหน้าปัจจุบัน (Export current page)** เพื่อดาวน์โหลดไฟล์ CSV *(ส่งออกเฉพาะรายการในหน้าที่แสดงอยู่ ให้ใช้ตัวกรองและเปลี่ยนหน้าเพื่อดึงประวัติย้อนหลัง)* ![หน้าตั้งค่าธนาคาร วันหยุด สุขภาพระบบ และประวัติการใช้งาน](/screenshots/th/30-settings-bank-holiday-system-audit.png) *ภาพที่ 5: ตัวอย่างหน้าจอการจัดการข้อมูลอ้างอิงและตรวจสอบระบบส่วนกลาง (ธนาคาร วันหยุด ฐานข้อมูล และ Audit Log)* --- ## 5. สิทธิ์เฉพาะผู้ดูแลแพลตฟอร์มในงานมิเตอร์และ VPN แม้ทีมผู้พัฒนาจะจัดการไซต์และมิเตอร์ของตนเองได้ แต่ยังมี 2 งานสำคัญที่สงวนสิทธิ์ไว้ให้ **ผู้ดูแลแพลตฟอร์ม** ดูแลความปลอดภัยของข้อมูลข้ามองค์กร: 1. **จัดการโปรไฟล์ VPN และผูกมิเตอร์ (`vpn.manage`):** สร้าง แก้ไข เปิด/ปิด โปรไฟล์ WireGuard/IPsec/OpenVPN และผูกมิเตอร์ในแท็บ **การเชื่อมต่อ (Connectivity)** ของไซต์ 2. **แก้ไข Serial มิเตอร์และยืนยันการสับเปลี่ยนมิเตอร์ที่ HES ตรวจพบ (`meter.identity.override`):** เมื่อมิเตอร์ใหม่ยังไม่ได้รับ Serial หรือ HES ตรวจพบ Serial ไม่ตรง/ซ้ำกับมิเตอร์อื่น ผู้ดูแลแพลตฟอร์มเป็นผู้ตรวจสอบป้ายชื่อหน้างานแล้วกด **แก้ Serial** หรือ **ยืนยันการสับเปลี่ยน** พร้อมระบุเหตุผล (อย่างน้อย 5 ตัวอักษร) ลง Audit Log --- ## ขั้นตอนถัดไป - [คู่มือผู้ดูแลบริษัทผู้พัฒนา: การจัดการลูกค้า ไซต์ และมิเตอร์](./04-developer-admin-guide) - [คู่มือมิเตอร์และข้อมูลพลังงาน: การมอนิเตอร์และ VEE](./05-meter-and-telemetry-guide) - [คู่มือการวางบิลและการอนุมัติ 3 ขั้นตอน](./06-billing-and-approval-guide) --- ## คู่มือผู้ดูแลบริษัทผู้พัฒนา (Developer Admin) Source: https://docs.wattdee.com/th/04-developer-admin-guide ::: warning การอัปเดต UAT คู่มือนี้อธิบายระบบรุ่นที่จะอัปเดต หน้าจอหรือการทำงานบางส่วนอาจแตกต่างจากระบบ UAT ปัจจุบัน ::: # คู่มือผู้ดูแลบริษัทผู้พัฒนาโครงการ (Developer Admin Guide) **ผู้ที่เกี่ยวข้อง:** ผู้ดูแลบริษัทผู้พัฒนา (Developer ADMIN) ผู้ดูแลแพลตฟอร์ม (ช่วยดำเนินการส่วน VPN และยืนยัน Serial) **สิ่งที่ต้องเตรียมก่อนเริ่ม:** - บัญชี **ผู้ดูแลบริษัท (Company administrator)** ของบริษัทผู้พัฒนาโครงการที่ผู้ดูแลแพลตฟอร์มสร้างให้แล้ว - ข้อมูลนิติบุคคลของบริษัทตนเอง (เลขผู้เสียภาษี 13 หลัก, ที่อยู่ออกใบกำกับภาษี, โลโก้ และไฟล์ลายเซ็นผู้มีอำนาจแบบ PNG พื้นหลังโปร่งใส) - ข้อมูลบริษัทลูกค้า (Off-taker), เงื่อนไขสัญญา PPA (อัตราค่าไฟ, ส่วนลด, วันตัดรอบ, เครดิตเทอม) และข้อมูลเครือข่าย/CT/VT ของมิเตอร์ --- ## 1. การตั้งค่าโปรไฟล์บริษัท โลโก้ และลายเซ็นดิจิทัล เมื่อคุณคลิกเมนู **การตั้งค่า (Settings)** ในแถบด้านซ้าย ระบบจะพาเข้าสู่พื้นที่ทำงานของบริษัทผู้พัฒนาของคุณโดยตรง 1. เปิดแท็บ **ข้อมูลบริษัท (Company information)** 2. คลิกปุ่ม **แก้ไขข้อมูลบริษัท (Edit company profile)** 3. ตรวจสอบและกรอกข้อมูลที่จะแสดงบนใบแจ้งหนี้และใบกำกับภาษี: - **ชื่อบริษัท (ภาษาไทย / ภาษาอังกฤษ)** - **เลขประจำตัวผู้เสียภาษี (13 หลัก)** - **เบอร์โทรศัพท์ (แสดงบนใบแจ้งหนี้)** และ **อีเมลสำหรับวางบิล** - **ที่อยู่สำนักงานใหญ่ (แสดงบนใบกำกับภาษี)** 4. ในหัวข้อ **ผู้มีอำนาจลงนามและลายเซ็นดิจิทัล**: - กรอก **ชื่อและนามสกุลผู้มีอำนาจลงนาม** และ **ตำแหน่งผู้ลงนาม** - คลิก **อัปโหลดภาพลายเซ็น (PNG/JPG)** *(แนะนำไฟล์ PNG พื้นหลังโปร่งใสเพื่อให้พิมพ์บนใบแจ้งหนี้ PDF ได้สวยงาม)* - คลิก **อัปโหลดภาพโลโก้** เพื่ออัปโหลดโลโก้บริษัท (รองรับ PNG, JPG, WebP) 5. คลิก **บันทึกข้อมูล (Save changes)** ![หน้าแก้ไขข้อมูลบริษัท ลายเซ็น และโลโก้](/screenshots/th/24-settings-company-profile-signature.png) *ภาพที่ 1: หน้าต่างแก้ไขข้อมูลบริษัทผู้พัฒนา พร้อมส่วนอัปโหลดลายเซ็นผู้มีอำนาจและโลโก้* ::: info ช่องข้อมูลที่ถูกล็อกโดยส่วนกลาง **ประเภทองค์กร (Organization type)** และ **ขีดจำกัดมิเตอร์ที่ใช้งาน (Active meter limit)** จะถูกกำหนดและปรับแก้โดย **ผู้ดูแลแพลตฟอร์ม** เท่านั้น ::: --- ## 2. การเพิ่มและจัดการบริษัทลูกค้า (Off-taker Customers) 1. ในหน้า **การตั้งค่า** ของบริษัทผู้พัฒนา คลิกแท็บ **บริษัทลูกค้า (Customer companies)** 2. คลิกปุ่ม **เพิ่มบริษัทลูกค้า (Add customer company)** 3. กรอกข้อมูลในขั้นตอน **1. บริษัท (Company)**: - **ชื่อบริษัทลูกค้า (ภาษาไทย หรือ อังกฤษ)** *(จำเป็น)* - **เลขประจำตัวผู้เสียภาษี (13 หลัก)**, **เบอร์โทรศัพท์ติดต่อ** และ **ที่อยู่สถานประกอบการ / ที่อยู่จดทะเบียน** 4. เลือกขั้นตอนถัดไปตามความพร้อมของหน้างาน: - **บันทึกและเพิ่มไซต์ (Save and add a site):** บันทึกบริษัทลูกค้าแล้วเข้าสู่ตัวช่วยสร้างไซต์และสัญญา PPA ทันที *(ยังไม่ต้องสร้างบัญชีให้ลูกค้าทันทีก็ได้ สามารถเชิญภายหลังได้)* - **บันทึกและเชิญผู้ดูแลของลูกค้า (Save and invite customer admin):** เข้าสู่ขั้นตอน **2. ผู้ดูแล (ไม่บังคับ)** เพื่อสร้างบัญชี **ผู้ดูแลฝั่งลูกค้า (Customer administrator)** คนแรก (กรอกชื่อ-นามสกุล อีเมล และกำหนดรหัสผ่านหรือเว้นว่างเพื่อสุ่มอัตโนมัติ ซึ่งระบบจะแสดงรหัสผ่านชั่วคราวให้คัดลอกเพียงครั้งเดียว) จากนั้นคลิก **ดำเนินการตั้งค่าต่อ (Continue setup)** เพื่อไปเพิ่มไซต์ต่อ ![แท็บบริษัทลูกค้าและหน้าต่างเพิ่มบริษัทลูกค้า](/screenshots/th/22-settings-developer-customers.png) *ภาพที่ 2: แท็บบริษัทลูกค้าภายใต้บริษัทผู้พัฒนา แสดงรายชื่อผู้รับซื้อไฟฟ้าและปุ่มเพิ่มบริษัทลูกค้า* --- ## 3. ตัวช่วยสร้างไซต์ สัญญา PPA และการลงทะเบียนมิเตอร์ คุณสามารถเพิ่มไซต์ได้จากแท็บ **ไซต์ในพอร์ต (Portfolio sites)** ของบริษัทผู้พัฒนา หรือเข้าไปในบริษัทลูกค้าแล้วคลิก **เพิ่มไซต์ (Add site)** ระบบจะเปิดขั้นตอนแนะนำ 3 ขั้นคือ **1. ไซต์และ PPA** → **2. มิเตอร์** → **3. ตรวจสอบ** ### ขั้นตอนที่ 1: สร้างไซต์และกำหนดสัญญา PPA 1. หากเปิดจากพอร์ตโฟลิโอรวม ให้เลือก **บริษัทลูกค้า / ผู้รับซื้อไฟฟ้า** ที่เป็นเจ้าของไซต์นั้น *(หากยังไม่มีลูกค้า สามารถคลิก **เพิ่มบริษัทลูกค้า** จากหน้านี้ได้ทันที)* 2. กรอกข้อมูลไซต์: - **ชื่อไซต์ (Site name)** *(จำเป็น)* - **กำลังติดตั้ง (kWp)** *(เช่น `500.00`, ใช้คำนวณเทียบประมาณการท้องฟ้าโปร่งบนกราฟ)* 3. กำหนดเงื่อนไขสัญญา PPA: - **ส่วนลดตามสัญญา (%)** (`0–100%`) - **วันตัดรอบบิล (`1–28`)** *(ค่าเริ่มต้นคือวันที่ `25`)* - **กำหนดชำระหลังตัดรอบ (วัน)** (`0–120` วัน, ค่าเริ่มต้น `30`) - **อัตราค่าไฟฟ้า (Tariff)** *(จำเป็น)* และสามารถกรอก **Peak กำหนดเอง (บาท/kWh)** / **Off-peak กำหนดเอง (บาท/kWh)** หากสัญญาใช้เรตเฉพาะที่ไม่ตรงกับตารางมาตรฐาน 4. คลิก **บันทึกและเพิ่มมิเตอร์ (Save and add meter)** ![หน้าตั้งค่าไซต์และเงื่อนไขสัญญา PPA](/screenshots/th/23-settings-customer-sites-contract.png) *ภาพที่ 3: การตั้งค่าไซต์และเงื่อนไขสัญญา PPA (อัตรา On-peak, Off-peak, ค่า Demand, ส่วนลด, วันตัดรอบ)* ::: tip แก้ไขไซต์หรือสัญญา PPA ภายหลัง / คัดลอกเงื่อนไขไปไซต์ถัดไป - **แก้ไขภายหลัง:** เปิดไซต์ > แท็บ **PPA** > คลิก **แก้ไขไซต์และ PPA** เพื่อปรับชื่อไซต์ กำลังติดตั้ง ตารางอัตรา PEA TOU รวมถึง **ค่าความต้องการพลังไฟฟ้า (บาท/kW)** *(การย้ายไซต์ไปบริษัทลูกค้าอื่นทำได้เฉพาะผู้ดูแลแพลตฟอร์ม และวันตัดรอบบิลจะแก้ไขไม่ได้เมื่อไซต์มีใบแจ้งหนี้แล้ว)* - **เพิ่มหลายไซต์ต่อเนื่อง:** ในขั้นตอนที่ 3 เมื่อกด **เพิ่มไซต์ถัดไปของลูกค้านี้ (Add next site for this customer)** ระบบจะคัดลอกเงื่อนไข PPA จากไซต์ก่อนหน้ามาเติมให้อัตโนมัติ ::: ### ขั้นตอนที่ 2: ลงทะเบียนมิเตอร์ (US-1.19: ไม่ต้องกรอก Serial เอง) 1. ในขั้นตอน **2. มิเตอร์** (หรือเข้าไปที่ไซต์ > แท็บ **มิเตอร์**) คลิก **เพิ่มมิเตอร์ (Add meter)** 2. กรอกข้อมูลการเชื่อมต่อและการวัดพลังงาน: - **รุ่นมิเตอร์ (Model):** `Saral 305`, `Premier 550` หรือ `Prometer 100` - **ที่อยู่ IP / โฮสต์ (Host)** และ **พอร์ต (Port)** *(ค่าเริ่มต้น `4059`)* - **ประเภทการเชื่อมต่อ (Connection):** `Public fixed IP`, `Private APN (SIM)` หรือ `VPN (Mikrotik)` *(หากใช้ VPN จะผูกโปรไฟล์ได้หลังบันทึก)* - **รูปแบบการสื่อสาร (Interface):** - **HDLC:** ใช้เมื่อมิเตอร์ต่อผ่านโมเด็ม 4G หรือตัวแปลงสัญญาณ - **WRAPPER:** ใช้เมื่อเสียบสาย LAN เข้าที่ตัวมิเตอร์โดยตรง (เช่น Prometer 100 ผ่าน Ethernet) - *หากไม่แน่ใจ ให้เลือก `HDLC` ก่อน แล้วกดทดสอบการเชื่อมต่อ ถ้าเชื่อมต่อถึงแต่มิเตอร์ไม่ตอบ ให้สลับเป็น `WRAPPER`* - **รอบการอ่าน (Poll interval):** `15 นาที`, `1 ชั่วโมง`, `6 ชั่วโมง` หรือ `24 ชั่วโมง` - **อัตราทดหม้อแปลงและตัวคูณ (CT/VT):** กรอก `CT Primary (A)`, `CT Secondary (A)`, `VT Primary (V)`, `VT Secondary (V)` ระบบจะคำนวณ **Multiplier** ให้อัตโนมัติ (เช่น `CT 1000/5 · VT 22000/110` = `×40000.0000`) - **จุดวัดพลังงาน (Reading Side):** - `Primary Side (แรงสูง / ตัวคูณหัวมิเตอร์แล้ว)`: มิเตอร์คูณ CT/VT มาแล้ว - `Secondary Side (แรงต่ำ / ต้องคูณ Multiplier)`: ระบบจะนำค่าที่อ่านได้มาคูณกับ Multiplier 3. ในโหมดตั้งค่าแนะนำ ให้ติ๊กเลือก **เริ่มอ่านค่าทันทีหลังบันทึก (Start reading right after saving)** เพื่อเปิดใช้งานใน HES และทดสอบการเชื่อมต่ออัตโนมัติ (หากเพิ่มนอกตัวช่วยตั้งค่า ให้กดปุ่ม **เปิดใช้งานใน HES** แล้วพิมพ์รหัส/Serial เพื่อยืนยัน จากนั้นกด **ทดสอบการเชื่อมต่อ**) 4. คลิก **บันทึกมิเตอร์ (Save meter)** 5. กด **ถัดไป: ตรวจสอบ** เพื่อเข้าสู่ขั้นตอน **3. ตรวจสอบ (Check)** ซึ่งจะสรุปความพร้อมของ PPA จำนวน `มิเตอร์ที่มีข้อมูล / ลงทะเบียน` และเตือนหากลูกค้ายังไม่มีบัญชีผู้ใช้งานฝั่งลูกค้า ![หน้าจอลงทะเบียนและตั้งค่ามิเตอร์ในไซต์](/screenshots/th/28-settings-site-meter-setup.png) *ภาพที่ 4: รายการมิเตอร์ของไซต์และแบบฟอร์มลงทะเบียนมิเตอร์ด้วย IP/Port, Interface และ CT/VT* ::: info ข้อสำคัญเกี่ยวกับ Serial Number และรหัสผ่านมิเตอร์ (US-1.19) - **ไม่ต้องกรอก Serial Number ในแบบฟอร์มเพิ่มมิเตอร์:** ระบบ HES จะอ่าน Serial Number จากตัวมิเตอร์จริงในการเชื่อมต่อสำเร็จครั้งแรก ระหว่างนั้นมิเตอร์จะแสดงสถานะ `รอ HES อ่าน Serial จากมิเตอร์ - ยังไม่ส่งเข้าบิล` เพื่อป้องกันการออกบิลผิดตัว - **รหัสผ่าน LLS Password ของมิเตอร์:** ห้ามกรอกผ่านหน้าเว็บ ให้ตั้งค่าที่เครื่อง HES (ไฟล์ secret รายรุ่นหรือ secrets file รายมิเตอร์) หากลืมตั้งค่า ระบบจะแจ้งเตือน `config_error` เมื่อทดสอบการเชื่อมต่อ - **กรณีพบ Serial ซ้ำ หรือสงสัยสับเปลี่ยนมิเตอร์:** หาก HES อ่านพบ Serial ไม่ตรงหรือชนกับมิเตอร์อื่น ระบบจะกักข้อมูลไม่ให้เข้าบิล และแสดงป้าย `ยืนยันตัวตนมิเตอร์ไม่สำเร็จ` (หรือ `Serial ซ้ำ` / `สงสัยสับเปลี่ยนมิเตอร์` ในมุมมองแพลตฟอร์ม) โปรดประสานงาน **ผู้ดูแลแพลตฟอร์ม** ตรวจสอบป้ายชื่อหน้างานแล้วกด **แก้ Serial** หรือ **ยืนยันการสับเปลี่ยน** พร้อมระบุเหตุผลอย่างน้อย 5 ตัวอักษร ::: --- ## 4. โปรไฟล์ VPN และการกำหนดให้มิเตอร์ (VPN Profiles & Connectivity) ระบบรองรับการเชื่อมต่อ VPN 3 โปรโตคอล ได้แก่ **WireGuard**, **IPsec** และ **OpenVPN** โดยใช้ร่วมกันได้ทุกไซต์ของบริษัทผู้พัฒนา ::: warning สิทธิ์ในการจัดการ VPN (`vpn.manage`) การสร้าง แก้ไข เปิด/ปิด ลบโปรไฟล์ VPN และการผูกมิเตอร์กับโปรไฟล์ VPN ในแท็บ **การเชื่อมต่อ (Connectivity)** ของไซต์ เป็นสิทธิ์ของ **ผู้ดูแลแพลตฟอร์ม (Platform Admin)** ทีมผู้พัฒนาสามารถแจ้งค่าตั้งค่า VPN ให้ผู้ดูแลแพลตฟอร์มบันทึก และตรวจสอบสถานะการเชื่อมต่อของไซต์ได้จากแท็บ **การเชื่อมต่อ** ::: ### ขั้นตอนการตั้งค่าโปรไฟล์ VPN (โดยผู้ดูแลแพลตฟอร์มในพื้นที่ของบริษัทผู้พัฒนา) 1. เปิดบริษัทผู้พัฒนาใน **การตั้งค่า** > คลิกแท็บ **โปรไฟล์ VPN (VPN profiles)** 2. คลิก **เพิ่มโปรไฟล์ VPN (Add VPN profile)** (หรือเลือกโปรไฟล์เดิมแล้วคลิก **แก้ไขการตั้งค่า**) 3. *(ทางเลือก)* สำหรับ **WireGuard** หรือ **OpenVPN** สามารถคลิก **นำเข้าการตั้งค่า (Import configuration)** เพื่อวางไฟล์คอนฟิกแล้วกด **ตรวจสอบการตั้งค่าที่นำเข้า** เพื่อเติมข้อมูลอัตโนมัติ 4. กรอก **รายละเอียดการเชื่อมต่อ**: - **ชื่อการเชื่อมต่อ** และเลือก **โปรโตคอล** (`WireGuard`, `IPsec`, `OpenVPN`) - **สำหรับ WireGuard (เลือกโหมดการเชื่อมต่อ / Connection mode):** - **เราเชื่อมต่อไปหาหน้างาน (`dial`):** ใช้เมื่อเราเตอร์ที่ไซต์มี Public IPv4 คงที่ โดยให้กรอก **ที่อยู่ IPv4 ของปลายทาง (Peer IPv4)** และ **พอร์ตปลายทาง** (เช่น `51820`) - **หน้างานเชื่อมต่อเข้ามาหาเรา (`listen`):** ใช้เมื่อหน้างานใช้ซิม **4G / CGNAT** ที่ไม่มี Public IP โดยไม่ต้องกรอก IP ปลายทาง แต่ให้ระบุ **พอร์ต UDP ของเซิร์ฟเวอร์** (`1024–65535` เช่น `51821`) และ **ต้องเปิดพอร์ต UDP นี้ใน Firewall ของเซิร์ฟเวอร์** - **เครือข่ายมิเตอร์ที่อนุญาต (Allowed meter networks CIDR):** เช่น `10.10.0.0/24` *(IP ของมิเตอร์ที่จะผูกเข้ากับ VPN นี้ต้องอยู่ในช่วง CIDR ที่ระบุ)* - กรอกค่าเฉพาะโปรโตคอล: เช่น `Local tunnel address (CIDR)`, `Peer public key`, `Keepalive (วินาที)` สำหรับ WireGuard; `IKEv2/IKEv1`, `PSK` หรือ `ใบรับรอง PEM` สำหรับ IPsec; `CA/Client Cert/Private Key (PEM)` และ `TLS Crypt` สำหรับ OpenVPN - หากแก้ไขโปรไฟล์เดิมและต้องการหมุนเวียนกุญแจ ให้ติ๊ก **เปลี่ยนข้อมูลยืนยันตัวตน (Replace credentials)** 5. คลิก **บันทึกการเชื่อมต่อ VPN (Save VPN connection)** และตรวจสถานะจนเปลี่ยนเป็น **เชื่อมต่อ VPN แล้ว (Tunnel established)** (หรือ `ระบบ VPN พร้อมทำงาน / Runner ready`) ### การกำหนด VPN ให้มิเตอร์ในไซต์ 1. เปิดไซต์ที่ต้องการ > คลิกแท็บ **การเชื่อมต่อ (Connectivity)** 2. เลือกโปรไฟล์ VPN ที่ต้องการด้านบน > เลือกมิเตอร์ในช่อง **มิเตอร์ HES (HES meter)** แล้วคลิก **กำหนด VPN ให้มิเตอร์ (Assign meter)** 3. หากต้องการยกเลิกการผูก ให้คลิก **ยกเลิก (Unassign)** *(คำเตือน: การยกเลิกการผูกจะทำให้ HES หยุดอ่านค่ามิเตอร์นั้นผ่าน VPN ทันที)* ![หน้าจัดการโปรไฟล์ VPN ของบริษัทผู้พัฒนา](/screenshots/th/25-settings-company-vpn.png) *ภาพที่ 5: แท็บโปรไฟล์ VPN แสดงรายการโปรไฟล์ สถานะการเชื่อมต่อ และแบบฟอร์มตั้งค่า WireGuard / IPsec / OpenVPN* --- ## 5. การจัดการทีมงานและผู้ใช้ของลูกค้า (People & Access) ผู้ดูแลบริษัทผู้พัฒนาสามารถจัดการผู้ใช้ทั้งภายใน **บริษัทผู้พัฒนาของตนเอง** และภายใน **บริษัทลูกค้าของตนเอง** (แท็บ **ผู้ใช้และสิทธิ์** ของบริษัทนั้นๆ) 1. เปิดแท็บ **ผู้ใช้และสิทธิ์ (People & access)** ของบริษัทที่ต้องการเพิ่มผู้ใช้ 2. คลิกปุ่ม **เพิ่มผู้ใช้ (Add user)** 3. ตรวจสอบ **สังกัด (Organization)** (หรือเลือกสังกัดหากเป็นหน้าเพิ่มผู้ใช้ส่วนกลางของบริษัท) 4. กรอก **ชื่อ-นามสกุล (Full name)** และ **อีเมล (Email)** 5. เลือก **บทบาท (Role)** ที่เหมาะสมกับหน้าที่: - ใน **บริษัทผู้พัฒนา:** `ผู้ดูแลบริษัท`, `วิศวกร O&M`, `ฝ่ายบัญชี` หรือ `ผู้ควบคุมระบบ` - ใน **บริษัทลูกค้า:** `ผู้ดูแลฝั่งลูกค้า`, `ตัวแทนลูกค้า` หรือ `ดูอย่างเดียว` - *กล่อง **เข้าถึงได้ (Access)** จะแสดงรายชื่อไซต์ทั้งหมดที่บัญชีนี้จะมองเห็นให้ตรวจสอบทันทีก่อนบันทึก* 6. กำหนด **รหัสผ่านเข้าสู่ระบบ**: คลิก **สุ่มรหัสผ่านปลอดภัย** หรือตั้งเองให้ครบเกณฑ์ 5 ข้อ หรือเว้นว่างเพื่อสร้างรหัสผ่านชั่วคราวให้อัตโนมัติ (แสดงเพียงครั้งเดียวหลังบันทึก) 7. คลิก **เพิ่มผู้ใช้ (Add user)** ### การดูแลบัญชีผู้ใช้ที่มีอยู่ - **ดูไซต์ที่เข้าถึง (View site access):** ตรวจรายชื่อไซต์ทั้งหมดที่ผู้ใช้นี้เข้าถึงได้ตามสังกัดบริษัท - **แก้ไขผู้ใช้และรีเซ็ตรหัสผ่าน (Reset password):** คลิกไอคอนดินสอ > กรอกรหัสผ่านใหม่หรือเว้นว่างเพื่อสุ่ม แล้วคลิก **ตั้งรหัสผ่านใหม่ (Reset password)** *(ผู้ใช้จะถูกออกจากระบบทุกอุปกรณ์ทันที)* - **ระงับบัญชี (Suspend account):** คลิกไอคอนปิดบัญชีเพื่อระงับการเข้าสู่ระบบทันทีโดยยังเก็บประวัติเดิมไว้ และสามารถกดเปิดใช้งานใหม่ภายหลังได้ - **ลบบัญชีถาวร (Delete account permanently):** อยู่ภายในหน้าแก้ไขผู้ใช้ ใช้เมื่อต้องการลบบัญชีถาวรเท่านั้น ![หน้าจัดการผู้ใช้และบทบาทของบริษัท](/screenshots/th/26-settings-company-people-roles.png) *ภาพที่ 6: หน้าผู้ใช้และสิทธิ์ แสดงรายชื่อทีมงาน บทบาท สถานะใช้งาน และปุ่มตรวจสอบไซต์ที่เข้าถึงได้* ::: warning กฎป้องกันข้อผิดพลาดของระบบผู้ใช้ - คุณ **ไม่สามารถเปลี่ยนบทบาทหรือระงับบัญชีของตัวเองได้** เพื่อป้องกันการยกระดับสิทธิ์หรือล็อกตัวเองออกจากระบบ - ระบบไม่อนุญาตให้ลดบทบาท ลบ หรือระงับ **ผู้ดูแลคนสุดท้ายที่ยังใช้งานอยู่** ของบริษัทใดๆ - การย้ายผู้ใช้ที่สร้างไว้แล้วข้ามไปยังบริษัทอื่น ทำได้โดย **ผู้ดูแลแพลตฟอร์ม** เท่านั้น ::: --- ## ขั้นตอนถัดไป - [คู่มือมิเตอร์และข้อมูลพลังงาน: การมอนิเตอร์ ทดสอบ HES และซ่อมแซมข้อมูล](./05-meter-and-telemetry-guide) - [คู่มือการวางบิลและการอนุมัติ 3 ขั้นตอน](./06-billing-and-approval-guide) --- ## คู่มือมิเตอร์และข้อมูลพลังงาน (Meter & Telemetry) Source: https://docs.wattdee.com/th/05-meter-and-telemetry-guide ::: warning การอัปเดต UAT คู่มือนี้อธิบายระบบรุ่นที่จะอัปเดต หน้าจอหรือการทำงานบางส่วนอาจแตกต่างจากระบบ UAT ปัจจุบัน ::: # คู่มือการมอนิเตอร์มิเตอร์และข้อมูลพลังงาน (Meter & Telemetry Guide) **ผู้ที่เกี่ยวข้อง:** ทีมปฏิบัติการส่วนกลาง (Platform SERVICE) วิศวกร O&M (Developer SERVICE) ผู้ควบคุมระบบ (OPERATOR) ผู้ดูแลบริษัท (ADMIN) ลูกค้าผู้รับซื้อไฟฟ้า (ดูอย่างเดียว) **สิ่งที่ต้องเตรียมก่อนเริ่ม:** - มีไซต์และมิเตอร์ลงทะเบียนในระบบแล้ว - สำหรับการทดสอบการเชื่อมต่อ สั่งอ่านค่าทันที และดึงข้อมูลย้อนหลัง (Backfill) จำเป็นต้องมีสิทธิ์ `meter.command` และบริการ HES กำลังทำงานอยู่ - สำหรับการเติมข้อมูล VEE แก้ไขค่าอ่าน หรือนำเข้า CSV จำเป็นต้องมีสิทธิ์ `telemetry.sync` (ผู้ดูแล หรือ วิศวกร O&M) --- ## 1. มอนิเตอร์มิเตอร์ทั้งพอร์ต (Fleet Monitoring) เปิดเมนู **มอนิเตอร์มิเตอร์ (Meter Monitoring)** จากแถบนำทางด้านซ้าย เพื่อติดตามสุขภาพอุปกรณ์ทั้งหมดโดยเรียง **มิเตอร์ที่มีปัญหาขึ้นก่อนเสมอ** ### มุมมองหลัก 4 แท็บด้านบน 1. **มิเตอร์ (Meters):** ตารางรวมมิเตอร์ทั้งหมด แสดงสถานะ ไซต์ บริษัทลูกค้า ข้อมูลล่าสุด และจำนวนการแจ้งเตือน (คลิกหัวคอลัมน์เพื่อเรียงลำดับ และคลิกที่แถวเพื่อเปิดหน้าข้อมูลมิเตอร์นั้น) - **ตัวกรองสถานะแบบปุ่มชิป:** คลิกกรอง **ขาดการติดต่อ (Offline)** *(ไม่ส่งข้อมูลเกิน 1 ชม. หรือ HES แจ้งปัญหา)*, **ยังไม่ส่งข้อมูล / ไม่ผูก HES (Not reporting / not linked)**, **มีแจ้งเตือน (With alarms)**, หรือ **ไซต์ยังไม่มีมิเตอร์ (Sites without a meter)** - **ตัวเลือก "ดูเป็น (View as)":** สลับมุมมองระหว่างตาราง **ผู้พัฒนาโครงการ** *(เฉพาะระดับแพลตฟอร์ม)*, **บริษัทลูกค้า (Offtakers)** และ **ไซต์ / มิเตอร์** - **ช่องค้นหา:** พิมพ์ชื่อไซต์ บริษัทลูกค้า Serial มิเตอร์ รุ่น รหัสไซต์ (เช่น `1-00012`) หรือ `IP:Port` 2. **พื้นที่ (Regions):** การ์ดสรุปสถานะมิเตอร์แยกตาม **จังหวัดและภูมิภาค** แสดงกำลังผลิตรวม (kWp) พิกัด GPS และแถบ **อัตราออนไลน์ (%)** (คลิกการ์ดจังหวัดเพื่อกรองตารางมิเตอร์ด้านล่าง) 3. **ซ่อมบำรุง (Maintenance):** รายงานประวัติ **สลับเปลี่ยนมิเตอร์ / ซ่อมบำรุง / สอบเทียบ / ตรวจเช็คหน้างาน** กรองตามประเภทงาน ส่งออกเป็น CSV และคลิก **บันทึกงานซ่อมบำรุง (Log maintenance)** *(สิทธิ์ `meter.write`)* เพื่อจดบันทึกงานภาคสนาม 4. **การแจ้งเตือน (Alerts):** แบ่งเป็น **การแจ้งเตือนปัจจุบัน (Active alerts)** *(รับทราบ / เลื่อน / มอบหมาย / จดบันทึก)* และ **ประวัติเหตุการณ์ (Event history)** *(กรองตามระดับ `วิกฤต / เฝ้าระวัง / ทั่วไป` และช่วงวันที่เวลาไทย ค่าเริ่มต้น 30 วันย้อนหลัง พร้อมส่งออก CSV)* ![หน้าจอมอนิเตอร์มิเตอร์ทั้งพอร์ตโฟลิโอ](/screenshots/th/06-meter-monitoring-fleet.png) *ภาพที่ 1: หน้ามอนิเตอร์มิเตอร์ แสดงแท็บมุมมอง ชิปตัวกรองสถานะ และตารางเรียงลำดับมิเตอร์ที่มีปัญหาขึ้นก่อน* --- ## 2. การเจาะลึก: ภาพรวมบริษัท → ภาพรวมไซต์ → รายละเอียดมิเตอร์ ### ภาพรวมบริษัท (Company Overview) คลิกชื่อบริษัทลูกค้าจากตัวสลับมุมมองหรือหน้าค้นหา เพื่อดู: - **ช่วงเวลาพลังงาน:** เลือก `วันนี้`, `7 วันที่ผ่านมา`, `เดือนนี้` หรือ `กำหนดเอง` (สูงสุด 93 วัน) - **KPI 4 ช่อง:** พลังงานในช่วงที่เลือก (kWh), มิเตอร์ที่ติดต่อล่าสุด (`ส่งข้อมูล / ใช้งาน`), ไซต์ที่ต้องตรวจสอบ และไซต์ทั้งหมด - **สิ่งที่ต้องตรวจสอบ (Needs attention):** แจ้งเตือนไซต์ที่ยังไม่มี PPA ไม่มีมิเตอร์ หรือมิเตอร์เงียบผิดปกติ พร้อมการ์ดสรุปสถานะบิลและตารางรายชื่อไซต์ที่ส่งออก CSV ได้ ![ภาพรวมบริษัทลูกค้า](/screenshots/th/07-meter-company-overview.png) *ภาพที่ 2: หน้าภาพรวมบริษัท แสดงแนวโน้มพลังงานรายวัน งานที่ต้องตรวจสอบ และรายชื่อไซต์ในสังกัด* ### ภาพรวมไซต์ (Site Overview) คลิกชื่อไซต์เพื่อเปิดดูพื้นที่ทำงานของไซต์: - **ภาพรวม (Overview):** กำลังติดตั้ง (kWp), มิเตอร์ที่ลงทะเบียน, เวลาติดต่อล่าสุด, กราฟพลังงาน 7 วันที่ผ่านมา และรายชื่อมิเตอร์ในไซต์ - **ข้อมูลพลังงาน (Data):** เปิดตารางและกราฟ 15 นาทีของไซต์นี้โดยตรง - **มิเตอร์ (Meters):** รายการมิเตอร์และปุ่มจัดการอุปกรณ์ (ในโหมดตั้งค่า) - **PPA:** รายละเอียดสัญญาและเงื่อนไขบิล - **การเชื่อมต่อ (Connectivity):** การกำหนดโปรไฟล์ VPN ของไซต์ ![ภาพรวมไซต์และมิเตอร์ในไซต์](/screenshots/th/08-meter-site-overview.png) *ภาพที่ 3: หน้าภาพรวมไซต์ แสดงตัวชี้วัดหลัก กราฟพลังงาน 7 วัน และรายการมิเตอร์ประจำไซต์* ### การตรวจสอบและวินิจฉัยมิเตอร์รายเครื่อง (Meter Detail & Diagnostics) เมื่อคลิกเข้าไปที่มิเตอร์ใดๆ จะพบแท็บ **ข้อมูลพลังงาน (Energy data)** และ **การตรวจสอบ (Diagnostics)** (ในโหมดตั้งค่าจะเป็น **ตั้งค่ามิเตอร์ / Configuration** และ **การตรวจสอบ / Diagnostics**): 1. ดูกล่องสถานะด้านบนสุดซึ่งสรุป **เหตุผลที่มิเตอร์อยู่ในสถานะนั้น** และ **ข้อผิดพลาดล่าสุด** จาก HES 2. ในส่วน **คำสั่ง (Commands)** *(สิทธิ์ `meter.command`)*: - คลิก **ทดสอบการเชื่อมต่อ (Test connection):** ส่งคำสั่งให้ HES ติดต่อไปยังมิเตอร์จริงเพื่อตรวจการเชื่อมต่อ TCP/DLMS และรหัสผ่าน LLS โดยจะแสดงผลลัพธ์พร้อมเวลาตอบสนอง (`ms`) หรือคำแนะนำแก้ไขปัญหา เช่น - `config_error`: ยังไม่ได้ตั้งรหัสผ่าน LLS บนเครื่อง HES - `auth_failed`: มิเตอร์ปฏิเสธรหัสผ่าน LLS ให้ตรวจรหัสผ่านบนเครื่อง HES - `หมดเวลา session / operation was canceled`: ต่อถึงแต่มิเตอร์ไม่ตอบ มักเกิดจากเลือก Interface (`HDLC` / `WRAPPER`) ไม่ตรง - `poll_timeout / connect_failed`: ติดต่อไม่ได้ ให้ตรวจ IP/Port, เครือข่าย/VPN และไฟเลี้ยงมิเตอร์ - คลิก **อ่านค่าทันที (Read now):** สั่งให้อ่านค่าล่าสุดจากมิเตอร์ทันที 3. ตรวจสอบตาราง **ค่าล่าสุดจากมิเตอร์** (kW, kWh สะสม, PF, แรงดัน V, กระแส A), **การสื่อสารกับ HES**, **การตั้งค่ามิเตอร์** *(หากพบคำเตือน `ตัวคูณไม่เท่ากับ CT × VT` หรือ `ฝั่งที่อ่านเป็น UNKNOWN` ต้องแก้ไขให้ถูกต้องก่อนออกบิล)* และ **เหตุการณ์ล่าสุดจาก HES** ![รายละเอียดและการตรวจสอบสถานะมิเตอร์](/screenshots/th/09-meter-detail-status.png) *ภาพที่ 4: หน้าการตรวจสอบมิเตอร์ แสดงปุ่มทดสอบการเชื่อมต่อ อ่านค่าทันที ค่าล่าสุด และข้อมูลการสื่อสาร HES* --- ## 3. การสับเปลี่ยนมิเตอร์ระหว่างรอบบิล (Mid-Cycle Swap, SOW §79) เมื่อจำเป็นต้องถอดเปลี่ยนมิเตอร์หน้างาน (เช่น ชำรุด หรือส่งสอบเทียบตามรอบ กฟภ.) **ห้ามลบมิเตอร์เดิม** ให้ใช้ฟังก์ชัน **สับเปลี่ยน** เพื่อรักษาประวัติการวัดและป้องกันการคิดค่าไฟซ้ำซ้อน: 1. เปิดหน้าไซต์ใน **การตั้งค่า** > แท็บ **มิเตอร์** (ต้องมีสิทธิ์ `meter.write`) 2. ที่แถวของมิเตอร์เดิมที่กำลังใช้งานอยู่ คลิกปุ่ม **สับเปลี่ยน (Replace)** 3. กำหนด **วันและเวลาที่มีผลสับเปลี่ยน (Effective swap date and time)** ให้ตรงกับเวลาถอดเปลี่ยนจริงหน้างาน *(ระบบจะบันทึก `activeTo` เพื่อหยุดนำข้อมูลหลังเวลานั้นมาคิดซ้ำ)* 4. เลือก **มิเตอร์ทดแทนในไซต์นี้** *(หากยังไม่ได้ลงทะเบียนมิเตอร์ใหม่ ให้เลือก "ปลดประจำการอย่างเดียว" แล้วค่อยลงทะเบียนมิเตอร์ใหม่ภายหลัง)* 5. กรอก **เหตุผลการสับเปลี่ยน (Audit Reason)** แล้วคลิก **ยืนยันการสับเปลี่ยน (Confirm replacement)** ::: warning ต้องเปิดใช้งานมิเตอร์ทดแทนใน HES แยกต่างหากหลังสับเปลี่ยน การสับเปลี่ยนมิเตอร์ **ไม่ได้เปิดใช้งานมิเตอร์ทดแทนใน HES ให้อัตโนมัติ** หลังสับเปลี่ยนเสร็จ ให้คลิกปุ่ม **เปิดใช้งานใน HES (Activate in HES)** บนแถบแจ้งเตือนสีเหลือง (หรือที่แถวของมิเตอร์ทดแทน) แล้วพิมพ์ Serial/ID ยืนยันเพื่อให้ HES เริ่มอ่านค่ามิเตอร์ใหม่ นอกจากนี้ **ห้ามสับเปลี่ยนย้อนหลังเข้าไปในเดือนที่ออกใบแจ้งหนี้สถานะ CHECKED หรือ APPROVED แล้ว** ::: --- ## 4. การดูข้อมูลและวิเคราะห์โหลดโปรไฟล์ 15 นาที (View Data / Analytics) คุณสามารถเปิดหน้านี้ได้จาก `/view-data` (เลือก **ไซต์** และ **มิเตอร์** หรือ **รวมทั้งไซต์**) หรือจากแท็บ **ข้อมูลพลังงาน (Data)** ของไซต์/มิเตอร์โดยตรง เวลาทั้งหมดในหน้านี้อ้างอิง **เวลาประเทศไทย (Asia/Bangkok, UTC+7)** ### การใช้งานบันไดช่วงเวลา (Zoom Ladder) 1. **แถบนำทางช่วงเวลา:** คลิกสลับระดับความละเอียดได้ทันทีบนแถบด้านบน: - **ปี (e.g. `2026`):** แสดงแท่งพลังงาน **รายเดือน** ทั้ง 12 เดือน (คลิกแท่งเดือนเพื่อเจาะดูรายวันของเดือนนั้น) - **เดือน (e.g. `พฤศจิกายน`):** แสดงแท่งพลังงาน **รายวัน** (คลิกแท่งวันเพื่อเจาะดูข้อมูล **ราย 15 นาที** ของวันนั้น) - **วัน (e.g. `จ. 16`):** แสดงเส้นกราฟและตาราง **ราย 15 นาที (00:00–24:00)** พร้อมแถบ **Day Strip** ด้านบนสำหรับสลับไปดูวันอื่นในเดือนเดียวกันได้ในคลิกเดียว - **ช่วงวันที่ (Date range):** เลือกช่วงวันที่เอง หรือใช้ปุ่มลัด (`7 วันล่าสุด`, `30 วันล่าสุด`, `เดือนนี้`, `เดือนที่แล้ว`) และเลือกความละเอียดได้ (`15 นาที` สำหรับช่วงไม่เกิน 7 วัน, `รายชั่วโมง` ไม่เกิน 14 วัน, `รายวัน` ไม่เกิน 366 วัน, `รายเดือน`) 2. **ปุ่มลัดเพิ่มเติม:** ใช้ลูกศร `<` / `>` เพื่อเลื่อนทีละช่วง, คลิก **วันนี้**, **เมื่อวาน**, หรือ **ข้อมูลล่าสุด** เพื่อกระโดดไปยังวันล่าสุดที่มีข้อมูลจากมิเตอร์ 3. **สลับหน่วยกราฟ:** สลับระหว่าง **พลังงาน kWh** และ **กำลัง kW / สูงสุด kW** ### การอ่านกราฟและตารางข้อมูล 15 นาที - **ช่วงอัตรา TOU:** พื้นหลังแสดงสีแยกตามช่วงเวลา (`พีค` จ–ศ 09:00–22:00, `ออฟพีค` จ–ศ 22:00–09:00, `วันหยุด` เสาร์-อาทิตย์และวันหยุดราชการ) - **สถานะ `รอข้อมูล` (เส้นลายทแยง):** ช่วงเวลาล่าสุดที่ยังไม่ถึงกำหนดเวลาอ่านค่าจาก HES ระบบจะรีเฟรชให้อัตโนมัติ - **สถานะ `ไม่มีข้อมูลจากมิเตอร์` (แถวไฮไลต์สีส้ม):** ช่วงที่ขาดการติดต่อ ระบบจะพับรวมช่วงที่หายต่อเนื่องให้เห็นชัดเจนและ **ไม่เติมเลข `0` ปลอม** เด็ดขาด - **ป้ายคุณภาพข้อมูล:** `ค่าประมาณ` (ส่วนแบ่งจากยอดรวมช่วงขาดการติดต่อ หรือข้อมูล VEE) และ `รอตรวจสอบ` (มิเตอร์รายงานเหตุผิดปกติ) โดยบทบาทที่มีสิทธิ์ `telemetry.quality.read` จะเห็นคำอธิบายต้นทางใน Tooltip - **ข้อมูลรายเฟสและแยกตามมิเตอร์:** เมื่อดูแบบ **รวมทั้งไซต์** ที่มีหลายมิเตอร์ จะเห็นแท่งสัดส่วนพลังงานแยกตามมิเตอร์ และเมื่อเลือกดู **มิเตอร์เดียว** ตารางจะแสดงค่า **PF**, **แรงดัน (V L1–L3)** และ **กระแส (A L1–L3)** เพิ่มเติม (หากมิเตอร์ส่งค่ามา) - **การส่งออก:** คลิก **ส่งออก CSV** (ไฟล์ UTF-8 พร้อม BOM เปิดใน Excel ภาษาไทยไม่เพี้ยน) หรือ **พิมพ์ A4** ![หน้าจอข้อมูลและวิเคราะห์โหลดโปรไฟล์ 15 นาที](/screenshots/th/10-view-data-telemetry.png) *ภาพที่ 5: หน้าดูข้อมูล/วิเคราะห์ แสดงบันไดช่วงเวลา Day Strip เส้นกราฟ TOU ราย 15 นาที สรุปยอด และตารางข้อมูล* --- ## 5. เครื่องมือคุณภาพข้อมูล การซ่อมแซม VEE, Backfill และเทียบช่วงเวลา คลิกปุ่ม **เครื่องมือข้อมูล (Data Tools)** บริเวณมุมขวาบนของแถบควบคุมในหน้าดูข้อมูลเพื่อเข้าถึง 3 เครื่องมือสำคัญ: ### 1) ตรวจและแก้ไขข้อมูล (Data Quality & VEE Repair) ทุกคนสามารถเปิดดูความครบถ้วนได้ ส่วนการแก้ไข (3 ปุ่มด้านล่าง) สงวนสิทธิ์เฉพาะผู้ที่มี `telemetry.sync` (**ผู้ดูแล** และ **วิศวกร O&M**): - **รายงานความครบถ้วน:** แสดงเปอร์เซ็นต์ความครบถ้วน (`%`), จำนวนช่วง 15 นาทีที่มีข้อมูลเทียบกับที่คาดหวัง และสัดส่วนแยกตามแหล่งที่มา (**อ่านจากมิเตอร์อัตโนมัติ**, **เติมด้วยค่าประมาณอัตโนมัติ**, **แก้ไขด้วยมือ / นำเข้าไฟล์ CSV**) - **เติมช่วงที่ขาดหายอัตโนมัติ (Auto-fill missing intervals):** 1. เลือกมิเตอร์และวิธีคำนวณ: - **LINEAR** (*เฉลี่ยเชื่อมระหว่างจุดก่อนหน้าและจุดถัดไป*): แนะนำเมื่อข้อมูลขาดช่วงสั้นๆ - **ROLLING_AVG** (*ค่าเฉลี่ยย้อนหลังจากช่วงเวลาเดียวกันของวันก่อนหน้า*, อ้างอิงย้อนหลังสูงสุด 7 วัน) 2. คลิก **เริ่มเติมข้อมูลอัตโนมัติ** *(ระบบเติมเฉพาะช่องที่ว่างอยู่ ไม่เขียนทับข้อมูลจริง และติดป้ายกำกับเป็น `ค่าประมาณ`; เติมได้ครั้งละไม่เกิน 31 วัน)* - **แก้ไขค่าอ่านรายเวลา (Manual reading edit):** 1. เลือกมิเตอร์ และกำหนดวันเวลาที่ลงท้ายด้วย `:00`, `:15`, `:30` หรือ `:45` 2. กรอก **พลังงานไฟฟ้า (kWh)**, **กำลังไฟฟ้าเฉลี่ย (kW)** *(เว้น `0` เพื่อให้คำนวณ `kWh × 4` อัตโนมัติ)*, **kVAR** และ **เหตุผลในการแก้ไขข้อมูล** *(อย่างน้อย 3 ตัวอักษร)* 3. คลิก **บันทึกค่าที่แก้ไข** (ระบบบันทึกค่าเดิม–ค่าใหม่และชื่อผู้แก้ไขในตารางประวัติแก้ไข) - **นำเข้าไฟล์ CSV (CSV import):** 1. เลือกมิเตอร์ และระบุว่าข้อมูลในไฟล์ **เป็นหน่วยสุทธิแล้ว** หรือ **เป็นค่าดิบจากมิเตอร์ (ให้ระบบคูณ CT/VT อัตโนมัติ)** 2. อัปโหลดไฟล์ `.csv` หรือวางข้อความที่มีหัวตาราง `timestamp,active_energy_kwh,active_power_kw,reactive_power_kvar` (สูงสุด 5,000 แถวต่อครั้ง) พร้อมระบุหมายเหตุแล้วกด **นำเข้าข้อมูล** ![แผงตรวจสอบความครบถ้วนและเครื่องมือ VEE](/screenshots/th/11-view-data-quality-vee.png) *ภาพที่ 6: แผงตรวจและแก้ไขข้อมูล (Data Quality & VEE) แสดงแถบความครบถ้วน แหล่งที่มาข้อมูล และปุ่มเติม/แก้/นำเข้า CSV* ::: warning ข้อจำกัดการล็อกรอบบิล (Billing Period Lock) การเติมค่า VEE การแก้ไขค่าอ่านด้วยมือ และการนำเข้า CSV **ไม่สามารถดำเนินการในเดือนที่มีใบแจ้งหนี้สถานะ `CHECKED` (ตรวจแล้ว) หรือ `APPROVED` (อนุมัติแล้ว)** หากจำเป็นต้องแก้ไขข้อมูลในเดือนนั้น ต้องแจ้งฝ่ายบัญชีให้ส่งคืนหรือยกเลิกใบแจ้งหนี้นั้นก่อน ::: ### 2) ดึงข้อมูลย้อนหลังจากมิเตอร์ (Backfill from Meter) *(สำหรับบทบาทที่มีสิทธิ์ `meter.command`)* ใช้สั่งให้ HES อ่านหน่วยความจำโหลดโปรไฟล์ 15 นาที (`DLMS Profile Generic 1.0.99.1.0.255`) จากตัวมิเตอร์จริงย้อนหลัง: 1. เปิด **เครื่องมือข้อมูล** > **ดึงข้อมูลย้อนหลังจากมิเตอร์** 2. เลือกมิเตอร์ที่ต้องการ (เลือกได้หลายตัวพร้อมกัน) และกำหนด **ช่วงวันที่** ตามเวลาประเทศไทย *(ดึงได้ครั้งละไม่เกิน **31 วัน** และต้องไม่เกินวันนี้)* 3. ตรวจสอบสรุปจำนวนช่วงเวลา แล้วคลิก **ส่งคำขอ** 4. ระบบจะส่งคำสั่งเข้าคิว HES โดยแบ่งอ่านทีละช่วง 7 วัน และแสดงสถานะสด (`กำลังส่งคำสั่ง` → `รอคิว HES` → `กำลังอ่านโปรไฟล์` → `เสร็จ`) สามารถปิดหน้าต่างได้ระหว่างรอคำสั่งทำงาน ::: warning ผลของการดึงข้อมูลย้อนหลังต่อใบแจ้งหนี้ฉบับร่าง ข้อมูลที่ดึงได้ใหม่จากมิเตอร์จะ **เขียนทับข้อมูลเดิมในช่วงเวลานั้น** หากเดือนนั้นมีใบแจ้งหนี้ฉบับร่าง (`DRAFT`) อยู่แล้ว ใบแจ้งหนี้จะถูกติดธงว่าข้อมูลเปลี่ยนแปลงและต้องกดคำนวณบิลใหม่อีกครั้ง (ส่วนเดือนที่ `CHECKED`/`APPROVED` แล้ว ระบบจะพักข้อมูลที่เปลี่ยนแปลงไว้ในคิวข้อมูลล่าช้า) ::: ### 3) เปรียบเทียบช่วงเวลา (Compare Periods) 1. เปิด **เครื่องมือข้อมูล** > **เปรียบเทียบช่วงเวลา** 2. เลือกช่วงเปรียบเทียบด่วน (**เดือนนี้ เทียบ เดือนก่อน**, **7 วันล่าสุด เทียบ 7 วันก่อน**, **ปีนี้ เทียบ ปีก่อน**) หรือกำหนดวันที่ของ **ช่วงที่ 1** และ **ช่วงที่ 2** ด้วยตนเอง 3. ตรวจสอบการ์ดผลต่าง **พลังงานไฟฟ้ารวม (kWh)**, **Peak kW** และตารางเปรียบเทียบแยกตามช่วง **On-Peak**, **Off-Peak**, **วันหยุด** พร้อมเปอร์เซ็นต์ความเปลี่ยนแปลง ![แผงเปรียบเทียบการใช้พลังงานระหว่าง 2 ช่วงเวลา](/screenshots/th/12-view-data-period-compare.png) *ภาพที่ 7: แผงเปรียบเทียบช่วงเวลา แสดงผลต่างพลังงานรวม Peak Demand และตารางแยกช่วง TOU* --- ## ขั้นตอนถัดไป - [คู่มือการวางบิลและการอนุมัติ 3 ขั้นตอน](./06-billing-and-approval-guide) - [ย้อนกลับไปดูสิทธิ์ของแต่ละบทบาท](./01-roles-and-permissions) --- ## คู่มือการออกบิล TOU และขั้นตอนอนุมัติ 3 ระดับ Source: https://docs.wattdee.com/th/06-billing-and-approval-guide ::: warning การอัปเดต UAT คู่มือนี้อธิบายระบบรุ่นที่จะอัปเดต หน้าจอหรือการทำงานบางส่วนอาจแตกต่างจากระบบ UAT ปัจจุบัน ::: # คู่มือการออกบิล TOU และขั้นตอนอนุมัติ 3 ระดับ ระบบออกบิลและวางบิลของ WattDee (`/billing`) คำนวณค่าไฟฟ้าตามสัญญาซื้อขายไฟฟ้าภาคเอกชน (Private Solar PPA) จากข้อมูลโหลดโปรไฟล์ราย 15 นาทีของมิเตอร์อัจฉริยะ ภายใต้กฎช่วงเวลา Time-of-Use (TOU) ของการไฟฟ้าส่วนภูมิภาค (กฟภ. / PEA) พร้อมระบบตรวจสอบและอนุมัติ 3 ระดับ (**Draft → Checked → Approved**) เพื่อความโปร่งใส ตรวจสอบย้อนหลังได้ และเป็นไปตามหลักการควบคุมภายใน ::: info สิทธิ์การใช้งานหน้า `/billing` การเข้าใช้งานหน้า **ระบบวางบิล & ออกใบแจ้งหนี้ PPA** ต้องมีสิทธิ์ `invoice.view` (ดูรายละเอียดบทบาทและสิทธิ์ได้ที่ [บทบาทและสิทธิ์การใช้งาน](./01-roles-and-permissions)): - **ทีมผู้พัฒนาโครงการ / แพลตฟอร์ม** (`Platform ADMIN`, `Developer ADMIN`, `SERVICE`, `ACCOUNTING`): เข้าถึงมุมมองจัดการบิลเต็มรูปแบบและเวิร์กโฟลว์อนุมัติ 3 ระดับ - **ฝั่งลูกค้า / ผู้รับซื้อไฟฟ้า** (`Customer ADMIN`, `CUSTOMER`): ระบบจะแสดงมุมมองพอร์ทัลลูกค้าสำหรับใบแจ้งหนี้ที่ `APPROVED` แล้วเท่านั้น (ดู [คู่มือพอร์ทัลลูกค้า](./07-customer-portal-guide)) - **บทบาท `OPERATOR` และ `READER`**: ไม่มีสิทธิ์ `invoice.view` หากเปิดหน้า `/billing` โดยตรงจะพบหน้า **สิทธิ์การเข้าถึงไม่เพียงพอ (`AccessDenied`)** ::: --- ## 1. ภาพรวมหน้าจอและการสลับมุมมอง (Table และ Stage Board) เมื่อเข้าเมนู **Billing** (`/billing`) จากแถบด้านซ้าย ผู้ใช้งานสามารถเลือกดูและจัดการใบแจ้งหนี้ได้ 2 รูปแบบหลัก: ### ส่วนควบคุมและตัวกรองด้านบน 1. **รอบบิล (Billing Period)**: เลือก **เดือน** และ **ปี** ที่ต้องการจัดการ โดยด้านบนจะแสดงช่วงวันที่จริงของรอบบิลนั้นตามวันตัดรอบของสัญญา เช่น `1 ต.ค. – 31 ต.ค.` หรือ `25 ก.ย. – 24 ต.ค.` (หากสัญญาตั้งวันตัดรอบเป็นวันที่ 25) 2. **ค้นหา (Search)**: ค้นหาตามชื่อไซต์ รหัสไซต์ ชื่อบริษัทลูกค้า หรือเลขที่ใบแจ้งหนี้ 3. **ตัวกรองสถานะใบแจ้งหนี้ (Invoice Status)**: - **ทั้งหมด (All stages)** - **1. รอสร้างบิล (Missing bills)**: ไซต์ที่ใช้งานอยู่แต่ยังไม่มีใบแจ้งหนี้ในรอบบิลนี้ - **2. แบบร่าง (Draft)**: คำนวณและบันทึกแบบร่างแล้ว รอฝ่ายปฏิบัติการ/วิศวกร (`Service`) ตรวจสอบ - **3. ตรวจแล้ว (Checked)**: ผ่านการตรวจสอบข้อมูลมิเตอร์ Stage 2 แล้ว รอฝ่ายบัญชีอนุมัติ - **4. อนุมัติแล้ว (Approved)**: ออกเป็นใบแจ้งหนี้อย่างเป็นทางการพร้อมรหัสอ้างอิงใบแจ้งหนี้แล้ว - **5. ยกเลิกแล้ว (Voided)**: ใบแจ้งหนี้ที่ถูกยกเลิก (`REJECTED`) พร้อมเหตุผลและสามารถกด **ออกบิลใหม่** ได้ 4. **เครื่องมือเพิ่มเติม (More tools)**: เปิดเครื่องมือ **เทียบค่าไฟ PPA กับ กฟภ.** และ **ออกบิลกรณีข้อมูลมิเตอร์ไม่ครบ (Fallback)** ### มุมมอง 1: ตารางรวม (Table View) ตารางรวมจัดกลุ่มไซต์ตามบริษัทลูกค้า (พับ/กางกลุ่มบริษัทได้ พร้อมสรุปจำนวนไซต์ในแต่ละสเตจ เช่น `รอสร้าง · ร่าง · ตรวจแล้ว · อนุมัติ · ยกเลิก`) รองรับการติ๊กเลือกหลายรายการเพื่อ **สร้างบิลเป็นชุด** หรือ **ลงนามอนุมัติเป็นชุด** ![ตารางรวมใบแจ้งหนี้ประจำเดือนแสดงสถานะแต่ละสเตจและยอดรวมสุทธิ](/screenshots/th/13-billing-overview-table.png) ### มุมมอง 2: บอร์ดสเตจ 5 ขั้นตอน (Stage Board / Kanban) เมื่อสลับมุมมองเป็น **บอร์ดสเตจ** และเลือก **บริษัทลูกค้า** ระบบจะแสดงคอลัมน์ 5 สเตจเรียงตามลำดับการทำงาน: 1. **1. รอสร้างบิล** (`ยังไม่ได้คำนวณบิลรอบนี้`) 2. **2. แบบร่าง (Draft)** (`รอฝ่าย Service ตรวจรับรอง`) 3. **3. ตรวจแล้ว (Checked)** (`รอฝ่ายบัญชีลงนามอนุมัติ`) 4. **4. อนุมัติแล้ว (Approved)** (`ลงนามเรียบร้อย / รอลูกค้าชำระ`) 5. **5. ยกเลิกแล้ว (Voided)** (`ยกเลิก / สามารถออกบิลใหม่`) คุณสามารถคลิกการ์ดเพื่อเปิดหน้าต่างรายละเอียด ลากพื้นที่ว่างเพื่อเลื่อนบอร์ดซ้าย-ขวา หรือลากการ์ดข้ามคอลัมน์เพื่อเปลี่ยนสถานะได้ (ระบบจะบังคับกติกา 3 ระดับอัตโนมัติ เช่น ห้ามลากข้ามจาก `Draft` ไป `Approved` โดยไม่ผ่าน `Checked`) ![บอร์ดสเตจ 5 ขั้นตอนสำหรับการติดตามและลากเปลี่ยนสถานะใบแจ้งหนี้](/screenshots/th/14-billing-kanban-board.png) --- ## 2. เกณฑ์รอบบิล เวลาอ้างอิงกรุงเทพฯ (UTC+7) และการออกบิลก่อนสิ้นรอบ เพื่อให้ยอดพลังงานในใบแจ้งหนี้ตรงกับรีจิสเตอร์สิ้นเดือนของมิเตอร์จริง ระบบตัดรอบเวลาทั้งหมดตามโซนเวลา **`Asia/Bangkok` (`UTC+7`)** (ประเทศไทยไม่มี Daylight Saving Time): - **วันตัดรอบมาตรฐาน (`billingCycleDay = 1`)**: รอบบิล `YYYY-MM` ครอบคลุมตั้งแต่ `วันที่ 1 เวลา 00:00:00+07:00` (รวม) จนถึง `วันที่ 1 ของเดือนถัดไป เวลา 00:00:00+07:00` (ไม่รวม) เช่น รอบ `2026-10` คือ `01/10/2026 00:00` ถึง `31/10/2026 23:59:59` เวลาไทย - **วันตัดรอบข้ามเดือน (`billingCycleDay = 2..28`)**: หากสัญญากำหนดวันตัดรอบเป็นวันที่ `d` (เช่น `d = 25`) รอบบิล `2026-10` จะครอบคลุมตั้งแต่ `2026-09-25 00:00:00+07:00` (รวม) ถึง `2026-10-25 00:00:00+07:00` (ไม่รวม) - **ใบแจ้งหนี้รอบแรกของไซต์ใหม่ (`activeFrom`)**: หากมิเตอร์ทุกตัวในไซต์เพิ่งติดตั้งและเริ่มใช้งาน (`activeFrom`) ระหว่างรอบบิล ระบบจะบันทึกจุดเริ่มต้นของรอบบิลเป็นวันเวลา `activeFrom` ของมิเตอร์ตัวแรก เพื่อให้ใบแจ้งหนี้แรกแสดงช่วงวันที่ใช้งานจริงและไม่นับช่วงก่อนติดตั้งเป็นข้อมูลขาดหายในการตรวจ Stage 2 - **วันครบกำหนดชำระ (`dueDate`)**: คำนวณจากวันที่สิ้นสุดรอบบิลบวกด้วยจำนวนวันเครดิตในสัญญา (`paymentTermDays` ค่าเริ่มต้น `30` วัน) เวลา `23:59:59+07:00` เช่น รอบ `2026-10` ที่ตัดรอบวันที่ `25 ต.ค.` และเครดิต `30 วัน` จะครบกำหนดชำระวันที่ `24 พ.ย.` ::: warning กติกาการออกบิลก่อนสิ้นรอบ (Open-Period Guard) โดยปกติระบบจะอนุญาตให้ออกใบแจ้งหนี้ได้ **หลังจากรอบบิลสิ้นสุดแล้วเท่านั้น** (`endDate <= เวลาปัจจุบัน`): - หากพยายามออกบิลสำหรับรอบบิลที่ยังไม่เริ่ม ระบบจะปฏิเสธด้วยรหัส **`422`** - หากพยายามออกบิลระหว่างที่รอบบิลยังไม่จบ ระบบจะปฏิเสธด้วยรหัส **`422`** ยกเว้นผู้ใช้งานที่มีสิทธิ์ **`invoice.issueEarly`** (`Developer ADMIN` หรือ `Platform ADMIN`) กดยืนยันในหน้าต่าง **"รอบบิลยังไม่สิ้นสุด"** ซึ่งจะแสดงจำนวนวันที่ผ่านมาแล้วเทียบกับจำนวนวันทั้งหมดของรอบบิล (เช่น `18/31 วัน`) ก่อนอนุญาตให้ออกบิลล่วงหน้า ::: --- ## 3. การตรวจสอบอัตราค่า Ft และปฏิทินวันหยุดก่อนออกบิล ### 3.1 การยืนยันอัตราค่าไฟฟ้าผันแปร (Ft Rate) อัตราค่า Ft ตามประกาศของคณะกรรมการกำกับกิจการพลังงาน (กกพ.) เป็นตารางอ้างอิงกลางที่ใช้ร่วมกันทุกโครงการ ดังนั้นจึงกำหนดได้เฉพาะ **Platform Administrator** (`ftrate.write`) เท่านั้น: 1. หากเดือนที่เลือกยังไม่ได้ยืนยันอัตรา Ft หน้า Billing จะแสดงแถบแจ้งเตือนสีเหลือง **"ต้องยืนยันอัตรา Ft"** 2. คลิกปุ่ม **ยืนยันอัตรา Ft** เพื่อเปิดหน้าต่าง **ยืนยันอัตราค่าไฟฟ้าผันแปร (Ft) ประจำรอบบิล** (หรือตั้งค่าได้ที่เมนู **การตั้งค่า → การคิดบิล/อัตรา**) 3. ตรวจสอบรอบบิล (`YYYY-MM`) และกรอก **อัตรา Ft (บาท/หน่วย)** ในช่วง `-2.0000` ถึง `10.0000` บาท/หน่วย (ระบบอาจแสดงอัตราของเดือนล่าสุดเป็นข้อมูลอ้างอิง แต่จะไม่เติมค่าอัตโนมัติหากเดือนนั้นยังไม่มีบันทึก) 4. กด **ยืนยันอัตรา Ft ประจำรอบบิล** เพื่อบันทึก ::: danger ข้อควรระวังเรื่องอัตรา Ft - หากยังไม่มีอัตรา Ft ของรอบบิลนั้นในฐานข้อมูล การกดคำนวณหรือสร้างใบแจ้งหนี้จริงจะถูกปฏิเสธด้วยรหัส **`422`** ทันที (ระบบจะไม่สมมติอัตรา Ft ให้ใบแจ้งหนี้ทางการเงิน) - เมื่อมีใบแจ้งหนี้อย่างน้อย 1 ฉบับในเดือนนั้นเข้าสู่สถานะ `CHECKED` หรือ `APPROVED` แล้ว **อัตรา Ft ของเดือนนั้นจะถูกล็อก** ไม่สามารถแก้ไขได้อีก ::: ### 3.2 ปฏิทินวันหยุดราชการ (Public Holidays) Platform Administrator สามารถจัดการวันหยุดราชการประจำปีได้ที่ **การตั้งค่า → วันหยุด (`Holiday`)** (รองรับการเติมวันหยุดอัตโนมัติจากตาราง กฟภ. หรือเพิ่มวันหยุดพิเศษ/วันหยุดชดเชยด้วยตนเอง) วันหยุดทั้งหมดในตารางจะถูกประเมินตามวันที่ในเวลาไทย (`Asia/Bangkok`) เพื่อคิดค่าไฟในอัตรา `Holiday Off-Peak` ตลอด 24 ชั่วโมง --- ## 4. กติกาการคิดค่าไฟ TOU สูตรคำนวณ และการปัดเศษ (พร้อมตัวอย่างตัวเลขจริง) ### 4.1 ช่วงเวลา Time-of-Use (TOU) ตามประกาศ กฟภ. (เวลาไทย UTC+7) | ช่วงอัตรา (TOU Period) | วันในสัปดาห์ | ช่วงเวลา (24 ชม.) | อัตราที่ใช้คำนวณ | | :--- | :--- | :--- | :--- | | **On-Peak** | จันทร์ – ศุกร์ | `09:00:00 – 21:59:59` | อัตรา On-Peak ตามสัญญา | | **Off-Peak** | จันทร์ – ศุกร์ | `22:00:00 – 08:59:59` | อัตรา Off-Peak ตามสัญญา | | **Holiday & Weekend Off-Peak** | เสาร์ – อาทิตย์ และวันหยุดราชการ | `00:00:00 – 23:59:59` | **อัตรา Off-Peak** ตามสัญญา | ### 4.2 การรวมข้อมูลหลายมิเตอร์และการสับเปลี่ยนมิเตอร์ระหว่างรอบ (Multi-Meter & Mid-Cycle Swap) 1. **การตัดช่วงเวลาใช้งาน (`activeFrom` / `activeTo`)**: ข้อมูลราย 15 นาทีของมิเตอร์แต่ละตัวจะถูกกรองเฉพาะช่วงที่มิเตอร์ตัวนั้นใช้งานจริง (`activeFrom <= timestamp < activeTo`) เพื่อป้องกันข้อมูลทดสอบหรือข้อมูลค้างหลังปลดมิเตอร์รั่วไหลเข้าบิล 2. **พลังงานรวม (`totalEnergyKwh`)**: นำหน่วยพลังงาน (kWh) จากทุกมิเตอร์ที่ใช้งานในรอบบิลมารวมกัน 3. **ความต้องการพลังไฟฟ้าสูงสุด (`demandPeakKw`)**: คำนวณจาก **ผลรวมกำลังไฟฟ้า (kW) ของทุกมิเตอร์ที่ทำงานพร้อมกัน ณ ช่วงเวลา 15 นาทีเดียวกัน** แล้วจึงหาค่าสูงสุดตลอดทั้งรอบบิล (`max_t Σ P_m(t)`) ไม่ใช่การนำค่าสูงสุดของแต่ละมิเตอร์มาหาค่าสูงสุดแยกกัน (เช่น หากมิเตอร์ A จ่าย 400 kW พร้อมกับมิเตอร์ B ที่จ่าย 1,600 kW ในช่วง 15 นาทีเดียวกัน ค่า Peak Demand ของไซต์คือ 2,000 kW) โดยระบบจะเก็บค่า `demandOnPeakKw` และ `demandOffPeakKw` ไว้อ้างอิงด้วย แต่ค่า Demand Charge (หากมี) จะคิดจาก `demandPeakKw` สูงสุดทั้งรอบบิล 4. **เอกสารแนบตารางสับเปลี่ยนมิเตอร์**: หากในรอบบิลมีมิเตอร์มากกว่า 1 เครื่อง ระบบจะบันทึก `meterId = null` บนหัวบิลและสร้าง **หน้า 2 (Attached Meter Replacement Schedule)** แนบท้าย PDF แสดงสัดส่วน kWh, Peak kW และช่วงเวลาใช้งานของแต่ละมิเตอร์ ### 4.3 ลำดับสูตรคำนวณและกติกาการปัดเศษ (Half-Up Per-Line Rounding) ระบบคำนวณด้วยเลขทศนิยมความแม่นยำสูง (`BigNumber`) และปัดเศษแบบ **Half-Up (`ROUND_HALF_UP`) ในทุกบรรทัด** เพื่อให้ตัวเลขแต่ละบรรทัดที่พิมพ์บนใบแจ้งหนี้บวกลบกันได้ตรงถึงระดับสตางค์: 1. **ปริมาณหน่วยและพลังไฟฟ้า**: - ปัดเศษ `energyOnPeakKwh`, `energyOffPeakKwh`, `energyHolidayOffPeakKwh` เป็นทศนิยม **2 ตำแหน่ง** (ค่าเริ่มต้น ปรับได้ 0–4 ตำแหน่งตามสัญญา) - `totalEnergyKwh` = ผลรวมของทั้ง 3 บรรทัดที่ปัดเศษแล้ว - ปัดเศษ `demandPeakKw` และ `peakKvar` เป็นทศนิยม **3 ตำแหน่ง** 2. **ค่าพลังงานฐานและค่าพลังไฟฟ้าสูงสุด**: - `onPeakAmount` = `round_2(energyOnPeakKwh × onPeakRate)` - `offPeakAmount` = `round_2(energyOffPeakKwh × offPeakRate)` - `holidayOffPeakAmount` = `round_2(energyHolidayOffPeakKwh × offPeakRate)` - `baseEnergyAmountThb` = `onPeakAmount + offPeakAmount + holidayOffPeakAmount` - `demandAmountThb` = `round_2(demandPeakKw × demandRateKw)` (สัญญา Private Solar PPA ทั่วไปมักกำหนด `demandRateKw = 0.0000`) 3. **ค่าไฟฟ้าผันแปร (Ft)**: - `ftTotalAmountThb` = `round_2(totalEnergyKwh × ftRateThb)` 4. **ส่วนลดตามสัญญา PPA (`discountAmountThb`)**: - ตรวจสอบเงื่อนไขวันเริ่มและวันหมดอายุส่วนลด (`discountStartDate` – `discountExpiryDate`) เทียบกับเดือนรอบบิล - ส่วนลดคิดจาก **`(ค่าพลังงานไฟฟ้าฐาน + ค่า Ft)` เท่านั้น** โดย**ไม่นำค่าพลังไฟฟ้าสูงสุด (Demand) และค่าปรับ PF มารวมลดราคา**: - `discountAmountThb` = `round_2((baseEnergyAmountThb + ftTotalAmountThb) × (discountPercent / 100))` 5. **ค่าปรับเพาเวอร์แฟกเตอร์ (PF Penalty: ตัวเลือกตามสัญญา)**: - ใช้เมื่อสัญญาเปิดใช้งาน `pfPenaltyEnabled = true` และ `demandPeakKw > 0` และ `peakKvar > 0` - ค่าเกณฑ์มาตรฐาน `pfThreshold = 0.85` (เทียบเท่า `tan(arccos(0.85)) = 0.6197`) - กิโลวาร์ที่อนุญาต: `allowanceKvar = demandPeakKw × tanPhi` - หาก `peakKvar > allowanceKvar`: - กิโลวาร์ส่วนเกิน: `excessKvar = round_2(peakKvar - allowanceKvar)` - ค่าปรับ PF: `pfPenaltyAmountThb` = `round_2(excessKvar × pfPenaltyRateThb)` (ค่าเริ่มต้น `56.07` บาท/kVAR) 6. **ยอดก่อนภาษี ภาษีมูลค่าเพิ่ม 7% และยอดชำระสุทธิ**: - `netSubtotal` = `baseEnergyAmountThb + ftTotalAmountThb - discountAmountThb + demandAmountThb + pfPenaltyAmountThb` - `vatAmountThb` = `round_2(netSubtotal × 0.07)` - `totalPayableThb` = `netSubtotal + vatAmountThb` ### 4.4 ตัวอย่างการคำนวณทีละขั้น (Worked Examples) #### ตัวอย่างที่ 1: สัญญา Solar PPA มาตรฐาน (คิดเฉพาะพลังงาน + Ft + ส่วนลด 15% + VAT 7%) สมมติข้อมูลรอบบิล `2026-10`: - พลังงาน **On-Peak**: `10,000.00 kWh` @ `4.1839` บาท/kWh - พลังงาน **Off-Peak**: `5,000.00 kWh` @ `2.6037` บาท/kWh - พลังงาน **Holiday Off-Peak**: `2,000.00 kWh` @ `2.6037` บาท/kWh - **Peak Demand**: `120.000 kW` @ `0.0000` บาท/kW (ไม่คิดค่า Demand) | ปิดค่าปรับ PF - อัตรา **Ft**: `0.3972` บาท/kWh | **ส่วนลดสัญญา PPA**: `15.00%` | ขั้นตอน | รายการ | สูตรคำนวณและวิธีปัดเศษ | จำนวนเงิน (บาท) | | :--- | :--- | :--- | ---: | | 1 | ค่าไฟ On-Peak | `10,000.00 × 4.1839 = 41,839.00` | `41,839.00` | | 2 | ค่าไฟ Off-Peak | `5,000.00 × 2.6037 = 13,018.50` | `13,018.50` | | 3 | ค่าไฟ Holiday Off-Peak | `2,000.00 × 2.6037 = 5,207.40` | `5,207.40` | | 4 | **ค่าพลังงานไฟฟ้าฐาน (Base Energy)** | `41,839.00 + 13,018.50 + 5,207.40` | **`60,064.90`** | | 5 | **ค่า Ft รวม (`17,000.00 kWh`)** | `17,000.00 × 0.3972 = 6,752.40` | **`6,752.40`** | | 6 | รวมค่าพลังงาน + Ft (ฐานคำนวณส่วนลด) | `60,064.90 + 6,752.40` | `66,817.30` | | 7 | **หักส่วนลดสัญญา PPA `15.00%`** | `66,817.30 × 0.15 = 10,022.595` (ปัด Half-Up) | **`-10,022.60`** | | 8 | **ยอดก่อนภาษีมูลค่าเพิ่ม (Net Subtotal)** | `66,817.30 - 10,022.60` | **`56,794.70`** | | 9 | **ภาษีมูลค่าเพิ่ม (VAT 7%)** | `56,794.70 × 0.07 = 3,975.629` (ปัด Half-Up) | **`3,975.63`** | | 10 | **ยอดชำระทั้งสิ้น (Total Payable)** | `56,794.70 + 3,975.63` | **`60,770.33`** | #### ตัวอย่างที่ 2: กรณีสัญญามีค่า Demand Charge และค่าปรับ Power Factor (PF Penalty) ใช้ข้อมูลพลังงานและ Ft เดียวกับตัวอย่างที่ 1 แต่เพิ่ม: - **Peak Demand**: `120.000 kW` @ `132.9300` บาท/kW - **Peak kVAR**: `100.000 kVAR` (เปิดค่าปรับ PF ที่เกณฑ์ `0.85`, อัตรา `56.07` บาท/kVAR) 1. **ส่วนลดสัญญา PPA 15%** ยังคงเป็น **`-10,022.60` บาท** เท่าเดิม เพราะส่วนลดคิดเฉพาะ `(ค่าพลังงานฐาน + Ft)` เท่านั้น 2. **ค่า Demand Charge**: `120.000 × 132.9300` = **`15,951.60` บาท** 3. **ค่าปรับ PF Penalty**: - กิโลวาร์ที่อนุญาต (`tanPhi = 0.6197`): `120.000 × 0.6197 = 74.364 kVAR` - กิโลวาร์ส่วนเกิน: `round_2(100.000 - 74.364) = 25.64 kVAR` - ค่าปรับ PF: `round_2(25.64 × 56.07) = round_2(1,437.6348)` = **`1,437.63` บาท** 4. **ยอดก่อนภาษี**: `60,064.90 + 6,752.40 - 10,022.60 + 15,951.60 + 1,437.63` = **`74,183.93` บาท** 5. **VAT 7%**: `round_2(74,183.93 × 0.07) = round_2(5,192.8751)` = **`5,192.88` บาท** 6. **ยอดชำระทั้งสิ้น**: `74,183.93 + 5,192.88` = **`79,376.81` บาท** --- ## 5. ขั้นตอนที่ 1: การสร้างใบแจ้งหนี้ฉบับร่าง (`DRAFT`) และโหมดข้อมูลไม่ครบ สิทธิ์ที่ใช้งานได้: `invoice.generate` (`Developer ADMIN`, `Developer ACCOUNTING`, `Platform ADMIN`) ### การสร้างบิลเดี่ยวหรือสร้างบิลเป็นชุด (Batch Generation) 1. เลือกรอบบิล (เดือน/ปี) ที่ต้องการ และยืนยันว่าตั้งค่าอัตรา Ft ของเดือนนั้นเรียบร้อยแล้ว 2. **แบบรายไซต์**: คลิกปุ่ม **สร้างบิล** (หรือ **ออกบิลใหม่** สำหรับไซต์ที่ถูกยกเลิก) ที่แถวของไซต์หรือบนการ์ด Kanban 3. **แบบหลายไซต์พร้อมกัน**: ติ๊กช่องเลือกหน้าไซต์ที่ต้องการในสถานะ **รอสร้างบิล / ยกเลิกแล้ว** (หรือติ๊กเลือกทั้งบริษัทลูกค้า) จากนั้นกดปุ่ม **สร้างบิล X ใบ** ในแถบด้านล่าง 4. ตรวจสอบรายชื่อไซต์และบริษัทในหน้าต่างยืนยัน **ตรวจรายการบิลก่อนสร้าง** แล้วกดยืนยันเพื่อสร้างฉบับร่าง (`DRAFT`) ![หน้าต่างยืนยันรายการไซต์และบริษัทก่อนกดสร้างใบแจ้งหนี้แบบร่าง](/screenshots/th/15-billing-generate-modal.png) ::: tip การดึงข้อมูลย้อนหลังอัตโนมัติก่อนคำนวณ ทุกครั้งที่สั่งสร้างบิลในโหมดปกติ (`AUTO`) ระบบจะประมวลผลข้อมูลจาก `hes.meter_readings` ในรอบบิลนั้นซ้ำให้อัตโนมัติ (`refreshProjection`) เพื่อให้ข้อมูลที่ HES เพิ่งดึงย้อนหลังได้หลังสัญญาณ 4G/VPN ขาดหายถูกนำมาคำนวณครบถ้วน หากต้องการ **คำนวณบิลฉบับร่างใหม่** สำหรับบิลสถานะ `DRAFT` หรือ `CHECKED` เลขที่ใบแจ้งหนี้เดิมจะถูกคงไว้ เพิ่มเลข `revision` และรีเซ็ตสถานะกลับเป็น `DRAFT` เพื่อให้ฝ่าย Service ตรวจสอบใหม่ (ส่วนบิลที่ `APPROVED` แล้วจะไม่ถูกเขียนทับ) หากต้องการลบฉบับร่างทิ้ง สามารถกด **ลบแบบร่าง** ได้เฉพาะสถานะ **`DRAFT`** เท่านั้น ::: ### การออกบิลกรณีข้อมูลมิเตอร์ไม่ครบ (Fallback / Manual Billing) กรณีมิเตอร์ขัดข้องหรือสื่อสารไม่ได้เป็นเวลานานในรอบบิล: 1. คลิก **เครื่องมือเพิ่มเติม (More tools) → ออกบิลกรณีข้อมูลมิเตอร์ไม่ครบ** 2. เลือก **โครงการ** และ **วิธีคำนวณหน่วยไฟฟ้า**: - **ใช้ค่าเฉลี่ยย้อนหลังอัตโนมัติ (`ROLLING_AVG`)**: เฉลี่ยค่า `On-Peak`, `Off-Peak`, `Holiday`, `Peak Demand kW` และ `Peak kVAR` จากใบแจ้งหนี้ที่ไม่ถูกยกเลิกล่าสุดไม่เกิน 3 รอบบิล - **กรอกหน่วยไฟฟ้าที่จดจากหน้างานด้วยตัวเอง (`MANUAL`)**: กรอกค่า kWh แยกตามช่วงเวลา, Peak kW และ Peak kVAR จากหน้าจอมิเตอร์จริง - **ใช้ข้อมูล 15 นาทีเท่าที่มี (`AUTO`)** 3. กด **คำนวณและสร้างใบแจ้งหนี้** เพื่อบันทึกเป็น `DRAFT` --- ## 6. ขั้นตอนที่ 2: การตรวจรับรองทางเทคนิค (`DRAFT → CHECKED`) สิทธิ์ที่ใช้งานได้: `invoice.check` (`Developer ADMIN`, `Developer SERVICE`, `Platform ADMIN`) คลิกที่ใบแจ้งหนี้เพื่อเปิดหน้าต่างรายละเอียดฉบับร่าง (`Invoice Detail`) หรือกดปุ่ม **ตรวจบิล** บนตาราง/การ์ด Kanban ![หน้ารายละเอียดใบแจ้งหนี้สถานะแบบร่าง (DRAFT) พร้อมผลคำนวณและการตรวจสอบ](/screenshots/th/16-billing-invoice-detail-draft.png) เมื่อกด **ตรวจบิล (`DRAFT → CHECKED`)** ระบบจะรันชุดตรวจสอบอัตโนมัติ **Stage 2 Telemetry & Multiplier Audit** ทั้ง 6 ด้าน: 1. **การตรวจสอบ CT/VT Multiplier & ด้านการวัด (`Reading Side`)**: ตรวจว่า `readingSide` ไม่เป็น `UNKNOWN`, มิเตอร์ผ่านการยืนยันตัวตน (Identity) จาก HES แล้ว, ค่า `multiplierRatio` อยู่ในเกณฑ์ `[0.001, 1000000]` และคลาดเคลื่อนจาก `(CT Ratio × VT Ratio)` ไม่เกิน **5%** 2. **ความครบถ้วนของข้อมูลโหลดโปรไฟล์ 15 นาที (`Coverage`)**: เทียบจำนวนช่วงเวลาจริงกับที่คาดหวัง (`>= 95%` ผ่าน, `< 95%` หรือ `< 80%` เตือน `WARNING`, `0` ช่วงเวลา ไม่ผ่าน `FAILED`) 3. **ความต่อเนื่องเมื่อมีการสับเปลี่ยนมิเตอร์ (`Swap Continuity`)**: ตรวจว่าไม่มีข้อมูลซ้ำซ้อนทับซ้อนเวลาเดียวกันระหว่างมิเตอร์เก่าที่ปลด (`activeTo`) กับมิเตอร์ใหม่ 4. **ความสมเหตุสมผลทางกายภาพ (`Sanity`)**: ตรวจว่าไม่มีค่า kWh ติดลบ (`FAILED` หากพบ) และตรวจว่า Peak Demand ไม่เกิน **125%** ของกำลังผลิตติดตั้ง `kWp` (`WARNING` หากเกิน) 5. **เทียบหน่วยกับเลขอ่านมิเตอร์สะสม (`Register Reconciliation`)**: เทียบผลรวมพลังงานราย 15 นาทีกับผลต่างเลขอ่านสะสมต้นรอบ–ท้ายรอบของมิเตอร์ (และรายงานจำนวนช่วงเวลาที่ประมาณค่าจากช่วงสัญญาณขาดหาย `ESTIMATED`) 6. **เกณฑ์คุณภาพข้อมูล 15 นาทีจาก HES (`Interval Quality`)**: (แสดงเมื่อเปิดใช้งานโหมดตรวจสอบธงสถานะ HES หรือระบบป้องกันค่าผิดปกติ `PLAUSIBILITY_GUARD`) แสดงรายการช่วงเวลาที่ต้องตรวจทานก่อนอนุมัติ หากทุกหัวข้อไม่มีสถานะ `FAILED` ใบแจ้งหนี้จะเปลี่ยนเป็น **`CHECKED` (ตรวจแล้ว)** พร้อมบันทึก `checkedByServiceUserId`, `checkedAt` และรายงานผล Audit ในใบแจ้งหนี้ ::: info การล็อกรอบบิล (Period Lock) ทันทีที่ใบแจ้งหนี้เข้าสู่สถานะ `CHECKED` หรือ `APPROVED` ระบบจะล็อกข้อมูล `load_profile_15min` ของโครงการในช่วงเวลารอบบิลนั้น หากมีข้อมูลย้อนหลังส่งเข้ามาเพิ่มภายหลัง ข้อมูลดังกล่าวจะถูกแยกเก็บใน `late_intervals` โดยไม่แก้ตัวเลขของใบแจ้งหนี้ที่ตรวจรับรองแล้ว (ดูวิธีจัดการใน [การแก้ไขปัญหาเรื่องรอบบิลถูกล็อกและ Late Intervals](./08-troubleshooting-faq)) ::: --- ## 7. ขั้นตอนที่ 3: การอนุมัติขั้นสุดท้ายโดยฝ่ายบัญชี (`CHECKED → APPROVED`) สิทธิ์ที่ใช้งานได้: `invoice.approve` (`Developer ADMIN`, `Developer ACCOUNTING`, `Platform ADMIN`) ![หน้ารายละเอียดใบแจ้งหนี้สถานะตรวจแล้ว (CHECKED) พร้อมปุ่มลงนามอนุมัติของฝ่ายบัญชี](/screenshots/th/17-billing-invoice-detail-checked.png) 1. ตรวจสอบข้อมูลใบแจ้งหนี้สถานะ **`ตรวจแล้ว (CHECKED)`** และรายงาน Audit (ดูปุ่ม `ดูรายงานตรวจสอบ` ได้จากเมนู ⋮ หรือหน้าต่างรายละเอียด) 2. คลิก **ลงนามอนุมัติ (`Approve`)** (หรือเลือกหลายรายการในแท็บ `3. ตรวจแล้ว` เพื่ออนุมัติเป็นชุด) 3. ตรวจสอบยอดชำระสุทธิและผู้ตรวจรับรองในหน้าต่าง **ยืนยันการลงนามอนุมัติใบแจ้งหนี้ (Final Approval)** แล้วกด **ยืนยันและลงนามดิจิทัล** ### กฎเหล็กของการอนุมัติขั้นที่ 3 - **ห้ามข้ามขั้นตอน**: ไม่สามารถอนุมัติบิลจาก `DRAFT` เป็น `APPROVED` โดยตรงได้ ต้องผ่าน Stage 2 `CHECKED` ก่อนเสมอ - **การแบ่งแยกหน้าที่ (Segregation of Duties / SoD)**: **ผู้ตรวจรับรอง (`CHECKED`) และผู้อนุมัติ (`APPROVED`) ต้องเป็นคนละคนกัน** แม้จะเป็นผู้ใช้ระดับ `ADMIN` ก็ตาม หากผู้ใช้คนเดียวกับผู้ตรวจ Stage 2 พยายามกดอนุมัติ ระบบจะแสดงป้าย **`ติดเงื่อนไข SoD`** และปฏิเสธคำสั่ง - **รหัสอ้างอิงใบแจ้งหนี้ (`Invoice Reference Code`)**: ระบบจะสร้างแฮช SHA-256 รูปแบบ `SIG_AVG_<อักขระฐานสิบหก 32 ตัว>` จาก `invoiceNumber|totalPayableThb|billingMonth|checkedByServiceUserId` และพิมพ์ในแถบ Audit ด้านล่างของเอกสาร PDF ในชื่อ **`รหัสอ้างอิงใบแจ้งหนี้` / `Invoice reference code`** - **บันทึกภาพข้อมูลคู่สัญญา (`issuedSnapshot`)**: ขณะอนุมัติ ระบบจะบันทึกชื่อ ที่อยู่ เลขประจำตัวผู้เสียภาษี ลายเซ็นบริษัท และบัญชีธนาคารรับชำระเงิน ณ เวลานั้นลงในใบแจ้งหนี้ เพื่อไม่ให้การแก้ไขข้อมูลบริษัทในอนาคตเปลี่ยนแปลงเอกสารใบกำกับภาษีที่ออกไปแล้ว - **เผยแพร่สู่พอร์ทัลลูกค้า**: ใบแจ้งหนี้จะถูกล็อกถาวร (แก้ไขตัวเลขไม่ได้) และปรากฏในหน้า **Customer Billing** ให้ฝั่งผู้รับซื้อไฟฟ้าดาวน์โหลดและลงนามรับทราบได้ทันที --- ## 8. การพรีวิว PDF ส่งออกเอกสาร ยกเลิกบิล (Void) และติดตามการรับชำระเงิน ### 8.1 การพรีวิวและการส่งออกเอกสาร (PDF / ใบวางบิล / Excel / Word) คลิก **ดูตัวอย่าง PDF (`พรีวิว PDF`)** เพื่อเปิดหน้าต่างพรีวิวเอกสาร A4: ![รายละเอียดใบแจ้งหนี้ที่อนุมัติแล้วและปุ่มดูตัวอย่าง PDF ด้านล่าง](/screenshots/th/18-billing-invoice-pdf-preview.png) - **ลายน้ำตามสถานะ**: ฉบับที่ยังไม่อนุมัติ (`DRAFT`/`CHECKED`) จะมีลายน้ำทแยงว่า **`ร่าง – ยังไม่อนุมัติ / DRAFT – NOT APPROVED`**; ฉบับที่ยกเลิกจะมีลายน้ำ **`ยกเลิก / VOID`**; และฉบับที่ `APPROVED` แล้วจึงแสดง **`ต้นฉบับ / Original`** - **สลับดูฉบับลงนามแล้ว**: เมื่อลูกค้าอัปโหลดเอกสารลงนามกลับมาแล้ว สามารถสลับแท็บระหว่าง **ต้นฉบับระบบ (`System PDF`)** และ **เอกสารลงนามแล้ว (`Signed PDF`)** ได้ในหน้าต่างเดียวกัน - **ความปลอดภัยของภาพลายเซ็น (`Private Signature Previews`)**: ภาพลายเซ็นผู้มีอำนาจของบริษัทและภาพลายเซ็นลูกค้าถูกจัดเก็บแบบส่วนตัว (`private/signatures/...`) และเปิดดูผ่าน API ที่ตรวจสอบสิทธิ์ผู้ใช้โดยตรง (`Cache-Control: private, no-store`) ไม่เปิดลิงก์ไฟล์สาธารณะ - **ความครบถ้วนของข้อมูลนิติบุคคล**: ก่อนส่งออก PDF/Excel/Word ระบบจะตรวจสอบว่าทั้งผู้ขายและผู้ซื้อมี **ชื่อบริษัท เลขประจำตัวผู้เสียภาษี 13 หลัก และที่อยู่** ครบถ้วน หากขาดข้อมูลจะปฏิเสธด้วยรหัส **`422`** (ต้องเติมให้ครบใน **Settings** ก่อนออกเอกสาร) - **รูปแบบที่รองรับ**: `PDF` (ใบแจ้งหนี้/ใบกำกับภาษี A4), `ใบวางบิล (Billing Notice PDF)` (รายฉบับหรือรวมหลายฉบับ), `Excel (.xlsx)` (พร้อมตารางโหลดโปรไฟล์ราย 15 นาที), และ `Word (.docx)` (รายงานผู้บริหาร) ### 8.2 การยกเลิกใบแจ้งหนี้ (`Void`) และการออกบิลใหม่ (`Reissue`) หากพบข้อผิดพลาดหลังออกบิล (สามารถยกเลิกได้ทั้งสถานะ `DRAFT`, `CHECKED` หรือ `APPROVED` โดยผู้มีสิทธิ์ `invoice.void`): 1. เปิดเมนู `⋮` ของรายการนั้นแล้วเลือก **ยกเลิกบิล (`Void`)** 2. กรอก **เหตุผลในการยกเลิกใบแจ้งหนี้** (บังคับระบุอย่างน้อย 3 ตัวอักษร) แล้วกด **ยืนยันยกเลิกใบแจ้งหนี้** 3. บิลเดิมจะเปลี่ยนเป็น **`REJECTED` (`ยกเลิกแล้ว`)** พร้อมบันทึกผู้ยกเลิก เวลา และเหตุผลไว้เป็นหลักฐานถาวร (ไม่สามารถกู้คืนหรือลบออกจากระบบได้) และหากมีข้อมูลค้างใน `late_intervals` ระบบจะนำกลับเข้า `load_profile_15min` ให้อัตโนมัติ จากนั้นกด **ออกบิลใหม่** เพื่อสร้างเลขที่ใบแจ้งหนี้ฉบับใหม่ทดแทน ### 8.3 การอัปเดตสถานะชำระเงินและส่งอีเมลแจ้งหนี้ - **บันทึกสถานะการรับชำระเงิน**: คลิกป้ายสถานะการชำระเงิน (`รอชำระ` / `ชำระแล้ว` / `ชำระบางส่วน` / `เกินกำหนด`) ที่แถวบิลหรือบนการ์ดเพื่อระบุสถานะ (`UNPAID`, `PAID`, `PARTIAL`, `OVERDUE`), ยอดเงินที่รับชำระ, วันครบกำหนด และเลขที่อ้างอิงการโอนเงิน (เช่น `TRF-20261028-0091`) - **ส่งอีเมลแจ้งหนี้**: เปิดเมนู `⋮ → ส่งอีเมล` (หรือไอคอนซองจดหมาย) เพื่อส่งใบแจ้งหนี้ไปยังอีเมลแผนกบัญชีของลูกค้าพร้อมบันทึกประวัติการส่ง --- ## 9. รายงานเปรียบเทียบค่าไฟฟ้า (Tariff Comparison) และการเทียบบิลคู่ขนาน ### 9.1 รายงานเปรียบเทียบค่าไฟฟ้า PPA กับอัตรา กฟภ. (`Rate Comparison`) 1. ในหน้า Billing คลิก **เครื่องมือเพิ่มเติม → เทียบค่าไฟ PPA กับ กฟภ.** (หรือจากแถบเครื่องมือเสริม) 2. เลือกโครงการที่ต้องการ ระบบจะคำนวณจากข้อมูลโหลดโปรไฟล์ราย 15 นาทีชุดเดียวกันเทียบ 3 รูปแบบ: - **สัญญา PPA ปัจจุบัน (`PPA Contract`)**: อัตราตามสัญญาพร้อมส่วนลด PPA - **อัตรา TOU มาตรฐาน กฟภ. (`PEA Standard TOU`)**: ส่วนลด `0%` - **อัตราคงที่อ้างอิง (`Fixed Flat Rate Benchmark`)**: ค่าเฉลี่ยระหว่าง On-Peak และ Off-Peak (ไม่มีส่วนลดและไม่มีค่า Demand) 3. หน้าต่างจะสรุป **ยอดประหยัดค่าไฟสุทธิ (บาท)** และ **เปอร์เซ็นต์ที่ประหยัดได้ (%)** เทียบกับอัตรา กฟภ. ::: warning แถบแจ้งเตือนค่าเริ่มต้น Ft `0.3972` บาท/หน่วย ในรายงานเปรียบเทียบ หากรอบบิล `YYYY-MM` ที่เลือกยังไม่ได้ตั้งค่า Ft ในฐานข้อมูล รายงานเปรียบเทียบความคุ้มค่าจะยังคงแสดงผลให้ดูเบื้องต้นโดยใช้ค่าสำรอง **`0.3972` บาท/หน่วย** พร้อมแสดงแถบแจ้งเตือนสีเหลือง: > *"เดือน YYYY-MM ยังไม่ได้ตั้งค่า Ft ในระบบ: ใช้ค่าเริ่มต้น 0.3972 บาท/หน่วย สำหรับการเปรียบเทียบเบื้องต้น"* (แตกต่างจากการคำนวณ/ออกใบแจ้งหนี้จริงซึ่งจะปฏิเสธด้วยรหัส `422` จนกว่าจะบันทึกอัตรา Ft ที่ยืนยันแล้ว) ::: ![หน้าต่างรายงานเปรียบเทียบค่าไฟฟ้าตามสัญญา PPA กับอัตราปกติ กฟภ. และแถบแจ้งเตือนค่าเริ่มต้น Ft](/screenshots/th/19-billing-tariff-comparison.png) ### 9.2 รายงานเทียบบิลคู่ขนาน (Parallel Run: `invoice.compare`) สำหรับผู้ดูแลหรือทีมปฏิบัติการที่มีสิทธิ์ `invoice.compare` สามารถเปิดเมนู `⋮ → เทียบข้อมูลมิเตอร์` เพื่อเทียบผลคำนวณบิลจาก **ข้อมูลค่าสะสมปัจจุบัน (Readings Projection)** กับ **ข้อมูลราย 15 นาทีโดยตรงจาก HES (HES Intervals)** แยกตามมิเตอร์และช่วงเวลา TOU แบบอ่านอย่างเดียว พร้อมรายการช่วงเวลาที่ยังไม่ผ่านเงื่อนไขอนุมัติอัตโนมัติ (หากเปิดใช้งานโหมดตรวจสอบคุณภาพข้อมูล HES) --- ## คู่มือพอร์ทัลลูกค้า (ผู้รับซื้อไฟฟ้า) Source: https://docs.wattdee.com/th/07-customer-portal-guide ::: warning การอัปเดต UAT คู่มือนี้อธิบายระบบรุ่นที่จะอัปเดต หน้าจอหรือการทำงานบางส่วนอาจแตกต่างจากระบบ UAT ปัจจุบัน ::: # คู่มือการใช้งานพอร์ทัลลูกค้า (Customer Portal Guide) พอร์ทัลลูกค้าของ WattDee ออกแบบมาสำหรับองค์กรผู้รับซื้อไฟฟ้า (**Off-Taker / Customer Tier**) เพื่อติดตามการผลิตไฟฟ้าพลังงานแสงอาทิตย์แบบเรียลไทม์ ตรวจสอบผลประหยัดค่าไฟฟ้าเมื่อเทียบกับอัตรา กฟภ. ตรวจสอบเอกสารใบแจ้งหนี้อย่างเป็นทางการ และลงนามรับทราบใบแจ้งหนี้ (Countersign) ได้ในที่เดียว --- ## 1. บทบาทและขอบเขตสิทธิ์ของผู้ใช้งานฝั่งลูกค้า สิทธิ์การเข้าใช้งานในพอร์ทัลลูกค้าขึ้นอยู่กับบทบาทที่ได้รับภายใต้บริษัทลูกค้าของคุณ (ดูรายละเอียดเพิ่มเติมที่ [บทบาทและสิทธิ์การใช้งาน](./01-roles-and-permissions)): | บทบาท | หน้าหลักและกราฟ 15 นาที | สถานะมิเตอร์ | ดูใบแจ้งหนี้ (`APPROVED`) | ลงนามรับทราบ (`Countersign`) | จัดการผู้ใช้และข้อมูลบริษัท | | :--- | :---: | :---: | :---: | :---: | :---: | | **ผู้ดูแลฝั่งลูกค้า (`ADMIN`)** | เข้าถึงได้ | เข้าถึงได้ (ไม่เห็น IP ภายใน) | เข้าถึงได้ | เข้าถึงได้ | เข้าถึงได้ (จัดการทีมงานและลายเซ็นบริษัท) | | **ตัวแทนลูกค้า (`CUSTOMER`)** | เข้าถึงได้ | เข้าถึงได้ (ไม่เห็น IP ภายใน) | เข้าถึงได้ | เข้าถึงได้ | ไม่มีสิทธิ์ | | **ดูอย่างเดียว (`READER`)** | เข้าถึงได้ | เข้าถึงได้ (ไม่เห็น IP ภายใน) | ไม่มีสิทธิ์ (เข้า `/billing` ไม่ได้) | ไม่มีสิทธิ์ | ไม่มีสิทธิ์ | ::: info ความเป็นส่วนตัวของระบบและการแยกเอกสารภายใน - **เฉพาะใบแจ้งหนี้ที่อนุมัติแล้ว (`APPROVED`)**: ฝั่งลูกค้าจะเห็นเฉพาะใบแจ้งหนี้ที่ผ่านการตรวจและลงนามอนุมัติจากผู้จำหน่ายไฟฟ้าแล้วเท่านั้น เอกสารฉบับร่าง (`DRAFT`), ขั้นตอนตรวจ (`CHECKED`), รายงานตรวจสอบภายใน และใบแจ้งหนี้ที่ถูกยกเลิก (`REJECTED`) จะไม่แสดงในพอร์ทัลลูกค้า - **ซ่อนข้อมูลเครือข่ายภายในของเกตเวย์ HES**: เพื่อความปลอดภัยของโครงสร้างพื้นฐาน ผู้ใช้ฝั่งลูกค้าทุกบทบาท (รวมถึง `ADMIN`) จะไม่เห็น IP Address, พอร์ต TCP, หมายเลข SIM, สถานะรหัสผ่าน DLMS หรือปุ่มสั่งอ่าน/Backfill มิเตอร์โดยตรง ::: --- ## 2. หน้าหลักลูกค้า: แดชบอร์ดพลังงานแสงอาทิตย์และผลประหยัด เมื่อลงชื่อเข้าใช้ด้วยบัญชีฝั่งลูกค้า ระบบจะเปิดหน้า **ภาพรวมพลังงานและผลประหยัดค่าไฟ** (`/`) ซึ่งแสดงข้อมูลสรุปของบริษัทและโครงการในสังกัด: 1. **ส่วนหัวและตัวเลือกวันที่**: - แสดงชื่อบริษัทลูกค้า ป้าย **ส่วนลดค่าไฟ PPA (%)** และสถานะภาพรวมของมิเตอร์ (เช่น `ระบบผลิตไฟฟ้าทำงานปกติ` หรือ `มิเตอร์ออนไลน์ X/Y โครงการ`) - ใช้ตัวเลือกวันที่ (**DatePicker**) มุมขวาบนเพื่อย้อนดูกราฟและยอดผลิตรายวันในอดีต - ปุ่มลัด **ภาพรวมบริษัท** และ **ดูใบแจ้งหนี้ทั้งหมด** (`/billing` สำหรับ `ADMIN` และ `CUSTOMER`) 2. **แถบแจ้งเตือนใบแจ้งหนี้รอบล่าสุด (Latest Statement Banner)**: - แสดงใบแจ้งหนี้รอบล่าสุดที่อนุมัติแล้ว พร้อมเลขที่เอกสาร (`#INV-...`), ยอดชำระสุทธิรวม VAT 7%, พลังงานไฟฟ้ารวม (kWh) และสถานะการลงนาม (`ลงนามรับทราบแล้ว` หรือ `รอการลงนามยืนยันจากผู้รับซื้อ`) - คลิก **ตรวจสอบและลงนามใบแจ้งหนี้** เพื่อไปยังหน้าใบแจ้งหนี้ทันที 3. **การ์ดตัวชี้วัดหลัก 4 รายการ (KPI Cards)**: - **พลังงานแสงอาทิตย์สะสมเดือนนี้ (kWh)**: แสดงหน่วยผลิตสะสมพร้อมแถบสัดส่วนช่วงเวลา `Peak`, `Off`, `Hol` - **ค่าไฟฟ้า PPA สุทธิสะสมเดือนนี้ (บาท)**: แสดงค่าไฟ PPA (ก่อน VAT) เทียบกับยอดอัตรา กฟภ. ปกติที่ขีดฆ่าไว้ - **ผลประหยัดค่าไฟสะสมเดือนนี้ (บาท)**: ส่วนต่างที่ประหยัดได้จริงเมื่อเทียบกับอัตรา PEA TOU พร้อมยอดประหยัดของวันที่เลือก - **พลังงานแสงอาทิตย์วันนี้ (kWh)**: ปริมาณผลิตวันนี้ ค่าไฟ PPA วันนี้ และกำลังผลิตสูงสุด (Peak kW) 4. **กราฟการใช้พลังงานแสงอาทิตย์ราย 15 นาที**: - แสดงเส้นกำลังการผลิตราย 15 นาทีแยกสีตามช่วงอัตรา (`On-Peak 09:00–22:00 น. จันทร์–ศุกร์`, `Off-Peak`, และ `วันหยุด Holiday`) - ช่วงที่ขาดข้อมูลจากมิเตอร์จะแสดงเป็น **เส้นขาด (`null` gap)** ตามจริง โดยไม่เติมเลขศูนย์หลอก - คลิก **วิเคราะห์ข้อมูลเชิงลึก** เพื่อดูตารางและกราฟรายละเอียดในหน้า `/view-data` 5. **การ์ดข้อมูลสัญญาซื้อขายไฟฟ้า (PPA) และจุดติดตั้งมิเตอร์**: - แสดงขนาดติดตั้ง (`kWp`), หมายเลขซีเรียลมิเตอร์, และป้ายสถานะการเชื่อมต่อ (`ออนไลน์ปกติ`, `การสื่อสารขัดข้อง`, `รอเชื่อมต่อครั้งแรก`, `ไม่เปิดใช้งาน`) - ตารางเทียบ **อัตราค่าไฟฟ้าตามสัญญา PPA หลังหักส่วนลด** กับอัตราฐาน กฟภ. ทั้ง 3 ช่วง (`On-Peak`, `Off-Peak`, `วันหยุด`) - คลิก **ดูสถานะมิเตอร์** หรือ **กราฟรายวัน/เดือน** เพื่อเจาะลึกข้อมูลรายไซต์ (อ่านเพิ่มเติมที่ [คู่มือการติดตามมิเตอร์และข้อมูลโทรมาตร](./05-meter-and-telemetry-guide)) ![หน้าหลักพอร์ทัลลูกค้าแสดง KPI ผลประหยัด กราฟ 15 นาที และสถานะมิเตอร์ประจำโครงการ](/screenshots/th/31-customer-dashboard-and-meter.png) --- ## 3. การตรวจสอบใบแจ้งหนี้และดาวน์โหลดเอกสาร (`/billing`) ผู้ใช้บทบาท **`ADMIN`** และ **`CUSTOMER`** สามารถเปิดหน้า **ใบแจ้งหนี้และประวัติการชำระค่าไฟฟ้า** (`/billing`) เพื่อตรวจสอบและจัดการเอกสารได้ตามขั้นตอนต่อไปนี้: ### 3.1 การกรองและตรวจสอบการ์ดสรุปสถานะ 1. ใช้ตัวกรองด้านบนเพื่อเลือก **ปีรอบบิล**, **โครงการ** (กรณีมีหลายไซต์) หรือพิมพ์ **ค้นหาเลขที่ใบแจ้งหนี้ / เดือน** 2. ตรวจสอบการ์ดสรุป 3 ช่องด้านบน: - **ใบแจ้งหนี้ที่ออกแล้วทั้งหมด** - **ลงนามยืนยันรับทราบแล้ว** - **รอการลงนามจากผู้รับซื้อ** ### 3.2 การอ่านการ์ดรายละเอียดใบแจ้งหนี้ (Spotlight Statement Card) คลิกที่แถวใดก็ได้ในตาราง **ประวัติใบแจ้งหนี้ย้อนหลัง** ด้านล่าง เพื่อแสดงรายละเอียดฉบับเต็มบนการ์ดด้านบน: - **ฝั่งซ้าย (สรุปปริมาณการใช้พลังงานไฟฟ้า TOU)**: แยกหน่วย `On-Peak`, `Off-Peak`, `วันหยุด (Holiday / เสาร์–อาทิตย์)`, `ความต้องการพลังไฟฟ้าสูงสุด (Peak Demand kW)` และ `รวมปริมาณพลังงานไฟฟ้าทั้งสิ้น (kWh)` - **ฝั่งขวา (รายละเอียดการคำนวณค่าไฟฟ้า, บาท)**: แสดงค่าพลังงานไฟฟ้าฐาน, ค่าไฟฟ้าผันแปร `Ft` พร้อมอัตราต่อหน่วย, ยอดหักส่วนลดตามสัญญา PPA (คำนวณจากค่าพลังงาน + Ft ตามเกณฑ์ใน [คู่มือการออกบิล TOU](./06-billing-and-approval-guide)), `VAT 7%` และ `ยอดชำระสุทธิรวมภาษีมูลค่าเพิ่ม` - **แถบอ้างอิงด้านล่าง**: แสดงสถานะการลงนามและ **`รหัสอ้างอิงใบแจ้งหนี้`** (`SIG_AVG_...`) เพื่อใช้ตรวจสอบความถูกต้องตรงกับเอกสาร PDF ### 3.3 การพรีวิวและดาวน์โหลดเอกสาร ที่มุมขวาล่างของการ์ด Spotlight (หรือปุ่มท้ายแถวในตารางประวัติ) คุณสามารถเลือกดำเนินการได้ดังนี้: 1. **พรีวิวใบแจ้งหนี้ (PDF)**: เปิดดูเอกสาร A4 ในหน้าต่างป๊อปอัป พร้อมตัวสลับดู **ต้นฉบับระบบ (`System PDF`)** และ **เอกสารลงนามแล้ว (`Signed PDF`)** (หากอัปโหลดแล้ว) 2. **ดาวน์โหลดใบแจ้งหนี้ (PDF)**: ดาวน์โหลดใบแจ้งหนี้ / ใบกำกับภาษี (ฉบับ A4 มาตรฐาน กฟภ.) 3. **ดาวน์โหลดใบวางบิล (PDF)**: ดาวน์โหลดเอกสารใบวางบิล (`Billing Notice`) 4. **ตารางคำนวณ (Excel)**: ดาวน์โหลดไฟล์ `.xlsx` ที่มีข้อมูลโหลดโปรไฟล์ราย 15 นาทีให้ฝ่ายบัญชีตรวจสอบซ้ำได้ทุกช่วงเวลา 5. **เอกสาร (Word)**: ดาวน์โหลดรายงานสรุปผู้บริหารรูปแบบ `.docx` 6. **เปิดดู PDF ที่ลงนามแล้ว**: เปิดดูหรือดาวน์โหลดไฟล์ที่ลูกค้าลงนามอัปโหลดกลับเข้าระบบแล้ว ![หน้าใบแจ้งหนี้ฝั่งลูกค้าแสดงรายละเอียด TOU ยอดชำระ รหัสอ้างอิง และปุ่มลงนามรับทราบ](/screenshots/th/32-customer-billing-and-countersign.png) --- ## 4. ขั้นตอนการลงนามรับทราบใบแจ้งหนี้ (Countersigning) สำหรับใบแจ้งหนี้สถานะ `APPROVED` ที่ขึ้นป้าย **รอการลงนามผู้รับซื้อ** คุณสามารถลงนามรับทราบได้ **2 วิธี** (ต้องใช้สิทธิ์ `invoice.countersign` ของบทบาท `Customer ADMIN` หรือ `CUSTOMER`): ### วิธีที่ 1: อัปโหลดไฟล์ PDF ที่ลงนามแล้ว (`Upload Countersigned PDF`) เหมาะสำหรับองค์กรที่ต้องการพิมพ์เอกสารไปประทับตราบริษัทและลงนามจริง หรือลงนามอิเล็กทรอนิกส์บนไฟล์ PDF ภายนอก: 1. คลิก **ดาวน์โหลดใบแจ้งหนี้ (PDF)** และให้ผู้มีอำนาจลงนาม / ประทับตราบนเอกสาร 2. กลับมาที่หน้ารายการหรือการ์ดใบแจ้งหนี้ คลิกปุ่ม **อัปโหลด PDF ที่ลงนามแล้ว** (หรือ **ลงนาม** ในตารางประวัติ) 3. กรอก **ชื่อผู้มีอำนาจลงนาม (ในนามผู้รับซื้อไฟฟ้า)** 4. เลือกไฟล์ **`.pdf`** ที่ลงนามแล้ว (**ขนาดไม่เกิน 15 MB** ระบบตรวจสอบลายเซ็นไฟล์ `%PDF` อัตโนมัติ) 5. กด **บันทึกและอัปโหลด**: ระบบจะอัปเดตสถานะเป็น **ลงนามรับทราบแล้ว** ทันที ### วิธีที่ 2: แนบภาพลายเซ็นผู้รับซื้อไฟฟ้า (`Attach Customer Signature Image`) เหมาะสำหรับลงนามเพื่อฝังภาพลายเซ็นลงบนเอกสาร PDF ของระบบโดยตรง: 1. คลิกปุ่ม **แนบลายเซ็นผู้รับซื้อ** บนการ์ด Spotlight (หรือเมนูของตาราง) 2. กรอก **ชื่อผู้ลงนามในนามผู้รับซื้อไฟฟ้า** 3. เลือกไฟล์ภาพลายเซ็น (**แนะนำไฟล์ `.png` พื้นหลังโปร่งใส** รองรับ `.png`, `.jpg`, `.webp` ขนาดไม่เกิน **2 MB**) 4. ตรวจสอบภาพตัวอย่างในกล่อง **Customer Signature Preview** (ภาพลายเซ็นถูกจัดเก็บเป็นไฟล์ส่วนตัวและดึงมาแสดงผ่าน API ที่ตรวจสอบสิทธิ์ผู้ใช้เท่านั้น ไม่ใช้ลิงก์สาธารณะ) 5. กด **บันทึกลายเซ็น**: ภาพลายเซ็นและชื่อผู้ลงนามจะถูกนำไปพิมพ์ในช่อง **"ในนามผู้ซื้อ / Customer Signature"** บนไฟล์ PDF ใบแจ้งหนี้โดยอัตโนมัติ ::: warning กติกาการแก้ไขหลังลงนามรับทราบแล้ว เมื่อฝ่ายผู้รับซื้อไฟฟ้าได้อัปโหลด PDF ที่ลงนามแล้วหรือภาพลายเซ็นเข้าสู่ระบบแล้ว **ไฟล์ดังกล่าวจะถูกล็อกถาวร** เพื่อป้องกันการแก้ไขย้อนหลัง (หากผู้ใช้ฝั่งลูกค้าหรือผู้พัฒนาพยายามอัปโหลดทับ ระบบจะปฏิเสธด้วยรหัส `409 Conflict`) หากจำเป็นต้องเปลี่ยนไฟล์เนื่องจากอัปโหลดผิดฉบับ กรุณาติดต่อ **Platform Super Administrator** เพื่อดำเนินการเปลี่ยนให้เป็นกรณีพิเศษ ::: --- ## 5. การจัดการบัญชีผู้ใช้ฝั่งลูกค้าและการเปลี่ยนรหัสผ่าน - **ผู้ดูแลฝั่งลูกค้า (`Customer ADMIN`)**: สามารถเข้าหน้า **การตั้งค่า (Settings)** เพื่อเพิ่ม แก้ไข หรือระงับบัญชีเพื่อนร่วมงานในบริษัท (`CUSTOMER` และ `READER`) ตั้งค่าข้อมูลนิติบุคคล (เช่น เลขประจำตัวผู้เสียภาษี 13 หลักและที่อยู่สำหรับใบกำกับภาษี) รวมถึงอัปโหลดภาพลายเซ็นองค์กรได้ - **ผู้ใช้งานทุกคน**: สามารถเปลี่ยนรหัสผ่านของตนเองได้ตลอดเวลาโดยคลิกที่ชื่อบัญชีมุมซ้ายล่างของแถบเมนู → **เปลี่ยนรหัสผ่าน (`Change password`)** (เมื่อเปลี่ยนรหัสผ่าน ระบบจะออกจากระบบบนอุปกรณ์อื่นทั้งหมดเพื่อความปลอดภัยอัตโนมัติ) หากพบปัญหาในการเข้าสู่ระบบหรือการดาวน์โหลดเอกสาร ดูแนวทางแก้ไขเพิ่มเติมได้ที่ [การแก้ไขปัญหาและคำถามที่พบบ่อย](./08-troubleshooting-faq) --- ## การแก้ไขปัญหา คำถามที่พบบ่อย และการเชื่อมต่อ AI Source: https://docs.wattdee.com/th/08-troubleshooting-faq ::: warning การอัปเดต UAT คู่มือนี้อธิบายระบบรุ่นที่จะอัปเดต หน้าจอหรือการทำงานบางส่วนอาจแตกต่างจากระบบ UAT ปัจจุบัน ::: # การแก้ไขปัญหา คำถามที่พบบ่อย และการเชื่อมต่อ AI คู่มือนี้รวบรวมปัญหาที่พบบ่อยในการออกบิล การควบคุมสิทธิ์ การเข้าสู่ระบบ การเชื่อมต่อมิเตอร์ วิธีแก้ไขทีละขั้นตอน รวมถึงวิธีใช้งานคู่มือ WattDee ร่วมกับ AI Assistants และ Agents --- ## 1. Error `422`: ไม่มีอัตราค่า Ft สำหรับรอบบิลเมื่อกดสร้างใบแจ้งหนี้ ### อาการที่พบ - ระบบปฏิเสธการคำนวณหรือสร้างใบแจ้งหนี้ด้วยข้อความ: `No Ft (Fuel Adjustment Tariff) rate is on record for YYYY-MM. Refusing to generate: billing would require inventing a rate.` (HTTP **`422`**) - ด้านบนของหน้า `/billing` หรือส่วนงานที่ต้องทำบน Dashboard แสดงแถบแจ้งเตือน **"ต้องยืนยันอัตรา Ft (`Ft verification required`)"** ### สาเหตุ 1. ระบบไม่อนุญาตให้สมมติอัตรา Ft สำหรับการออกใบแจ้งหนี้ทางการเงินจริง หากยังไม่มีบันทึกอัตรา Ft ตามประกาศ กกพ. ประจำเดือน `YYYY-MM` ในฐานข้อมูล การออกบิลจะถูกระงับทันที 2. มีเพียง **Platform Administrator** (สิทธิ์ `ftrate.write`) เท่านั้นที่กำหนดหรือแก้ไขอัตรา Ft ได้ บัญชีฝั่งผู้พัฒนา (`Developer ADMIN` / `ACCOUNTING`) ไม่สามารถตั้งค่า Ft เองได้ ### วิธีแก้ไขทีละขั้นตอน 1. ให้ **Platform Administrator** ลงชื่อเข้าใช้และไปที่หน้า `/billing` แล้วคลิก **ยืนยันอัตรา Ft** ในแถบเตือนสีเหลือง (หรือไปที่ **การตั้งค่า → การคิดบิล/อัตรา**) 2. ตรวจสอบเดือนรอบบิล (`YYYY-MM`) และกรอก **อัตรา Ft (บาท/หน่วย)** ตามประกาศ กกพ. (ในช่วง `-2.0000` ถึง `10.0000`) 3. กด **ยืนยันอัตรา Ft ประจำรอบบิล** จากนั้นกลับมาที่ `/billing` เพื่อสร้างใบแจ้งหนี้ตามปกติ (รายละเอียดเพิ่มเติมดูที่ [คู่มือการออกบิล TOU](./06-billing-and-approval-guide)) ::: tip เหตุใดหน้า "เทียบค่าไฟ PPA กับ กฟภ." จึงยังคำนวณได้แม้ยังไม่ตั้งค่า Ft? หน้าต่าง **เทียบค่าไฟ PPA กับ กฟภ.** (`/api/billing/rate-comparison`) เป็นเพียงการประมาณการเปรียบเทียบเบื้องต้น หากเดือนนั้นยังไม่มีอัตรา Ft ระบบจะใช้ค่าเริ่มต้น **`0.3972` บาท/หน่วย** ชั่วคราวพร้อมแสดง **แถบแจ้งเตือนสีเหลือง** ด้านบนเพื่อเตือนให้ผู้ใช้งานทราบว่าตัวเลขดังกล่าวยังไม่ใช่ค่า Ft ที่ยืนยันแล้ว ![แถบแจ้งเตือนค่าเริ่มต้น Ft 0.3972 บาท/หน่วย ในหน้าต่างเปรียบเทียบค่าไฟฟ้า](/screenshots/th/19-billing-tariff-comparison.png) ::: --- ## 2. Error `422`: รอบบิลยังไม่สิ้นสุด (`Open Billing Period` กับสิทธิ์ `invoice.issueEarly`) ### อาการที่พบ - เมื่อกด **สร้างบิล** ก่อนวันสิ้นสุดรอบบิล (โดยเฉพาะผู้ใช้บทบาท `ACCOUNTING`) ระบบแจ้งเตือน: `Billing period YYYY-MM has not ended (X/Y days elapsed)...` (HTTP **`422`**) หรือ *"รอบบิล ... ยังไม่สิ้นสุด - ออกใบแจ้งหนี้ได้หลังสิ้นรอบ หรือให้ผู้ดูแลระบบของบริษัทออกก่อนสิ้นรอบ"* ### สาเหตุ - ตามกติกาธุรกิจ (BL-1) ใบแจ้งหนี้รายเดือนต้องคำนวณหลังจากรอบบิลปิดสมบูรณ์แล้ว (ตาม `billingCycleDay` ในเวลา `Asia/Bangkok UTC+7`) เพื่อป้องกันการออกบิลที่ขาดข้อมูลช่วงปลายเดือน - เฉพาะผู้ที่มีสิทธิ์ **`invoice.issueEarly`** (`Developer ADMIN` และ `Platform ADMIN`) เท่านั้นที่ยืนยันการออกบิลก่อนสิ้นรอบได้ ส่วน `Developer ACCOUNTING` ต้องรอให้พ้นวันตัดรอบก่อน (และไม่อนุญาตให้ออกบิลสำหรับเดือนในอนาคตที่ยังไม่เริ่มโดยเด็ดขาด) ### วิธีแก้ไขทีละขั้นตอน 1. หากเป็นรอบบิลปัจจุบันที่ยังไม่ครบกำหนดตัดรอบ ให้รอจนพ้นเวลา `00:00` น. ของวันตัดรอบถัดไปแล้วจึงกด **สร้างบิล** 2. หากจำเป็นต้องออกบิลปิดยอดกลางเดือน (เช่น ปิดสัญญาหรือทดสอบระบบ) ให้ **Developer ADMIN** หรือ **Platform ADMIN** กด **สร้างบิล** และยืนยันในหน้าต่าง **"รอบบิลยังไม่สิ้นสุด"** โดยกด **ออกก่อนสิ้นรอบ** --- ## 3. เหตุใดผู้ตรวจบิล (`CHECKED`) และผู้อนุมัติ (`APPROVED`) ต้องเป็นคนละคนกัน ### อาการที่พบ - บนการ์ด Kanban หรือตารางรวม ปุ่มอนุมัติเปลี่ยนเป็นป้าย **`ติดเงื่อนไข SoD`** (ไอคอนโล่ล็อก) หรือพบข้อความแจ้งเตือน: `Segregation of duties violation: The accounting approver cannot be the same user who performed the technical service check.` ### สาเหตุ ระบบบังคับใช้หลักการควบคุมภายในแบบ **Dual Control / Segregation of Duties (`checker ≠ approver`)**: 1. บัญชีผู้ใช้ที่กดตรวจรับรองทางเทคนิค Stage 2 (`checkedByServiceUserId`) **ไม่สามารถ** กดอนุมัติขั้นสุดท้าย Stage 3 (`APPROVED`) บนใบแจ้งหนี้ฉบับเดียวกันได้ **แม้ว่าผู้ใช้นั้นจะเป็น `ADMIN` ที่มีสิทธิ์ทั้งสองขั้นก็ตาม** 2. ใบแจ้งหนี้ไม่สามารถข้ามจาก `DRAFT` เป็น `APPROVED` โดยไม่ผ่าน `CHECKED` ได้ ### วิธีแก้ไขทีละขั้นตอน 1. ให้วิศวกรปฏิบัติการ (`SERVICE`) หรือผู้ดูแลระบบคนที่ 1 ตรวจรับรองขั้นที่ 2 (`DRAFT → CHECKED`) 2. ให้เจ้าหน้าที่ฝ่ายบัญชี (`ACCOUNTING`) หรือผู้ดูแลระบบ **อีกคนหนึ่ง** ลงชื่อเข้าใช้ด้วยบัญชีของตนเองเพื่อกด **ลงนามอนุมัติ (`CHECKED → APPROVED`)** --- ## 4. รอบบิลถูกล็อกและมีข้อมูลพลังงานเข้ามาหลังปิดรอบ (`Locked Period` และ `late_intervals`) ### อาการที่พบ - ในส่วน **ต้องดำเนินการ (Action Queue)** บนหน้า Dashboard แสดงรายการ: `พลังงานเข้ามาหลังปิดรอบบิล X ไซต์ (Y kWh ยังไม่อยู่ในใบแจ้งหนี้)` - หรือไม่สามารถสับเปลี่ยนมิเตอร์/รันประมวลผลข้อมูลย้อนหลังทับเดือนที่ออกบิลไปแล้วได้ ### สาเหตุ 1. ทันทีที่ใบแจ้งหนี้เข้าสู่สถานะ **`CHECKED`** หรือ **`APPROVED`** ช่วงเวลาของใบแจ้งหนี้นั้น (`[billingPeriodStart, billingPeriodEnd)`) จะ **ถูกล็อก (`Period Lock`)** เพื่อรับประกันว่าข้อมูลโหลดโปรไฟล์ 15 นาที (`load_profile_15min`) ในฐานข้อมูลจะตรงกับตัวเลขที่พิมพ์บนใบแจ้งหนี้เสมอ 2. หากมิเตอร์เพิ่งส่งข้อมูลย้อนหลังเข้ามาหลังสัญญาณขาดหาย (Backfill) หรือมีการแก้ไขค่าอ่านในช่วงเวลาที่ล็อกไว้ ระบบประมวลผลจะ **ไม่เขียนทับ** `load_profile_15min` แต่จะแยกข้อมูลใหม่/ที่เปลี่ยนแปลงไปเก็บในตาราง **`late_intervals`** และรายงานผลรวมแยกตามช่วง TOU และ Peak Demand ให้เห็นทันที ### วิธีแก้ไขทีละขั้นตอน 1. ตรวจสอบปริมาณหน่วยไฟที่เข้ามาทีหลังบน Dashboard (Action Queue) หรือเรียกดูรายละเอียดผ่าน API `GET /api/billing/late-intervals` 2. ตัดสินใจตามสถานะของใบแจ้งหนี้: - **กรณีบิลยังอยู่ในสถานะ `CHECKED` (ยังไม่ได้อนุมัติส่งลูกค้า)**: ให้สั่งคำนวณบิลใหม่ (หรือเปลี่ยนสถานะกลับเป็น `DRAFT`) ระบบจะนำข้อมูลจาก `late_intervals` มาเขียนลง `load_profile_15min` ให้อัตโนมัติใน Transaction เดียวกัน จากนั้นให้ตรวจรับรอง Stage 2 และอนุมัติ Stage 3 ใหม่อีกครั้ง - **กรณีบิลอยู่ในสถานะ `APPROVED` แล้ว**: หากยอดพลังงานที่ตกหล่นมีนัยสำคัญและต้องออกบิลใหม่ ให้กด **ยกเลิกบิล (`Void`)** พร้อมระบุเหตุผล (ระบบจะนำ `late_intervals` กลับมาอัปเดตให้ทันที) แล้วกด **ออกบิลใหม่ (`Reissue`)** เพื่อสร้างใบแจ้งหนี้ฉบับใหม่ที่รวมหน่วยครบถ้วน --- ## 5. เหตุใด `READER` และ `OPERATOR` เข้า `/billing` ไม่ได้ และทำไม `READER` ไม่เห็น IP มิเตอร์ ### สาเหตุที่เข้าหน้า `/billing` ไม่ได้ (`AccessDenied`) สิทธิ์ใน WattDee ถูกกำหนดจาก **ประเภทองค์กร × บทบาท (`Tier × Role`)** ไม่ได้ดูจากชื่อบทบาทเพียงอย่างเดียว (ดูตารางเต็มที่ [บทบาทและสิทธิ์การใช้งาน](./01-roles-and-permissions)): - การเปิดหน้า `/billing` ต้องมีสิทธิ์ **`invoice.view`** - **`Customer READER` (ดูอย่างเดียว)**: มีไว้ดูกราฟการผลิตและสถานะมิเตอร์เท่านั้น ไม่มีสิทธิ์ด้านเอกสารการเงินหรือการตั้งค่าใดๆ - **`Developer OPERATOR` (ผู้ควบคุมระบบ)**: มีไว้เฝ้าระวังมิเตอร์ ทดสอบการเชื่อมต่อ และจัดการการแจ้งเตือน ไม่เกี่ยวข้องกับการออกบิล - หากบัญชีทั้งสองพยายามเข้า `/billing` โดยตรง หน้าเว็บจะแสดงหน้า **`ไม่มีสิทธิ์เข้าถึงข้อมูลการเรียกเก็บเงิน (Billing)` (`AccessDenied`)** ### สาเหตุที่ `READER` (และผู้ใช้ฝั่งลูกค้า) ไม่เห็น IP Address ของมิเตอร์ - การดู IP Address, พอร์ต, หมายเลข SIM และรายละเอียดเครือข่ายเกตเวย์ของมิเตอร์ต้องมีสิทธิ์ **`meter.network.read`** - บทบาทฝั่งลูกค้าทั้งหมด (`Customer ADMIN`, `CUSTOMER`, `READER`) รวมถึง `Developer ACCOUNTING` **ไม่ได้รับสิทธิ์ `meter.network.read`** เพื่อป้องกันการเปิดเผยโครงสร้าง VPN/SIM ภายใน - ทั้ง Backend API (`stripMeterNetworkFields`) และหน้า UI จะตัดข้อมูล `ipAddress`, `port`, `simCardId` และ `lastError` ของเกตเวย์ออกโดยอัตโนมัติ ### วิธีแก้ไข หากผู้ใช้งานจำเป็นต้องตรวจดูใบแจ้งหนี้หรือข้อมูลเครือข่าย ให้ติดต่อ **ผู้ดูแลองค์กร (Organization Admin)** เพื่อปรับบทบาทให้เหมาะสม (เช่น เปลี่ยนจาก `READER` เป็น `CUSTOMER` เพื่อดูและลงนามใบแจ้งหนี้ หรือเปลี่ยนเป็น `SERVICE`/`OPERATOR` สำหรับทีมเทคนิคฝั่งผู้พัฒนา) --- ## 6. ติดจำกัดความถี่การเข้าสู่ระบบ (`429`) และวิธีรีเซ็ตรหัสผ่านเมื่อลืมรหัสผ่าน ![หน้าเข้าสู่ระบบ WattDee พร้อมการแจ้งเตือนเมื่อรหัสผ่านผิดหรือเข้าสู่ระบบถี่เกินกำหนด](/screenshots/th/01-login-page.png) ### กรณีขึ้นข้อความ "มีการเข้าสู่ระบบหลายครั้งเกินไป" (`429 Too Many Requests`) - **สาเหตุ**: ในโหมดใช้งานจริง (Production) ระบบยืนยันตัวตน (BetterAuth) จำกัดความถี่ในการพยายามลงชื่อเข้าใช้ไม่เกิน **ประมาณ 3 ครั้งภายใน 10 วินาทีต่อ IP Address** เพื่อป้องกันการเดารหัสผ่าน - **วิธีแก้ไข**: 1. หยุดกดปุ่มเข้าสู่ระบบและรออย่างน้อย **10–15 วินาที** ก่อนลองใหม่อีกครั้ง 2. ตรวจสอบภาษาของแป้นพิมพ์ ปุ่ม Caps Lock และตัวสะกดของอีเมลให้ถูกต้อง ### กรณีลืมรหัสผ่านเข้าสู่ระบบ (ไม่มีลิงก์ "ลืมรหัสผ่าน" หรือ "สมัครสมาชิก") - **สาเหตุ**: WattDee ปิดการสมัครสมาชิกสาธารณะและปิดการรีเซ็ตรหัสผ่านเองโดยไม่มีการยืนยันตัวตน เพื่อความปลอดภัยของข้อมูลหลายองค์กร (Multi-Tenant Security) มีเพียงผู้ดูแลระบบขององค์กรเท่านั้นที่รีเซ็ตให้ได้ - **วิธีรีเซ็ตรหัสผ่านโดยผู้ดูแล (`Admin Reset Password`)**: 1. ติดต่อ **ผู้ดูแลบริษัท (`Company ADMIN` / `Developer ADMIN`)** หรือ **Platform Administrator** 2. ให้ผู้ดูแลเข้าไปที่ **การตั้งค่า → บริษัท → ผู้ใช้และสิทธิ์ (`People & access`)** แล้วกดไอคอน **แก้ไข (`Edit`)** ที่ชื่อของคุณ 3. ในหัวข้อ **ตั้งรหัสผ่านใหม่ (`Reset password`)** ผู้ดูแลสามารถพิมพ์รหัสผ่านใหม่ที่ตรงตามเกณฑ์ความปลอดภัย (ยาวอย่างน้อย 8 ตัวอักษร มี `A-Z`, `a-z`, `0-9` และอักขระพิเศษ `!@#$%&*`) หรือ **เว้นว่างไว้เพื่อสุ่มรหัสผ่านชั่วคราว (แสดงครั้งเดียว)** แล้วกด **ตั้งรหัสผ่านใหม่** 4. ระบบจะออกจากระบบบนอุปกรณ์เดิมทั้งหมดโดยอัตโนมัติ เมื่อได้รหัสผ่านใหม่และลงชื่อเข้าใช้แล้ว แนะนำให้เปลี่ยนเป็นรหัสผ่านส่วนตัวทันทีที่ **เมนูบัญชีมุมซ้ายล่าง → เปลี่ยนรหัสผ่าน** --- ## 7. มิเตอร์แสดงสถานะ `ขาดการติดต่อ` (`Offline`): วิธีตรวจ VPN และ `ทดสอบการเชื่อมต่อ` มิเตอร์จะถูกจัดอยู่ในสถานะ **`ขาดการติดต่อ (Offline)`** เมื่อไม่ได้ส่งข้อมูลเข้ามามากกว่า **1 ชั่วโมง (`60 นาที`)** หรือเมื่อ HES แจ้งสถานะขัดข้อง (`commLostAt` / `verification_failed` / `inactive`) ให้ตรวจสอบตามลำดับต่อไปนี้ (ต้องมีสิทธิ์ `meter.command`, `meter.network.read` หรือ `vpn.manage`; ดูเพิ่มเติมที่ [คู่มือการติดตามมิเตอร์และข้อมูลโทรมาตร](./05-meter-and-telemetry-guide)): 1. **ตรวจสถานะการเปิดใช้งานใน HES**: - เปิดหน้า **การตั้งค่า → ไซต์ → มิเตอร์** แล้วดูแท็กสถานะ หากขึ้นว่า **`ปิดใน HES - ไม่ถูกอ่านค่า`** หรือ **`HES รอตรวจสอบ`** ให้ตรวจสอบว่าตั้งค่าเรียบร้อยแล้วกดปุ่ม **เปิดใช้งานใน HES (`Activate in HES`)** 2. **ตรวจสอบการเชื่อมต่อ VPN (กรณีเชื่อมต่อแบบ `VPN (Mikrotik)`)**: - ให้ `Platform ADMIN` เข้าที่ **การตั้งค่า → บริษัทผู้พัฒนา → โปรไฟล์ VPN (`VPN profiles`)** และกด **อัปเดตสถานะ (`Refresh status`)** - ตรวจสอบว่าสถานะท่อ VPN เป็น **`เชื่อมต่อ VPN แล้ว` (`tunnel_up`)** (หากขึ้น `controller_offline`, `runner_error`, `pending` หรือ `disabled` ต้องตรวจสอบอุปกรณ์ Mikrotik / อินเทอร์เน็ตหน้างาน) - ตรวจสอบว่าได้ผูกมิเตอร์เข้ากับโปรไฟล์ VPN ที่ถูกต้อง และ IP ของมิเตอร์อยู่ในช่วง `allowed_ips` 3. **กดปุ่ม `ทดสอบการเชื่อมต่อ` (`Test connection`)**: - เปิดแผงรายละเอียดมิเตอร์ในหน้า `/meter` (แท็บการตรวจสอบ) หรือในหน้าตั้งค่ามิเตอร์ แล้วกด **ทดสอบการเชื่อมต่อ** จากนั้นอ่านคำอธิบายผลจาก HES: - `config_error` / ยังไม่มีรหัสผ่าน LLS: ต้องตั้งค่า LLS Password บนเครื่อง HES และรีสตาร์ทบริการ HES - `auth_failed`: มิเตอร์ปฏิเสธรหัสผ่าน LLS ให้ตรวจว่ารหัสผ่านบน HES ตรงกับที่ตั้งบนตัวมิเตอร์ - `operation was canceled` (หมดเวลา session): เชื่อมต่อ TCP ได้แต่มิเตอร์ไม่ตอบ มักเกิดจากเลือก Interface ผิดระหว่าง **`HDLC`** (ผ่านโมเด็ม 4G/ตัวแปลงสัญญาณ) กับ **`WRAPPER`** (เสียบสาย LAN ตรงที่ตัวมิเตอร์) - `connect_failed` / `poll_timeout`: ติดต่อ IP/พอร์ต (ค่าเริ่มต้น `4059`) ไม่ได้ ให้เช็กไฟเลี้ยงมิเตอร์ สัญญาณซิม 4G/APN ท่อ VPN และการ Forward พอร์ต - `protocol_error`: ตรวจสอบรุ่นมิเตอร์ (`Saral 305`, `Premier 550`, `Prometer 100`) และ Interface ให้ตรงกับอุปกรณ์จริง 4. **กู้คืนข้อมูลช่วงที่ขาดหาย**: - เมื่อ `ทดสอบการเชื่อมต่อ` ผ่านแล้ว ให้กด **อ่านค่าทันที (`Read now`)** หรือสั่ง **Backfill** (ดึงย้อนหลังได้สูงสุด 31 วันต่อคำสั่ง) เพื่อให้ HES ดึงโหลดโปรไฟล์ที่เก็บอยู่ในหน่วยความจำมิเตอร์กลับมาคำนวณ --- ## 8. การใช้งานคู่มือ WattDee ร่วมกับ AI Assistants และ Agents คู่มือผู้ใช้งาน WattDee เผยแพร่อยู่ที่ **`https://docs.wattdee.com`** พร้อมช่องทางมาตรฐานสำหรับ AI Assistants, LLM และ Coding Agents ดังนี้: | ช่องทาง | ที่อยู่ / คำสั่ง | เหมาะสำหรับ | | :--- | :--- | :--- | | **ดัชนีเอกสารสำหรับ AI (`/llms.txt`)** | `https://docs.wattdee.com/llms.txt` | ให้ AI Agent อ่านสารบัญ URL และสรุปเนื้อหาของคู่มือทุกหน้า (ทั้งไทยและอังกฤษ) เพื่อค้นหาหน้าที่เกี่ยวข้องได้อย่างรวดเร็ว | | **คู่มือฉบับเต็มในไฟล์เดียว (`/llms-full.txt`)** | `https://docs.wattdee.com/llms-full.txt` | ดาวน์โหลดหรือส่งให้ AI อ่านเนื้อหา Markdown ทั้งหมดของคู่มือทั้ง 2 ภาษาในครั้งเดียว (หรือเลือกเฉพาะภาษาได้ที่ `/th/llms-full.txt` และ `/en/llms-full.txt`) | | **MCP Server สำหรับเครื่องมือ AI** | `bun run docs:mcp` | เชื่อมต่อ Model Context Protocol (MCP) เข้ากับ Claude Desktop, Cursor หรือ Antigravity พร้อมเครื่องมือ `search_wattdee_manual`, `get_wattdee_guide` และ `get_role_capabilities` | ### ตัวอย่างการตั้งค่า `bun run docs:mcp` ใน MCP Client ในโฟลเดอร์หลักของโปรเจกต์ AMR สามารถเรียกใช้งานเซิร์ฟเวอร์ MCP ของเอกสารคู่มือผ่านคำสั่ง: ```bash bun run docs:mcp ``` หรือเพิ่มรายการในไฟล์ตั้งค่า MCP Client ของคุณ (ปรับพาธให้ตรงกับเครื่องที่รัน): ```json { "mcpServers": { "wattdee-docs": { "command": "bun", "args": ["run", "docs:mcp"], "cwd": "/path/to/AMR" } } } ``` ::: tip ตัวอย่างคำถามที่ถาม AI Assistant ได้ทันทีหลังเชื่อมต่อ - *"ตรวจสอบสูตรคำนวณส่วนลด PPA และภาษีมูลค่าเพิ่ม 7% ในคู่มือ WattDee ให้หน่อย"* - *"ลูกค้าขึ้นหน้า AccessDenied ตอนเข้า /billing ต้องปรับสิทธิ์อย่างไรตามคู่มือ?"* - *"สรุปขั้นตอนแก้ปัญหาเมื่อเจอ Error 422 ไม่มีอัตรา Ft หรือรอบบิลยังไม่สิ้นสุด"* ::: --- # WattDee User Manual (English) ## WattDee User Manual (English) Source: https://docs.wattdee.com/en/ ::: warning UAT release This guide describes the upcoming portal update. Some screens or actions may differ in the current UAT portal. :::
WattDee LogoWattDee Operations Manual

WattDee AMR & Private PPA Operations Manual

Step-by-step operational documentation for platform administrators, solar developers, O&M engineers, accounting teams, and customer off-takers covering DLMS/COSEM meter onboarding, 15-minute VEE telemetry repair, PEA Time-of-Use billing, and 3-tier invoice approval.

WattDee Portfolio Dashboard showing Health Strip, TOU KPIs, generation curve, and Action Queue
01 DLMS Meter & VPN Register meters under US-1.19 automatic serial discovery, configure CT/VT multipliers, and attach WireGuard, IPsec, or OpenVPN profiles.
02 15-Minute VEE Profile Track 15-minute Asia/Bangkok intervals with zero fake zeros, run linear or rolling-average VEE repair, and backfill from meter memory.
03 3-Stage TOU Invoice Calculate PEA Peak/Off-Peak/Holiday invoices using verified monthly Ft rates under DRAFT → CHECKED → APPROVED Segregation of Duties.
04 Off-Taker Countersign Customer off-takers monitor solar generation and countersign strictly APPROVED invoices (drafts and internal IPs stay isolated).
## Quick Role Lookup Jump directly to the guide that matches your organization tier and role: | Role | Core Responsibilities | Guide | | :--- | :--- | :--- | | **Platform Admin** | Monitor the full portfolio, onboard solar developer companies, publish electricity tariffs and monthly Ft rates, manage bank accounts, public holidays, database health, and audit logs. | [Platform Admin Guide](./03-platform-admin-guide) | | **Solar Developer** | Update company profile and invoice signatures, onboard customer companies (off-takers), configure sites and PPA contracts, register meters (`US-1.19`), coordinate VPN setup with a platform administrator, and invite staff. | [Developer Admin Guide](./04-developer-admin-guide) | | **Service & Operator** | Monitor fleet meter status, run live HES connection tests and read-now probes, handle mid-cycle swaps, inspect 15-minute telemetry, run VEE gap repair, backfill, and compare periods. | [Meter & Telemetry Guide](./05-meter-and-telemetry-guide) | | **Accounting** | Generate TOU PPA invoices, manage the 3-tier draft-check-approve workflow, handle late intervals and voiding, and export invoice PDFs. | [Billing & Approval Guide](./06-billing-and-approval-guide) | | **Customer Off-taker** | Sign in, monitor solar generation at your company sites, inspect TOU energy curves, manage customer staff, and countersign approved invoices. | [Customer Portal Guide](./07-customer-portal-guide) · [Roles & Permissions](./01-roles-and-permissions) | | **Troubleshooting & AI** | Resolve missing Ft `422` errors, period locks, `AccessDenied`, `429` sign-in limits, offline meters, and connect `llms.txt` or MCP clients. | [Troubleshooting & FAQ](./08-troubleshooting-faq) | ## Manual Directory (Chapters 01 to 08)
Chapter 01 Roles and Permissions Understand the Organization Tier × Role authorization model and how to inspect the read-only permissions matrix. Chapter 02 Login and Account Guide Sign in, navigate the portfolio switcher and global search, manage alerts in the notification center, switch language/theme, and change passwords. Chapter 03 Platform Admin Guide Portfolio dashboard, creating developer companies, tariffs and monthly Ft rates, bank accounts, public holidays, database partitions, and system audit logs. Chapter 04 Developer Admin Guide Company profile and digital signatures, onboarding customers, guided site/PPA/meter setup, VPN profiles, and user management. Chapter 05 Meter and Telemetry Guide Fleet monitoring, company/site/meter drill-down, HES diagnostics, mid-cycle swaps, 15-minute telemetry zoom ladder, VEE repair, backfill, and period comparison. Chapter 06 Billing and Approval Guide TOU invoice calculation, 3-tier check/approve workflow, customer countersigning, and period locks. Chapter 07 Customer Portal Guide Off-taker experience for monitoring site solar output, checking savings, inspecting approved invoices, and countersigning. Chapter 08 Troubleshooting, FAQ & AI Integration Step-by-step fixes for common billing, permission, sign-in, and meter issues, plus llms.txt and MCP usage.
::: info AI & Documentation Index Plain-text documentation index for AI tools and MCP clients is available at /llms.txt, with the full English bundle at /en/llms-full.txt and local MCP server via `bun run docs:mcp`. Looking for Thai? Open the [Thai Manual (`/th/`)](/th/). :::
--- ## Roles and Permissions Source: https://docs.wattdee.com/en/01-roles-and-permissions ::: warning UAT release This guide describes the upcoming portal update. Some screens or actions may differ in the current UAT portal. ::: # Roles and Permissions **Who is this for:** All Roles Platform Admin Developer Admin Customer Admin **Prerequisites:** - An active user account created by an administrator (public self-registration is disabled). - To view the in-app permissions table, your role must have user-management access (`Platform administrator`, `Company administrator`, or `Customer administrator`). --- ## How Access Works: Organization Tier × Role In WattDee, **access is never granted per individual site**. Every user's access comes from two facts enforced by the server: 1. **Organization Tier** determines **which companies and sites** you can reach. 2. **Role within that Organization** determines **which actions** you are allowed to perform on those companies and sites. ::: warning Same Role Name, Different Powers Across Tiers The `ADMIN` role does **not** mean the same thing in every organization: - `ADMIN` in the **Platform owner** organization (**Platform administrator**) manages all companies, all sites, shared reference data, and system settings. - `ADMIN` in a **Solar developer** organization (**Company administrator**) manages only their own company, their own customer companies, their developed sites, meters, and billing. - `ADMIN` in a **Customer company** (**Customer administrator**) manages only staff inside their own customer company and countersigns approved invoices. They cannot edit meters, contracts, or draft invoices. ::: --- ## Organization Tiers & Data Scope | Organization Tier | UI Label | Reachable Sites | Primary Purpose | | :--- | :--- | :--- | :--- | | **Platform owner** (`SUPER_ADMIN`) | **Platform owner** | **All companies and all sites** | Platform-wide governance: developer onboarding, electricity tariffs, monthly Ft rates, public holidays, bank accounts, VPN profiles, database health, and audit logs. | | **Solar developer** (`DEVELOPER`) | **Solar developer** | **Sites developed by the company** and its customer companies | Onboard off-taker customers, set up sites and PPA contracts, register/operate meters, repair telemetry, and issue/approve invoices. | | **Customer company** (`OFFTAKER`) | **Customer company** | **Sites where the company buys power** | Monitor generation, review 15-minute data, view approved invoices, and countersign invoices. | --- ## Roles by Organization Tier ### 1. Platform Owner Tier | Role Code | UI Title | Access Level | Capabilities & Scope | | :--- | :--- | :--- | :--- | | `ADMIN` | **Platform administrator** | Manage | Full platform authority (all 33 capabilities): create/delete companies, change company types, set active meter limits, manage users across all organizations, configure tariffs, publish monthly Ft rates, edit public holidays, manage bank accounts, manage VPN profiles, override meter serial numbers and confirm HES-detected swaps, issue early invoices, view database health, and inspect system audit logs. | | `SERVICE` | **Central operations team** | Operate | Monitors meters and communications across **all sites**: register/edit/replace meters (`meter.write`), run connection tests & read-now commands, view meter IP/port/SIM details, reprocess/repair 15-minute telemetry, view data quality reasons, acknowledge/snooze/assign meter alarms, view parallel billing comparisons, and read Ft rates/holidays. *(Cannot manage companies/users, change tariffs/banks/holidays, or generate/approve invoices.)* | ### 2. Solar Developer Tier | Role Code | UI Title | Access Level | Capabilities & Scope | | :--- | :--- | :--- | :--- | | `ADMIN` | **Company administrator** | Manage | Edits own developer profile, logo, and invoice signature; creates/edits/deletes its customer companies and their users; manages developer staff; creates/edits sites and PPA contracts; registers/edits/swaps meters; runs telemetry repair; manages alerts; and executes the full invoice lifecycle including early invoice issuance (`invoice.issueEarly`). *(Platform-only controls (creating developer companies, Ft rates, public holidays, bank accounts, VPN profile management, and manual serial override/swap confirmation) remain with the Platform administrator.)* | | `SERVICE` | **O&M engineer** | Operate | Registers/edits/swaps meters, runs connection tests & read-now commands, views meter IP/port/SIM details, repairs/imports 15-minute telemetry, views data quality reasons, manages meter alarms, views parallel billing comparisons, and performs the **Step 2 technical invoice review (`invoice.check`)**. *(Cannot generate or approve invoices.)* | | `ACCOUNTING` | **Accounting** | Billing | Views draft and approved invoices, generates/recalculates invoices, performs **Step 3 final invoice approval (`invoice.approve`)**, voids invoices with a reason, deletes draft invoices, views parallel billing comparisons, and reads Ft rates, holidays, and bank accounts. *(Under the 3-tier billing rule, Step 2 technical checker and Step 3 approver must be two different people.)* | | `OPERATOR` | **System operator** | Operate | Reviews meters and generation, runs connection tests and read-now commands, views meter network details and 15-minute data quality reasons, dispatches and manages alarms, and reads Ft rates/holidays. *(Cannot add/edit/delete meters or edit/import telemetry.)* | ### 3. Customer Company Tier (Off-taker) | Role Code | UI Title | Access Level | Capabilities & Scope | | :--- | :--- | :--- | :--- | | `ADMIN` | **Customer administrator** | Manage | Updates own customer company profile, logo, and signature; adds, edits, and suspends users inside their own company; views coworkers' emails and roles; views the customer permissions table; views **APPROVED** invoices and countersigns them on behalf of the customer. *(Never sees `DRAFT` or `CHECKED` invoices.)* | | `CUSTOMER` | **Customer representative** | Billing | Views **APPROVED** invoices and countersigns them on behalf of the customer, alongside site generation dashboards and 15-minute data. *(Sees colleague names only: no colleague emails/roles and no Settings access.)* | | `READER` | **Read only** | Read only | Views Dashboard, Meter Monitoring, and View Data / Analytics for the company's sites only. *(Cannot access Billing History or Settings, and cannot modify any data.)* | --- ## Viewing the Read-Only Permissions Matrix Administrators can verify the live server-enforced permission matrix at any time inside the portal: 1. Click **Settings** in the left navigation sidebar. 2. Open a company (Solar Developer administrators are taken directly to their company workspace). 3. Select the **People & access** tab. 4. Click **Role permissions** in the sub-navigation bar at the top. 5. Review the matrix grouped into **People and organizations**, **Sites and meters**, **Billing and invoices**, and **Shared reference data**. Your current role column is highlighted as **Your role**, and each column header shows the granted count (for example, `26 / 26`). ![Read-only role permissions matrix in Settings](/screenshots/en/27-settings-permission-matrix.png) *Figure 1: Read-only Role permissions matrix showing capabilities enforced by the server for the selected organization tier.* ::: tip Platform-Reserved Capabilities When viewing **Role permissions** inside a Solar Developer or Customer Company, platform-only permissions (such as publishing monthly Ft rates, editing public holidays, managing bank accounts, creating developer companies, and managing VPNs) are omitted from the company grid with a note explaining they are reserved for **Platform administrators**. ::: --- ## Next Steps - [Login and Account Management](./02-login-and-account) - [Platform Admin Guide](./03-platform-admin-guide) - [Developer Admin Guide](./04-developer-admin-guide) --- ## Login and Account Guide Source: https://docs.wattdee.com/en/02-login-and-account ::: warning UAT release This guide describes the upcoming portal update. Some screens or actions may differ in the current UAT portal. ::: # Login, Navigation, and Account Management **Who is this for:** All Roles Platform Admin Developer Admin Service & Operator Accounting Customer Off-taker **Prerequisites:** - A company email address and initial/temporary password provisioned by your administrator. - A modern web browser with cookies and JavaScript enabled. --- ## 1. Signing In Public sign-up is disabled in WattDee. Every user account is created and assigned to an organization by an administrator. 1. Open the WattDee portal URL. *(If you clicked a deep link to a specific meter or invoice, the portal redirects you right back to that page after signing in.)* 2. Optionally, use the top-right controls on the sign-in screen to switch language (**English / ไทย**) or toggle **Light / Dark mode**. 3. Enter your **Email** and **Password** (click the eye icon inside the password field to show or hide characters). 4. Click **Sign in**. ![WattDee Sign-In Page](/screenshots/en/01-login-page.png) *Figure 1: WattDee sign-in screen with language switch and theme toggle in the top-right corner.* ::: warning Session Expiry, Rate Limits, and Suspended Accounts - **12-hour session expiry:** Each sign-in session lasts **12 hours** (automatically refreshed hourly while active). After 12 hours or explicit sign-out, you must sign in again. - **Sign-in rate limit:** Repeated rapid sign-in attempts trigger rate limiting (`Too many sign-in attempts. Please try again later.`). Wait briefly before trying again. - **Suspended accounts:** If an administrator suspends your account, your active sessions end immediately and future sign-in attempts are blocked until reactivated. ::: --- ## 2. Top Bar: Portfolio Switcher & Global Search The top bar lets you scope your view across developers or customers and jump straight to any permitted company, site, or meter. ### Portfolio / Customer Switcher (`GroupSwitcher`) 1. Click the pill selector on the left side of the top bar (next to the WattDee logo): - **Platform staff (multiple developers):** Switch between **All developers** or a specific solar developer. - **Solar developer staff (or single-developer view):** Switch between **All customers** or a specific customer off-taker company, showing `(X sites · Y meters)`. - **Customer users with one organization:** Displays a read-only company pill showing your company name, site/meter count, and green active indicator. 2. When the list contains more than 8 organizations, a **Search** input appears inside the dropdown to filter quickly. 3. Changing the switcher updates both **Dashboard** and **Meter Monitoring**. *(While inside **Settings**, this area shows a **Companies** breadcrumb link instead.)* ### Global Search (`EntitySearch`) 1. Click **Search companies, sites, meters** in the top bar. 2. Type a company name, site name/code, or meter serial number. 3. Matching results appear hierarchically (**Company > Site > Meter**), scoped strictly to companies you are permitted to access. 4. Use Arrow keys + `Enter` or click a row to open that workspace. *(When searching from inside **Settings**, choosing a result opens the Settings view for that entity.)* ![Top Navigation Bar with Portfolio Switcher and Global Search](/screenshots/en/03-navbar-group-search.png) *Figure 2: Top bar showing sidebar toggle, portfolio/customer switcher, and hierarchical global search.* --- ## 3. Notification Center The bell icon at the top-right shows your live count of unresolved meter alarms (`9+` when more than nine). 1. Click the **Notifications** bell icon to open the alert popover. 2. Switch between three filter tabs: - **New:** All unresolved alarms. - **Critical:** Only `CRITICAL` severity unresolved alarms. - **All:** Includes alarms that have already been acknowledged or snoozed. 3. Click **View meter** on any item to jump directly to that meter, or click **Open alert workspace** at the bottom to open the full alert & history view (`/meter?view=anomalies`). 4. For roles with alarm-management rights (`alert.manage`: Platform Admin/Service, Developer Admin/Service/Operator): - Click **Acknowledge** on an item or **Acknowledge all** in the header. - Click **Manage** to **Snooze** (`1 h`, `8 h`, or `24 h`), **Assign to** a colleague in your organization, or add a **Note** (up to 500 characters) and click **Save note**. ![Notification Center Popover](/screenshots/en/04-notification-center.png) *Figure 3: Notification Center showing New / Critical / All tabs, alarm management controls, and link to the alert workspace.* --- ## 4. Sidebar Navigation & Account Menu ### Left Navigation Sidebar - Under **Operations**: - **Dashboard:** Portfolio generation overview, meter health strip, and your role's action queue. - **Meter Monitoring:** Fleet status board, regional map, maintenance log, and alerts. - **Billing History:** *(Visible only to roles that can view invoices; Customer `Read only` and Developer `System operator` roles do not see this item.)* - Under **Settings** *(visible only when your role has settings access)*: Expand to access **Companies**, **Billing & tariffs**, **Bank accounts**, **Holidays**, **Database & system**, and **Audit log** (each item shown only if permitted). - Use the sidebar toggle button (three horizontal bars) in the top-left to collapse or expand the sidebar rail. ### Account Menu (Sidebar Footer) Click your name and avatar at the bottom-left of the sidebar to open the Account Menu: 1. View your full name, email, role badge, user ID, organization, and active customer scope. 2. Switch **Language** between **ไทย** and **English** at any time. 3. Switch **Theme** between **Light**, **Dark**, and **System**. 4. Use quick links to **My company overview** (for users without Settings access) or **Settings**. 5. Click **Change password** or **Sign out**. --- ## 5. Changing Your Password You can change your own password at any time, and should do so immediately after receiving an initial or temporary password. 1. Click your account card at the bottom-left of the sidebar and select **Change password**. 2. Enter your **Current password**. 3. Enter your **New password** and confirm it. 4. Ensure every item in the password policy checklist turns green: - At least 8 characters long - At least 1 uppercase letter (`A–Z`) - At least 1 lowercase letter (`a–z`) - At least 1 number (`0–9`) - At least 1 special character (`!@#$%&*`, etc.) - Must differ from your current password and match the confirmation field. 5. Click **Confirm** to save the new password. ![Account Menu and Change Password Dialog](/screenshots/en/05-user-menu-password.png) *Figure 4: Account menu at the sidebar footer showing language/theme controls and Change password.* ::: warning Session Revocation on Password Change or Admin Reset - **Self-service password change:** Your current browser stays signed in with a refreshed token, while **all other active sessions on other browsers or devices are immediately signed out**. - **Administrator password reset:** If an administrator resets your password from **People & access**, **every active session across all your devices is immediately terminated**. Sign back in with the new/temporary password and set a personal password. ::: --- ## Next Steps - [Review Roles and Permissions](./01-roles-and-permissions) - [Platform Admin Guide](./03-platform-admin-guide) - [Developer Admin Guide](./04-developer-admin-guide) - [Meter and Telemetry Guide](./05-meter-and-telemetry-guide) --- ## Platform Admin Guide Source: https://docs.wattdee.com/en/03-platform-admin-guide ::: warning UAT release This guide describes the upcoming portal update. Some screens or actions may differ in the current UAT portal. ::: # Platform Admin Guide **Who is this for:** Platform Administrator (Platform ADMIN) Central Operations Team (Platform SERVICE, read/health tabs only) **Prerequisites:** - Signed in with a **Platform administrator** account under the platform organization (`Advanced Grid Co., Ltd.`). - Solar developer details (Thai/English names, 13-digit Tax ID) and official ERC/PEA monthly Ft rates and public holiday schedules. --- ## 1. Portfolio Dashboard Overview After signing in, the **Dashboard** (`Solar portfolio`) provides a real-time view across every solar developer and site: 1. **Scope with the top switcher:** Choose **All developers** to monitor the entire platform, or select a specific solar developer to inspect their fleet. 2. **Review the Health Strip:** Check live counts for `online`, `offline`, `not reporting`, `meters with alarms`, and HES data projection lag. Click any pill to jump straight to the filtered meter list. 3. **Check the 4 KPI cards:** - **Today Energy (kWh)** with Peak / Off-Peak / Holiday bar and comparison vs. the same time yesterday. - **Today Value (THB)** *(intentionally displays `-` when the selected portfolio spans sites on different tariff rates rather than guessing an average)*. - **Month Cumulative Energy (kWh)** and revenue. - **Total Installed Capacity (kWp)** and active site count. 4. **Act on the right-hand Action Queue:** - If the current billing month has no verified **Ft rate**, an item **Verify Ft rate for YYYY-MM** appears. Click it to confirm and publish the Ft rate right from the Dashboard. - Also lists urgent meter alarms, draft/checked invoices waiting on action, and late telemetry intervals. 5. **Analyze Generation Curves & Site List:** Switch between **Day** (15-minute kW curve against the dashed clear-sky expected ceiling), **Month** (daily bars), and **Year** (monthly bars). Click bars to drill down, expand the **TOU Day/Month Summary**, or toggle the site portfolio between **Table** and **Cards**. ![Platform Admin Portfolio Dashboard Overview](/screenshots/en/02-dashboard-overview.png) *Figure 1: Portfolio Dashboard showing Health Strip, TOU KPIs, generation curve, and Action Queue.* --- ## 2. Company Directory & Creating Solar Developers Only **Platform administrators** can create developer companies, delete companies, change organization types, and adjust active meter limits. ### Browsing the Company Directory 1. Click **Settings** > **Companies** in the left navigation sidebar. 2. Use **Search companies** to filter by company name or ID. 3. Organizations are grouped under **Platform administration**, **Developer companies**, and **Unassigned customers**. ![Settings Companies Directory](/screenshots/en/20-settings-companies-directory.png) *Figure 2: Companies directory grouped by tier, with the Add developer company action.* ### Creating a New Solar Developer Company 1. On **Settings > Companies**, click **Add developer company**. 2. Enter **Company name (Thai)** and **Company name (English)** *(required)*. 3. Ensure **Organization type** is set to **Solar developer**. 4. Enter tax and billing details: **Tax ID (13 digits)**, **Phone (shown on invoices)**, **Billing email**, and **Head office address (shown on tax invoices)**. 5. Optionally enter **Authorized signatory name**, **Signatory title**, and upload the **Authorized signature (transparent PNG/JPG/WebP)** and **Company logo**. 6. Click **Add company** to save. ![Create Developer Company Modal](/screenshots/en/21-settings-create-developer-modal.png) *Figure 3: Add company dialog for creating a new solar developer and configuring branding.* ### Setting Meter Limits & Creating the First Company Admin 1. Open the newly created developer company, go to **Company information**, and click **Edit company profile**. 2. Adjust **Active meter limit** (default is `100,000` active meters per company; inactive meters are excluded) and click **Save changes**. 3. Open the **People & access** tab and click **Add user** to create the developer's first **Company administrator** so they can onboard customers, sites, and staff. ::: tip Deleting a Company Clicking **Delete company** removes the company from active management while leaving previously issued invoices unchanged. ::: --- ## 3. Tariffs & Monthly Ft Rates (`Billing & tariffs`) Only **Platform administrators** can publish or update monthly Ft rates (`ftrate.write`). 1. Under **Settings** in the sidebar, click **Billing & tariffs**. ### Tab 1: Tariffs (`Tariff structures`) 1. Review the **Current billing rules** summary strip (billing cut-off day, decimal precision for energy/rate/amount, and power factor penalty rules). 2. Click **Add tariff** or **Edit** on an existing tariff schedule. 3. Set **Tariff category**, **Start date** / **End date**, **Peak / Off-peak / Holiday grid tariffs**, **Service charge**, and **Bill calculation type** (**With Ft** or **Without Ft**). 4. Expand **Advanced billing rules** to configure contracts tied to this tariff: - **Billing cut-off day (1–28)** *(e.g., `25` bills from the 25th to the 24th of the next month)* - **Payment due (days after cut-off)** (`0–120` days) - **Decimal places** for energy (`0–4`), rate (`2–6`), and amount (`0–4`) - **Power factor penalty (PEA)**: toggle on/off, **Minimum PF threshold** (PEA standard `0.85`), and **Penalty rate** (PEA standard `56.07` THB/kVAR). 5. Click **Save changes**, or click **CSV** to export the tariff table. ::: warning Billing Cut-Off Day Locks After First Invoice Once a site has any non-rejected invoice, its **Billing cut-off day** is locked (`409` on change) so billing periods never overlap or leave unbilled gaps. Other terms still update, and the portal lists which sites kept their existing cut-off day. ::: ### Tab 2: Monthly Ft Rates 1. Switch to the **Monthly Ft rates** tab. 2. Click **Publish Ft rate** (or **Edit** on an existing month). 3. Enter **Billing month** in `YYYY-MM` format (for example, `2026-10`). 4. Enter **Ft rate (THB/kWh)** (between `-2.0000` and `10.0000`, e.g. `0.3972`). 5. Click **Save Ft rate**. ![Tariffs and Monthly Ft Rates Screen](/screenshots/en/29-settings-tariff-ft-rates.png) *Figure 4: Billing & tariffs screen with Tariffs and Monthly Ft rates tabs.* ::: warning Missing Ft Rate Blocks Invoice Calculation Invoice calculation strictly rejects (`422`) any billing month that does not have a published Ft rate. Always publish or verify the month's Ft rate before billing run day. ::: --- ## 4. Bank Accounts, Holidays, Database Health & Audit Log ### Payment Bank Accounts (`Settings > Bank accounts`) 1. Open **Bank accounts** under Settings. 2. Click **Add bank account** (or **Edit** an existing row). 3. Fill in **Bank name**, **Branch**, **Seller (company receiving payments)** (choose **Platform (shared by all sellers)** or a specific **Solar developer** so invoices print that seller's own bank account), **Account name**, **Account number**, and **PromptPay / QR number**. 4. Click **Add account / Save changes**. ### Public Holiday Calendar (`Settings > Holidays`) Energy recorded on weekends and dates in this calendar is automatically classified as **Rate C (Holiday)**. 1. Open **Holidays** under Settings. 2. **Bulk annual load:** Select a year (`2025`, `2026`, or `2027`) under **Load annual public holidays (PEA / MEA calendar)** and click **Load annual holidays**. 3. **Add a single holiday:** Pick **Holiday date (YYYY-MM-DD)**, enter an optional **Holiday name**, and click **Add holiday**. ### Database & System Health (`Settings > Database & system`) *(Accessible to `Platform administrator`, `Central operations team`, and roles with `meter.network.read`.)* 1. Open **Database & system** to inspect: - **Database size** and PostgreSQL version. - **Monthly partitions** status (`Ready` vs `Partition needs extension`) and per-partition row counts and storage sizes. - **Meter data sync (HES)**: projection lag in seconds and meters waiting over 1 hour. - **System record counts**: Projects, Meters, Invoices, and Audit events. 2. Click **Refresh status** to pull the latest health metrics. ### System Audit Log (`Settings > Audit log`) *(Restricted to **Platform administrators** holding `org.admin`.)* 1. Open **Audit log** under Settings. 2. Filter across the whole platform by: - **Search audit events** (activity, record ID, or summary) - **Filter by actor email** - **Category:** `All categories`, `Meter data`, `Invoices`, `PPA contracts`, `Meters` - **From** and **To** dates 3. Click **Export current page** to download a CSV of the visible page (use filters and pagination to export older pages). ![Bank Accounts, Holidays, Database Health, and Audit Log](/screenshots/en/30-settings-bank-holiday-system-audit.png) *Figure 5: Platform reference and governance tools (Bank accounts, Holidays, Database health, and Audit log).* --- ## 5. Platform-Exclusive Meter & VPN Responsibilities Even when solar developers manage their own sites and meters, two cross-tenant safeguards remain exclusive to **Platform administrators**: 1. **VPN Profiles & Meter Assignment (`vpn.manage`):** Creating, editing, enabling/disabling WireGuard, IPsec, and OpenVPN profiles and assigning site meters under the site's **Connectivity** tab. 2. **Serial Overrides & HES Swap Confirmation (`meter.identity.override`):** Resolving pending/duplicate/mismatch meter identities by verifying the physical nameplate on site and entering a mandatory audit reason (at least 5 characters) to **Correct serial** or **Confirm swap**. --- ## Next Steps - [Developer Admin Guide: Customers, Sites, Meters & VPN](./04-developer-admin-guide) - [Meter & Telemetry Guide: Monitoring, Diagnostics & VEE](./05-meter-and-telemetry-guide) - [Billing and 3-Tier Approval Guide](./06-billing-and-approval-guide) --- ## Developer Admin Guide Source: https://docs.wattdee.com/en/04-developer-admin-guide ::: warning UAT release This guide describes the upcoming portal update. Some screens or actions may differ in the current UAT portal. ::: # Solar Developer Admin Guide **Who is this for:** Company Administrator (Developer ADMIN) Platform Administrator (assisting with VPN & serial confirmation) **Prerequisites:** - Signed in with a **Company administrator** account in a **Solar developer** organization (created by your Platform Administrator). - Legal entity details for invoicing (13-digit Tax ID, registered address, company logo, and transparent PNG authorized signature). - Off-taker customer details, PPA contract terms (tariff, discount, cut-off day, payment term), and meter network/CT/VT specifications. --- ## 1. Company Profile, Logo & Digital Signature Clicking **Settings** in the sidebar opens your Solar Developer workspace directly. 1. Open the **Company information** tab. 2. Click **Edit company profile**. 3. Update the legal and billing fields shown on invoices and tax documents: - **Company name (Thai)** and **Company name (English)** - **Tax ID (13 digits)** - **Phone (shown on invoices)** and **Billing email** - **Head office address (shown on tax invoices)** 4. Under **Authorized signatory and digital signature**: - Enter **Authorized signatory name** and **Signatory title**. - Click **Upload signature (PNG/JPG)** *(use a transparent PNG for crisp rendering on invoice PDFs)*. - Click **Upload logo** to attach your company logo (PNG, JPG, or WebP). 5. Click **Save changes**. ![Company Profile and Digital Signature Dialog](/screenshots/en/24-settings-company-profile-signature.png) *Figure 1: Edit company details dialog showing tax fields, authorized signatory, signature preview, and logo upload.* ::: info Platform-Locked Fields **Organization type** and **Active meter limit** are controlled exclusively by the **Platform administrator**. ::: --- ## 2. Onboarding Customer Companies (Off-takers) 1. In your developer workspace under **Settings**, select the **Customer companies** tab. 2. Click **Add customer company**. 3. Complete **Step 1. Company**: - Enter **Customer company name** *(required)*. - Fill in **Tax ID (13 digits)**, **Phone number**, and **Business / registered address**. 4. Choose how to proceed: - **Save and add a site:** Saves the customer and jumps directly into site & PPA setup *(customer portal logins are optional and can be invited later)*. - **Save and invite customer admin:** Proceeds to **Step 2. Administrator (optional)** to create the customer's first **Customer administrator** account (enter full name, sign-in email, and either enter or auto-generate an initial password, shown once on **Step 3. Continue**), then click **Continue setup**. ![Customer Companies Tab under Solar Developer](/screenshots/en/22-settings-developer-customers.png) *Figure 2: Customer companies directory under a Solar Developer, with the Add customer company workflow.* --- ## 3. Guided Site, PPA Contract & Meter Setup From either **Portfolio sites** or inside a customer company's **Sites** tab, click **Add site** to launch the 3-stage setup wizard: **1. Site & PPA** → **2. Meter** → **3. Check**. ### Stage 1: Site & PPA Contract (`Site & PPA`) 1. If started from your developer portfolio, choose the **Customer / off-taker** for this site *(or click **Add customer company** right from the form)*. 2. Enter **Site name** *(required)* and **Installed capacity (kWp)** *(used for clear-sky baseline curves on charts)*. 3. Configure PPA billing terms: - **Contract discount (%)** (`0–100%`) - **Billing cut-off day** (`1–28`, default `25`) - **Payment term after cut-off (days)** (`0–120`, default `30`) - **Electricity tariff** *(required)* and optional **Custom peak / off-peak rates (THB/kWh)** to override the schedule rate. 4. Click **Save and add meter**. ![Site and PPA Contract Configuration](/screenshots/en/23-settings-customer-sites-contract.png) *Figure 3: Site and PPA contract configuration including PEA TOU schedule, peak/off-peak rates, demand charge, discount, and cut-off day.* ::: tip Editing Existing Sites & Prefilling Multi-Site Rollouts - **Edit later:** Open the site > **PPA** tab > **Edit site and PPA** to adjust capacity, PEA TOU tariff, **Demand charge (THB/kW)**, discount, or payment terms. *(Only a Platform Administrator can reassign an existing site to a different customer company, and the billing cut-off day locks once the site has any non-rejected invoice.)* - **Multi-site rollout:** On Stage 3 (`Check`), clicking **Add next site for this customer** automatically copies the previous site's PPA terms so you don't have to re-type them. ::: ### Stage 2: Registering Meters (`US-1.19` Automatic Serial Discovery) 1. In Stage 2 (**Meter**), or later from the site's **Meters** tab, click **Add meter**. 2. Fill in the communication and metering parameters: - **Meter model:** `Saral 305`, `Premier 550`, or `Prometer 100`. - **IP address / host** and **Port** *(default `4059`)*. - **Connection type:** `Public fixed IP`, `Private APN (SIM)`, or `VPN (Mikrotik)`. - **Communication format (Interface):** - **HDLC:** Meter connects through a 4G modem or serial/IP converter. - **WRAPPER:** Ethernet LAN cable plugged directly into the meter (e.g., Prometer 100 over Ethernet). - *Not sure? Start with `HDLC` and run **Test connection**; if the host is reached but the meter times out without answering, switch to `WRAPPER`.* - **Polling interval:** `15 minutes`, `1 hour`, `6 hours`, or `24 hours`. - **Transformer ratios and multiplier (CT/VT):** Enter `CT Primary (A)`, `CT Secondary (A)`, `VT Primary (V)`, and `VT Secondary (V)`. The **Multiplier** is computed automatically. - **Energy reading side:** - `Primary side`: High-voltage side / meter already applies CT/VT multiplier. - `Secondary side`: Low-voltage side / WattDee multiplies raw readings by the Multiplier. 3. During guided setup, keep **Start reading right after saving** checked so the meter is activated in HES and tested immediately. *(Outside guided setup, click **Activate in HES**, type the meter label/serial to confirm, and run **Test connection**.)* 4. Click **Save meter**. 5. Click **Next: check setup** to open **Stage 3 (`Check`)**, showing PPA status, `Meters reporting / registered`, and a reminder if the customer company has no portal users yet. ![Site Meter Configuration and Add Meter Form](/screenshots/en/28-settings-site-meter-setup.png) *Figure 4: Site meters list and registration form showing connection settings, CT/VT ratios, and activation state.* ::: info Important Rules for Serial Numbers & LLS Passwords (US-1.19) - **No manual serial entry:** HES reads the serial number directly from the meter on its first successful connection. While waiting, the meter shows `Waiting for HES to read the serial. Not billed yet` and its intervals are kept out of invoices. - **No LLS password entry in the portal:** Configure the meter's LLS password on the HES host (model secret or per-meter secrets file). If omitted, **Test connection** reports `config_error`. - **Serial conflicts or suspected swaps:** If HES detects a duplicate serial or a mismatch against a registered meter, readings are held from billing (`Identity check failed` / `Duplicate` / `Suspected meter swap`). Contact your **Platform administrator** to verify the physical nameplate and run **Correct serial** or **Confirm swap** with an audit reason (minimum 5 characters). ::: --- ## 4. VPN Profiles & Meter Connectivity WattDee supports **WireGuard**, **IPsec**, and **OpenVPN** profiles shared across a developer's sites. ::: warning Platform Permission Required for VPN Changes (`vpn.manage`) Creating, editing, enabling/disabling VPN profiles and assigning meters under a site's **Connectivity** tab require the **Platform administrator** (`vpn.manage`) role. Developer admins coordinate profile details and assignments with the platform administrator. ::: ### Configuring a VPN Profile (Platform Admin in Developer Workspace) 1. Open the developer company in **Settings** > **VPN profiles**. 2. Click **Add VPN profile** (or select a profile and click **Edit settings**). 3. *(Optional)* For **WireGuard** or **OpenVPN**, expand **Import configuration**, paste the configuration text, and click **Review imported settings**. 4. Enter **Connection details**: - **Connection name** and **Protocol** (`WireGuard`, `IPsec`, `OpenVPN`). - **For WireGuard (Connection mode):** - **We dial the site (`dial`):** Use when the site gateway has a static public IPv4. Enter **Peer IPv4 address** and **Peer port** (default `51820`). - **The site dials us (`listen`):** Use when the site connects over **4G / CGNAT** without a public IP. Enter **Server UDP port** (`1024–65535`, default `51821`) and **ensure that UDP port is open in the server firewall** (no peer IP is required). - **Allowed meter networks (CIDR):** e.g., `10.10.0.0/24` *(every meter assigned to this VPN profile must use an IP inside these CIDR blocks)*. - Complete protocol-specific settings (WireGuard local tunnel CIDR, peer public key, keepalive; IPsec IKEv1/IKEv2, PSK or PEM certificates; OpenVPN transport UDP/TCP, server certificate name, PEM certificates, optional TLS Crypt). - Check **Replace credentials** when rotating keys on an existing profile. 5. Click **Save VPN connection** and wait for the status tag to show **Tunnel established** (or **Runner ready**). ### Assigning a VPN Profile to a Site Meter 1. Open the target site > **Connectivity** tab. 2. Select the VPN profile, choose the meter from **HES meter**, and click **Assign meter**. 3. To detach a meter, click **Unassign** *(note: unassigning stops HES polling for that meter)*. ![Developer VPN Profiles Configuration](/screenshots/en/25-settings-company-vpn.png) *Figure 5: VPN profiles management screen showing active tunnel statuses and protocol configuration.* --- ## 5. Managing Team Members & Customer Users (`People & access`) Developer Administrators manage users inside both **their own developer company** and **their customer companies**. 1. Open **People & access** on the target developer or customer company. 2. Click **Add user**. 3. Verify **Organization** and enter **Full name** and **Email**. 4. Select the **Role** (available options match the company tier): - **Solar Developer:** `Company administrator`, `O&M engineer`, `Accounting`, `System operator` - **Customer Company:** `Customer administrator`, `Customer representative`, `Read only` - *The **Access** box previews all sites the user will reach before you save.* 5. Set a **Password**: type a password meeting all 5 complexity rules, click **Generate secure password**, or leave blank to auto-generate a one-time temporary password (displayed once after creation). 6. Click **Add user**. ### Ongoing Account Management - **View site access:** Inspect the paginated list of sites reachable by that user. - **Edit / Reset password:** Click the edit icon > optionally enter a password or leave blank to auto-generate > click **Reset password** *(immediately signs the user out on every device; one-time temporary password is shown once)*. - **Suspend account:** Immediately revokes access while preserving history and audit trails; accounts can be reactivated anytime. - **Delete account permanently:** Located inside the Edit user dialog for permanent removal. ![Company People and Roles Management](/screenshots/en/26-settings-company-people-roles.png) *Figure 6: People & access view listing company users, active/suspended status, roles, and site-access inspection.* ::: warning Built-In Governance Safeguards - You **cannot change your own role or suspend your own account**, preventing self-escalation or accidental lockout. - The **last active Administrator** of any organization cannot be demoted, suspended, or deleted. - Only a **Platform administrator** can move an existing user from one organization to another. ::: --- ## Next Steps - [Meter & Telemetry Guide: Fleet Monitoring, HES Diagnostics & VEE Repair](./05-meter-and-telemetry-guide) - [Billing and 3-Tier Approval Guide](./06-billing-and-approval-guide) --- ## Meter & Telemetry Guide Source: https://docs.wattdee.com/en/05-meter-and-telemetry-guide ::: warning UAT release This guide describes the upcoming portal update. Some screens or actions may differ in the current UAT portal. ::: # Meter Monitoring & Telemetry Guide **Who is this for:** Central Operations (Platform SERVICE) O&M Engineer (Developer SERVICE) System Operator (OPERATOR) Administrators Customer Off-taker (view only) **Prerequisites:** - Sites and meters are registered under a Solar Developer and Customer company. - Live commands (**Test connection**, **Read now**, **Backfill**) require `meter.command` and an active HES service. - Telemetry repair (**Auto-fill estimation**, **Manual edit**, **CSV import**) requires `telemetry.sync` (Platform/Developer Admin or Service). --- ## 1. Fleet Meter Monitoring (`Meter Monitoring`) Open **Meter Monitoring** from the left sidebar to track meter health across your permitted portfolio, sorted **worst-first** so offline and unreporting meters surface immediately. ### Four Top-Level Views 1. **Meters** *(default board)*: Lists every meter (plus sites without meters yet) sorted by severity (`Offline` → `Never reported` → `Not linked to HES` → `No meter` → `Online with alarms` → `Online` → `Switched off`). - **Status filter chips:** Click **Offline** *(silent > 1 hour, `commLostAt`, or HES verification failed)*, **Not reporting / not linked**, **With alarms**, or **Sites without a meter**. - **View as switcher:** Aggregate rows by **Developers** *(platform only)*, **Offtakers**, or **Sites / Meters**, plus a customer dropdown and **Search** box (matches site name, offtaker, serial, model, site code like `1-00012`, or `IP:Port`). 2. **Regions:** Interactive province & region cards displaying total kWp, GPS coordinates, and online percentage bars. Click any province card to filter the meter table below. 3. **Maintenance:** Summary counts and filterable log of **Swap**, **Maintenance**, **Calibration**, and **Inspection** events, with CSV export and **Log maintenance** *(requires `meter.write`)*. 4. **Alerts:** Two sub-tabs: **Active alerts** *(acknowledge, snooze, assign, and add notes)* and **Event history** *(filter by `Critical / Warning / Info` and Bangkok date range defaulting to the last 30 days, with CSV export)*. ![Fleet Meter Monitoring Board](/screenshots/en/06-meter-monitoring-fleet.png) *Figure 1: Meter Monitoring fleet board with view tabs, status filter chips, and worst-first meter table.* --- ## 2. Drill-Down: Company Overview → Site Overview → Meter Detail ### Company Overview Open any customer or developer company to view: - **Energy period selector:** `Today`, `Last 7 days`, `This month`, or `Custom` (up to 93 days). - **4 Summary KPIs:** Energy in selected period (`kWh`), Meters recently contacted (`reporting / active`), Sites needing attention, and Company sites. - **Needs attention panel:** Direct links to sites missing a PPA, missing active meters, or with silent meters, plus a **Company billing** status summary and exportable site list. ![Company Overview Workspace](/screenshots/en/07-meter-company-overview.png) *Figure 2: Company overview showing period energy trend, Needs attention items, billing snapshot, and site table.* ### Site Overview Click any site to open its workspace tabs: - **Overview:** Installed capacity (`kWp`), registered meters, last contact timestamp, 7-day daily energy trend, and meter status list. - **Data:** Embedded 15-minute telemetry explorer scoped to the site. - **Meters:** Site meter table and configuration actions (when opened from Settings). - **PPA:** Contract terms and rates. - **Connectivity:** VPN profile assignments for the site's meters. ![Site Overview Workspace](/screenshots/en/08-meter-site-overview.png) *Figure 3: Site overview displaying capacity, 7-day energy trend, and registered meters.* ### Meter Detail & Live HES Diagnostics Click any meter to open its detail view (**Energy data** / **Configuration** and **Diagnostics**): 1. Review the top status banner explaining **why the meter is in its current state** and any **last HES error**. 2. Under **Commands** *(requires `meter.command`)*: - Click **Test connection:** Sends a live probe through HES to verify network reachability, DLMS framing, and the LLS password. Results report latency (`ms`) or clear troubleshooting hints: - `config_error`: No LLS password is configured on the HES host. - `auth_failed`: The meter rejected the LLS password configured on HES. - `Operation canceled / session timeout`: Meter was reached but did not answer; check `HDLC` vs `WRAPPER` interface selection. - `poll_timeout / connect_failed`: Cannot reach the meter; verify IP/port, VPN/network, and meter power. - Click **Read now:** Queues an immediate on-demand meter poll. 3. Inspect **Latest reading** (`kW`, cumulative `kWh`, `PF`, `Voltage`, `Current`), **HES communication** details, **Meter configuration** *(flags warnings if `CT × VT ≠ Multiplier` or if Reading side is `UNKNOWN`)*, and **Recent HES events**. ![Meter Detail and Diagnostics Panel](/screenshots/en/09-meter-detail-status.png) *Figure 4: Meter diagnostics view showing live probe commands, latest readings, HES comms, and CT/VT configuration check.* --- ## 3. Mid-Cycle Meter Replacement (`Replace Meter, SOW §79`) When replacing a physical meter on site (due to failure or PEA statutory calibration rotation), **never delete the old meter**. Use **Replace** so historical readings stay intact and billing never double-counts energy: 1. Open the site under **Settings** > **Meters** *(requires `meter.write`)*. 2. Click **Replace** on the active meter being retired. 3. Set the **Effective swap date and time** to match the physical swap time (`activeTo` is recorded at this instant). 4. Choose an inactive **Replacement meter in this site** *(or select retire-only and register the replacement meter afterwards)*. 5. Enter the **Reason for replacement** (stored in maintenance and audit logs) and click **Confirm replacement**. ::: warning Activate Replacement Meters Separately in HES Swapping **does not automatically activate** the replacement meter in HES. After confirming the swap, click **Activate in HES** on the warning banner (or the replacement meter row) and type its serial/ID to start scheduled polling. Also note that swaps cannot be backdated into months locked by `CHECKED` or `APPROVED` invoices. ::: --- ## 4. Exploring 15-Minute Telemetry (`View Data / Analytics`) Open **View Data / Analytics** at `/view-data` (or via the **Data** tab inside any Site or Meter). All timestamps and calendar boundaries use **Asia/Bangkok (UTC+7)**. ### Navigating the Time Zoom Ladder 1. **Ladder breadcrumb:** Switch levels directly from the top bar: - **Year** (e.g., `2026`): Monthly bars (click any bar to drill into that month). - **Month** (e.g., `November`): Daily bars (click any bar to drill into that day's 15-minute intervals). - **Day** (e.g., `Mon 16`): 15-minute curve (`00:00–24:00`) with an interactive monthly **Day Strip** above the chart showing daily energy bars and dashed missing-day indicators. - **Date range:** Select custom dates or presets (**Last 7 days**, **Last 30 days**, **This month**, **Last month**) and choose resolution (**15 min** up to 7 days, **Hourly** up to 14 days, **Daily** up to 366 days, **Monthly**). 2. **Quick jumps:** Use `<` / `>` step arrows, **Today**, **Yesterday**, or **Latest data** to jump straight to the most recent day with meter readings. 3. **Metric toggle:** Switch between **Energy kWh** and **Power kW / Peak kW**. ### Reading the Chart, Markers & Data Table - **TOU rate bands:** Background shading indicates **Peak** (Mon–Fri `09:00–22:00`), **Off-Peak** (Mon–Fri `22:00–09:00`), and **Holiday** (weekends & public holidays). - **Waiting slots:** Hatched bars/rows indicate the interval's scheduled HES read window has not elapsed yet; the view refreshes automatically. - **Missing intervals:** Highlighted warning rows summarize consecutive missing slots. WattDee **never fabricates `0`** for missing meter intervals. - **Quality markers:** `Estimated` (interpolated/derived share across a communication gap) and `Under review` (meter event flag raised) badges appear on intervals, with source details on hover for roles holding `telemetry.quality.read`. - **Site split & phase detail:** Multi-meter site views include a per-meter share breakdown; selecting a single meter also displays **PF**, **Voltage (V L1–L3)**, and **Current (A L1–L3)** columns when reported. - **Export:** Click **Export CSV** (UTF-8 with BOM for clean Thai characters in Excel) or **Print A4**. ![View Data 15-Minute Telemetry Explorer](/screenshots/en/10-view-data-telemetry.png) *Figure 5: View Data telemetry explorer with Zoom Ladder, Day Strip, TOU load curve, summary tiles, and 15-minute table.* --- ## 5. Data Tools: Quality & VEE Repair, Backfill & Period Compare Click the **Data Tools** dropdown in the top-right toolbar of View Data to access three specialized panels: ### 1) Data Quality & VEE Repair Everyone can inspect completeness metrics; repair actions require `telemetry.sync` (**Admin** or **O&M Engineer**): - **Completeness summary:** Shows overall completeness (`%`), observed vs. expected 15-minute slots, and source breakdown (**Auto meter reads**, **Auto-estimated**, **Manual / CSV import**). - **Auto-fill missing intervals:** 1. Select the meter and estimation method: - **LINEAR:** Linear interpolation between the previous and next known points (recommended for short gaps). - **ROLLING_AVG:** Historical rolling average for the same 15-minute slot from the preceding 7 days. 2. Click **Run auto-fill** *(fills empty slots only, never overwrites actual meter reads, and labels rows as `Estimated`, max 31 days per run)*. - **Manual reading edit:** 1. Select the meter and a 15-minute aligned timestamp (`:00`, `:15`, `:30`, or `:45`). 2. Enter **Energy (kWh)**, **Average power (kW)** *(leave `0` to auto-calculate `kWh × 4`)*, **Reactive power (kVAR)**, and a **Reason** *(minimum 3 characters)*. 3. Click **Save changes** (all previous/new values and actors are logged in the meter's edit history). - **CSV import:** 1. Choose the target meter and specify whether values are **Already net kWh** or **Raw meter values (apply CT/VT multiplier automatically)**. 2. Upload a `.csv` file or paste CSV lines with header `timestamp,active_energy_kwh,active_power_kw,reactive_power_kvar` (up to 5,000 rows per batch), enter a reason, and click **Import**. ![Data Quality and VEE Repair Panel](/screenshots/en/11-view-data-quality-vee.png) *Figure 6: Data Quality & VEE panel showing completeness bar, source breakdown, and Auto-fill / Manual Edit / CSV Import actions.* ::: warning Billing Period Lock Protection Auto-fill estimation, manual edits, and CSV imports are **blocked (`409`) for any month that has a `CHECKED` or `APPROVED` invoice**. Ask Accounting to return or void the invoice before repairing telemetry in that period. ::: ### 2) Backfill from Meter (`meter.command`) Requests HES to re-read the 15-minute load profile (`DLMS Profile Generic 1.0.99.1.0.255`) directly from the physical meter's memory: 1. Open **Data Tools** > **Backfill from meter**. 2. Select one or more meters and a Bangkok **From – To** date range *(maximum **31 days** per request, cannot include future dates)*. 3. Review the estimated slot count and click **Send request**. 4. HES processes the span in 7-day chunks and reports live progress (`Sending` → `Queued` → `Reading` → `Done` / `Failed`). You can close the drawer while commands finish in the background. ::: warning Backfill Overwrites & Draft Invoices Recovered readings overwrite existing values in the requested span. If an open `DRAFT` invoice covers that month, it is flagged stale so Accounting knows to recalculate; months locked by `CHECKED`/`APPROVED` invoices hold changes safely in late-interval tracking. ::: ### 3) Compare Periods 1. Open **Data Tools** > **Compare periods**. 2. Pick a quick preset (**This month vs Last month**, **Last 7 days vs Prior 7 days**, **This year vs Last year**) or choose custom **Period 1** and **Period 2** date ranges. 3. Review the **Total Energy (kWh)** and **Peak Demand (kW)** delta cards alongside the side-by-side TOU breakdown table (**On-Peak**, **Off-Peak**, **Holiday**). ![Period Comparison Panel](/screenshots/en/12-view-data-period-compare.png) *Figure 7: Compare Periods panel showing kWh and Peak kW deltas across two selected date ranges.* --- ## Next Steps - [Billing and 3-Tier Approval Guide](./06-billing-and-approval-guide) - [Back to Roles and Permissions](./01-roles-and-permissions) --- ## PPA Billing Calculation & 3-Tier Approval Guide Source: https://docs.wattdee.com/en/06-billing-and-approval-guide ::: warning UAT release This guide describes the upcoming portal update. Some screens or actions may differ in the current UAT portal. ::: # PPA Billing Calculation & 3-Tier Approval Guide The WattDee billing module (`/billing`) calculates Private Solar PPA monthly invoices from 15-minute smart meter telemetry under Thailand's Provincial Electricity Authority (PEA) Time-of-Use (TOU) tariff structure, protected by a 3-tier verification and approval workflow (**Draft → Checked → Approved**) with full audit traceability and Segregation of Duties (SoD). ::: info Access to `/billing` Opening **PPA Billing & Invoicing** requires the `invoice.view` capability (see [Roles and Permissions](./01-roles-and-permissions)): - **Developer & Platform Staff** (`Platform ADMIN`, `Developer ADMIN`, `SERVICE`, `ACCOUNTING`): Access the full billing workspace and 3-tier approval controls. - **Customer / Off-Taker Users** (`Customer ADMIN`, `CUSTOMER`): Automatically routed to the dedicated Customer Billing view showing **only `APPROVED` invoices** (see the [Customer Portal Guide](./07-customer-portal-guide)). - **`OPERATOR` and `READER` roles**: Do **not** hold `invoice.view`. Navigating directly to `/billing` displays an **`AccessDenied`** screen. ::: --- ## 1. Billing Workspace Views: Table vs. Stage Board From `/billing`, you can manage monthly invoicing across all active sites using two synchronized views: ### Top Toolbar & Filters 1. **Billing period**: Select the target **Month** and **Year**. The subtitle shows the exact calendar dates covered based on the site's cut-off day (e.g., `1 Oct – 31 Oct`, or `25 Sep – 24 Oct` when `billingCycleDay = 25`). 2. **Search**: Filter by site name, site code, customer company name, or invoice number. 3. **Invoice status filter**: - **All stages** - **1. Missing bills**: Active sites without a live invoice for the selected period. - **2. Draft**: Calculated and persisted; awaiting Stage 2 technical review. - **3. Checked**: Technically verified by Service; awaiting Stage 3 accounting sign-off. - **4. Approved**: Finalized with an Invoice Reference Code and published to the Customer Portal. - **5. Voided**: Canceled (`REJECTED`) invoices retained for audit history; eligible for replacement reissue. 4. **More tools**: Opens **Compare PPA rate with utility** (Tariff Savings Comparison) and **Create bill with incomplete meter data** (Fallback billing). ### View 1: Table View The Table view groups sites by customer company (collapsible groups with per-stage counts) and supports multi-select checkboxes for batch invoice generation and batch Stage 3 approval. ![Monthly billing table view showing grouped customer companies, invoice statuses, and totals](/screenshots/en/13-billing-overview-table.png) ### View 2: 5-Stage Kanban Board (`Stage board`) Switch the view toggle to **Stage board** and pick a customer company (`บริษัทลูกค้า` / Customer company) to display the 5 workflow columns: 1. **1. Missing (`รอสร้างบิล`)**: No bill calculated for this period yet. 2. **2. Draft (`แบบร่าง`)**: Awaiting Stage 2 Service verification. 3. **3. Checked (`ตรวจแล้ว`)**: Awaiting Stage 3 Accounting approval. 4. **4. Approved (`อนุมัติแล้ว`)**: Issued and awaiting customer payment/countersignature. 5. **5. Voided (`ยกเลิกแล้ว`)**: Canceled; ready to reissue a replacement. Click any card to open the Invoice Detail dialog, drag empty board space to pan horizontally, or drag cards between columns (3-tier rules are enforced: for instance, you cannot drag directly from `Draft` to `Approved` without passing `Checked`). ![5-stage Kanban billing board showing workflow columns and invoice cards](/screenshots/en/14-billing-kanban-board.png) --- ## 2. Billing Window, Bangkok Timezone (UTC+7), and Open-Period Guard To ensure interval totals agree with physical meter end-of-month register resets, every billing window is evaluated on **`Asia/Bangkok` (`UTC+7`)** midnight (Thailand has no daylight saving time): - **Standard calendar cut-off (`billingCycleDay = 1`)**: Billing month `YYYY-MM` runs from `YYYY-MM-01 00:00:00+07:00` (inclusive) to the `1st of the following month 00:00:00+07:00` (exclusive). - **Cross-month cut-off (`billingCycleDay = 2..28`)**: For example, with `cycleDay = 25`, billing month `2026-10` covers `2026-09-25 00:00:00+07:00` (inclusive) to `2026-10-25 00:00:00+07:00` (exclusive). - **First invoice for newly commissioned sites (`activeFrom`)**: When every active meter on a site was commissioned (`activeFrom`) inside the billing cycle, the invoice's `billingPeriodStart` starts at the earliest meter's `activeFrom` timestamp so the first invoice reflects true operating days and Stage 2 coverage checks do not penalize pre-commissioning days. - **Payment due date (`dueDate`)**: Calculated as `paymentTermDays` (default `30` days) after the cut-off date at `23:59:59+07:00` (e.g., `2026-10` cut on the 25th with 30-day terms is due on `24 Nov`). ::: warning Open-Period Guard (BL-1) By default, invoices can only be generated **after the billing period has ended** (`endDate <= now`): - Attempting to bill a period that has not started yet is rejected with HTTP **`422`**. - Attempting to bill an ongoing period before its cut-off date is rejected with HTTP **`422`**, unless confirmed by a user holding **`invoice.issueEarly`** (`Developer ADMIN` or `Platform ADMIN`) through the early-issuance confirmation dialog showing elapsed vs. total period days (e.g., `18/31 days`). ::: --- ## 3. Mandatory Ft Rate Verification & Public Holiday Calendar ### 3.1 Verifying the Monthly Ft Rate Because the Energy Regulatory Commission (ERC) Fuel Adjustment Tariff (**Ft**) is a system-wide regulatory parameter, only a **Platform Administrator** (`ftrate.write`) can configure or update it: 1. If the selected month has no verified Ft rate on record, a warning banner (**Ft verification required**) appears at the top of `/billing`. 2. Click **Verify Ft rate** (or open **Settings → Billing & tariffs**). 3. Verify the target `YYYY-MM` billing month and enter the declared **Ft rate (THB/kWh)** between `-2.0000` and `10.0000`. (If unconfigured, the input starts blank rather than auto-filling an unverified value; the latest configured month is shown below as reference only.) 4. Click **Confirm** to save. ::: danger Mandatory Ft Refusal (`422`) & Period Lock - Both preview calculations and invoice generation **refuse with HTTP `422`** if no Ft rate exists for `YYYY-MM`. The billing engine never invents a fallback Ft rate for real invoices. - Once any invoice for a billing month reaches `CHECKED` or `APPROVED`, the Ft rate for that month is **locked** and cannot be modified. ::: ### 3.2 Public Holiday Calendar Platform Administrators manage official Thai public holidays under **Settings → Holidays** (supporting annual PEA preset auto-fill as well as manual entries). Dates are evaluated in `Asia/Bangkok` calendar dates (`YYYY-MM-DD`) so official holidays, including Songkran and substitution holidays, always bill at the `Holiday Off-Peak` rate. --- ## 4. TOU Billing Formulas, Rounding Rules & Worked Examples ### 4.1 Official PEA TOU Schedule (Asia/Bangkok UTC+7) | TOU Period | Days | Time Window (24-Hour) | Applied Contract Rate | | :--- | :--- | :--- | :--- | | **On-Peak** | Monday – Friday | `09:00:00 – 21:59:59` | Contract On-Peak Rate | | **Off-Peak** | Monday – Friday | `22:00:00 – 08:59:59` | Contract Off-Peak Rate | | **Holiday & Weekend Off-Peak** | Saturday, Sunday & Official Public Holidays | `00:00:00 – 23:59:59` | **Contract Off-Peak Rate** | ### 4.2 Multi-Meter & Mid-Cycle Swap Aggregation 1. **Strict Active-Window Clipping**: Intervals from each meter are clipped to `[activeFrom, activeTo)` so bench-test packets or post-decommission readings never leak into billing. 2. **Total Energy**: Sum of scaled kWh across all contributing active meters. 3. **Site Concurrent Peak Demand (`demandPeakKw`)**: At every 15-minute timestamp `t`, the engine sums active power `kW` across all active meters simultaneously (`max_t Σ P_m(t)`). For example, if Meter A draws 400 kW while Meter B draws 1,600 kW in the same 15-minute slot, site Peak Demand is `2,000.000 kW`. `demandOnPeakKw` and `demandOffPeakKw` are also recorded for reference, while any demand charge bills on overall `demandPeakKw`. 4. **Meter Replacement Schedule Annex**: Whenever >1 meter contributes during a billing period, `meterId` on the invoice header is `null` and Page 2 of the PDF automatically attaches the **Attached Meter Replacement Schedule** showing per-meter active dates, kWh, peak kW, and interval counts. ### 4.3 Step-by-Step Rounding & Formulas (`ROUND_HALF_UP`) All calculations execute in arbitrary-precision decimal arithmetic (`BigNumber`) and round **half-up at every step** so printed invoice lines always reconcile to the exact satang (`0.01 THB`): 1. **Quantities**: - `energyOnPeakKwh`, `energyOffPeakKwh`, and `energyHolidayOffPeakKwh` are each rounded to **2 decimal places** (default; configurable 0–4). - `totalEnergyKwh` is the exact sum of the three printed rounded energy lines. - `demandPeakKw` and `peakKvar` are rounded to **3 decimal places**. 2. **Base Energy & Demand Charges**: - `onPeakAmount` = `round_2(energyOnPeakKwh × onPeakRate)` - `offPeakAmount` = `round_2(energyOffPeakKwh × offPeakRate)` - `holidayOffPeakAmount` = `round_2(energyHolidayOffPeakKwh × offPeakRate)` - `baseEnergyAmountThb` = `onPeakAmount + offPeakAmount + holidayOffPeakAmount` - `demandAmountThb` = `round_2(demandPeakKw × demandRateKw)` (`0.00` for energy-only Solar PPAs) 3. **Float Tariff (Ft)**: - `ftTotalAmountThb` = `round_2(totalEnergyKwh × ftRateThb)` 4. **Contract Discount**: - Eligible when `discountPercent > 0` and the billing month falls within `[discountStartDate, discountExpiryDate]`. - Applied **strictly to `(Base Energy + Ft)`**, never to Demand Charge or Power Factor Penalty: - `discountAmountThb` = `round_2((baseEnergyAmountThb + ftTotalAmountThb) × (discountPercent / 100))` 5. **Optional Power Factor (PF) Penalty**: - Evaluated only when `pfPenaltyEnabled = true`, `demandPeakKw > 0`, and `peakKvar > 0`. - At default `pfThreshold = 0.85`, `tan(arccos(0.85)) = 0.6197`. - `allowanceKvar = demandPeakKw × tanPhi`. - If `peakKvar > allowanceKvar`: `excessKvar = round_2(peakKvar - allowanceKvar)` and `pfPenaltyAmountThb = round_2(excessKvar × pfPenaltyRateThb)` (default `56.07 THB/kVAR`). 6. **Net Subtotal, 7% VAT & Total Payable**: - `netSubtotal` = `baseEnergyAmountThb + ftTotalAmountThb - discountAmountThb + demandAmountThb + pfPenaltyAmountThb` - `vatAmountThb` = `round_2(netSubtotal × 0.07)` - `totalPayableThb` = `netSubtotal + vatAmountThb` ### 4.4 Worked Calculation Examples #### Example 1: Standard Energy-Only Solar PPA (15% Discount, No Demand Charge) Suppose for billing month `2026-10`: - **On-Peak Energy**: `10,000.00 kWh` @ `4.1839 THB/kWh` - **Off-Peak Energy**: `5,000.00 kWh` @ `2.6037 THB/kWh` - **Holiday Off-Peak Energy**: `2,000.00 kWh` @ `2.6037 THB/kWh` - **Peak Demand**: `120.000 kW` @ `0.0000 THB/kW` | PF Penalty disabled - **Ft Rate**: `0.3972 THB/kWh` | **PPA Discount**: `15.00%` | Step | Line Item | Calculation & Half-Up Rounding | Amount (THB) | | :--- | :--- | :--- | ---: | | 1 | On-Peak Energy Charge | `10,000.00 × 4.1839 = 41,839.00` | `41,839.00` | | 2 | Off-Peak Energy Charge | `5,000.00 × 2.6037 = 13,018.50` | `13,018.50` | | 3 | Holiday Off-Peak Charge | `2,000.00 × 2.6037 = 5,207.40` | `5,207.40` | | 4 | **Base Energy Subtotal** | `41,839.00 + 13,018.50 + 5,207.40` | **`60,064.90`** | | 5 | **Ft Surcharge (`17,000.00 kWh`)** | `17,000.00 × 0.3972 = 6,752.40` | **`6,752.40`** | | 6 | Energy + Ft (Discount Base) | `60,064.90 + 6,752.40` | `66,817.30` | | 7 | **Contract Discount (`15.00%`)** | `66,817.30 × 0.15 = 10,022.595` (half-up) | **`-10,022.60`** | | 8 | **Net Subtotal before VAT** | `66,817.30 - 10,022.60` | **`56,794.70`** | | 9 | **VAT (7.00%)** | `56,794.70 × 0.07 = 3,975.629` (half-up) | **`3,975.63`** | | 10 | **Total Payable** | `56,794.70 + 3,975.63` | **`60,770.33`** | #### Example 2: Contract with Demand Charge & Power Factor Penalty Using the same energy and Ft figures as Example 1, plus: - **Peak Demand**: `120.000 kW` @ `132.9300 THB/kW` - **Peak kVAR**: `100.000 kVAR` (PF threshold `0.85`, penalty rate `56.07 THB/kVAR`) 1. **PPA Discount (15%)** remains **`-10,022.60 THB`** because the discount applies only to `(Base Energy + Ft)`. 2. **Peak Demand Charge**: `120.000 × 132.9300` = **`15,951.60 THB`**. 3. **PF Penalty**: - Reactive allowance (`tanPhi = 0.6197`): `120.000 × 0.6197 = 74.364 kVAR` - Excess kVAR: `round_2(100.000 - 74.364) = 25.64 kVAR` - Penalty: `round_2(25.64 × 56.07) = round_2(1,437.6348)` = **`1,437.63 THB`** 4. **Net Subtotal before VAT**: `60,064.90 + 6,752.40 - 10,022.60 + 15,951.60 + 1,437.63` = **`74,183.93 THB`** 5. **VAT (7.00%)**: `round_2(74,183.93 × 0.07) = round_2(5,192.8751)` = **`5,192.88 THB`** 6. **Total Payable**: `74,183.93 + 5,192.88` = **`79,376.81 THB`** --- ## 5. Stage 1: Generating Draft Invoices & Fallback Modes Required capability: `invoice.generate` (`Developer ADMIN`, `Developer ACCOUNTING`, `Platform ADMIN`). ### Single or Batch Invoice Generation 1. Select the billing month and year, ensuring the monthly Ft rate has been verified. 2. **Single site**: Click **Create bill (`สร้างบิล`)** or **Reissue (`ออกบิลใหม่`)** on the table row or Kanban card. 3. **Batch generation**: Check multiple sites in **Missing** or **Voided** state (or select an entire company group), click **Create X bills** in the floating action bar, review the list in the confirmation dialog, and confirm. ![Batch invoice generation confirmation modal showing selected sites and companies](/screenshots/en/15-billing-generate-modal.png) ::: tip Automatic Backfill Refresh & Recalculation Rules - Before calculating an `AUTO` invoice, the server automatically re-projects `hes.meter_readings` across the entire billing window (`refreshProjection`) so any telemetry recovered after an outage is included. - Recalculating an existing `DRAFT` or `CHECKED` invoice preserves its `invoiceNumber`, increments `revision`, resets status to `DRAFT` (requiring a fresh Stage 2 check), and never alters an `APPROVED` invoice. - Only **`DRAFT`** invoices can be deleted (**Delete draft**); `CHECKED`, `APPROVED`, and `REJECTED` invoices must use **Void** to preserve the audit trail. ::: ### Incomplete Meter Data Fallback (`ROLLING_AVG` / `MANUAL`) If a meter experienced a prolonged outage: 1. Click **More tools → Create bill with incomplete meter data**. 2. Pick the **Site** and choose a calculation mode: - **`ROLLING_AVG`**: Averages On-Peak, Off-Peak, Holiday, Peak Demand kW, and Peak kVAR from up to the 3 most recent non-voided invoices. - **`MANUAL`**: Enter on-site meter readings directly (`On-Peak kWh`, `Off-Peak kWh`, `Holiday kWh`, `Peak kW`, `Peak kVAR`). - **`AUTO`**: Standard 15-minute interval projection. 3. Click **Calculate & create invoice** to save as `DRAFT`. --- ## 6. Stage 2: Technical Service Verification (`DRAFT → CHECKED`) Required capability: `invoice.check` (`Developer ADMIN`, `Developer SERVICE`, `Platform ADMIN`). Click a `DRAFT` card or row to inspect its financial, TOU telemetry, and audit details, then click **Check bill (`ตรวจบิล`)**. ![Invoice detail dialog in DRAFT status showing TOU breakdown and technical review CTA](/screenshots/en/16-billing-invoice-detail-draft.png) Transitioning to `CHECKED` executes the 6-point **Stage 2 Telemetry & Multiplier Audit (`verifyInvoiceTelemetry`)**: 1. **CT/VT Multiplier & Reading Side**: Verifies `readingSide` is `PRIMARY` or `SECONDARY` (never `UNKNOWN`), HES meter identity is verified, multiplier is within `[0.001, 1000000]`, and `multiplierRatio` matches `(CT × VT)` within **5%**. 2. **15-Minute Telemetry Coverage**: Compares actual vs. expected intervals (`>= 95%` PASSED; `< 95%` or `< 80%` WARNING; `0` intervals FAILED). 3. **Meter Swap Continuity**: Confirms zero overlapping interval timestamps between retired (`activeTo`) and replacement meters. 4. **Physical Sanity**: Flags negative active energy intervals (`FAILED`) or Peak Demand > `125%` of plant rated `kWp` (`WARNING`). 5. **Register Reconciliation**: Compares summed 15-minute kWh against the meter's cumulative register delta over the period and counts `ESTIMATED` outage-gap intervals. 6. **HES Interval Quality** (when interval confirmation rules or `PLAUSIBILITY_GUARD` flags apply): Reports intervals requiring manual review before approval. If any critical check is `FAILED`, transition to `CHECKED` is blocked (`400`). Non-critical observations (`WARNING`) are recorded on the audit report and still allow checking. Moving to `CHECKED` also **locks the billing month** (`periodLock`) so subsequent late telemetry is routed to `late_intervals` rather than mutating the audited bill (see [Locked Periods & Late Intervals](./08-troubleshooting-faq)). --- ## 7. Stage 3: Accounting Final Approval (`CHECKED → APPROVED`) Required capability: `invoice.approve` (`Developer ADMIN`, `Developer ACCOUNTING`, `Platform ADMIN`). ![Invoice detail dialog in CHECKED status ready for Accounting final approval](/screenshots/en/17-billing-invoice-detail-checked.png) 1. Review the `CHECKED` invoice and Stage 2 audit report (`View verification report`). 2. Click **Sign & Approve (`ลงนามอนุมัติ`)** (or batch-select multiple `CHECKED` invoices). 3. Verify the site, invoice number, billing month, and Total Payable in the **Final Approval** modal, then click **Confirm & Apply Digital Signature**. ### Inviolable Stage 3 Governance Rules - **No Direct Jump**: Invoices cannot skip from `DRAFT` directly to `APPROVED`; Stage 2 `CHECKED` is mandatory. - **Segregation of Duties (`checker ≠ approver`)**: The user who approves (`APPROVED`) **cannot be the same user** who performed Stage 2 verification (`checkedByServiceUserId`), even if that user holds an `ADMIN` role. In the UI, the checker sees a **`SoD restriction`** (`ติดเงื่อนไข SoD`) shield badge instead of the approve button. - **Invoice Reference Code (`รหัสอ้างอิงใบแจ้งหนี้`)**: Approval generates a SHA-256 hash formatted as `SIG_AVG_<32_HEX_CHARS>` from `invoiceNumber|totalPayableThb|billingMonth|checkedByServiceUserId`, printed on the PDF audit strip as **`Invoice reference code`** (`รหัสอ้างอิงใบแจ้งหนี้` in the UI, replacing the legacy electronic certification wording). - **`issuedSnapshot`**: At approval time, the seller, buyer, project, and default bank account details are frozen in `issued_snapshot` so later settings updates never alter historical tax invoices. - **Immutability & Customer Publication**: The invoice is locked permanently and immediately visible in the [Customer Portal](./07-customer-portal-guide). --- ## 8. PDF Preview, Exports, Voiding, Payment & Email Delivery ### 8.1 PDF Preview & Exports (`PDF` / `Billing Notice` / `Excel` / `Word`) Click **Preview PDF (`พรีวิว PDF`)** to open the live A4 document viewer: ![Approved invoice details with the Preview PDF action at the bottom](/screenshots/en/18-billing-invoice-pdf-preview.png) - **Status Watermarks**: `DRAFT` and `CHECKED` documents display a diagonal **`ร่าง – ยังไม่อนุมัติ / DRAFT – NOT APPROVED`** watermark; voided documents display **`ยกเลิก / VOID`**; only `APPROVED` documents carry **`ต้นฉบับ / Original`**. - **System vs. Signed PDF Toggle**: Once the customer uploads a countersigned PDF, switch between **System PDF** and **Signed PDF** right inside the preview dialog. - **Private Signature Previews**: Organization signatory images and customer countersignature images are stored privately (`private/signatures/...`) and retrieved strictly through authenticated endpoints (`/api/organizations/:id/signature` and `/api/invoices/:id/customer-signature` with `Cache-Control: private, no-store`), never exposed via public URLs. - **Legal Identity Guard (`422`)**: Exporting documents refuses with `422` if either seller or buyer lacks a company name, valid 13-digit Tax ID, or address. - **Export Formats**: Official bilingual A4 **PDF** (with Annex Page 2 for multi-meter sites), **Billing Notice PDF (`ใบวางบิล`)** (single or consolidated), multi-sheet **Excel (`.xlsx`)** with 15-min interval load curves, and **Word (`.docx`)** executive summary. ### 8.2 Voiding (`REJECTED`) & Reissuing If a `DRAFT`, `CHECKED`, or `APPROVED` invoice must be canceled (requires `invoice.void`): 1. Open the row `⋮` menu (or card icon) and select **Void (`ยกเลิกบิล`)**. 2. Enter a mandatory **cancellation reason** (minimum 3 characters) and confirm. 3. The invoice transitions permanently to **`REJECTED`** (`voidedAt`, `voidedByUserId`, `voidReason` preserved), any pending **`late_intervals`** for that period are replayed into `load_profile_15min` in the same transaction, and you can immediately click **Reissue (`ออกบิลใหม่`)** to generate a new replacement invoice with the next running number. ### 8.3 Payment Tracking & Email Dispatch - **Payment Status**: Click the payment status pill (`Unpaid`, `Paid`, `Partial`, `Overdue`) on any row or card to record paid amount, due date, and transfer/receipt reference. - **Email Dispatch**: Use `⋮ → Send email` to dispatch the invoice PDF notification to the off-taker's accounting contact. --- ## 9. Tariff Savings Comparison & Parallel Run Diagnostics ### 9.1 Tariff Savings Comparison (`Compare PPA rate with utility`) 1. Open **More tools → Compare PPA rate with utility**. 2. Choose a site for the active billing month. The report computes three side-by-side totals from the exact same interval stream: - **PPA Contract**: Actual contracted TOU rates and PPA discount. - **PEA Standard TOU**: `0%` discount benchmark. - **Fixed Flat Rate Benchmark**: Midpoint average of On-Peak and Off-Peak rates (`0%` discount, no demand charge). 3. Review net THB savings and `%` savings versus PEA. ::: warning `0.3972` Ft Fallback Warning Banner If the selected `YYYY-MM` billing month has **no configured Ft rate** in the database (`ftRateIsFallback = true`), Tariff Savings Comparison uses a provisional **`0.3972 THB/kWh`** fallback rate so teams can preview estimated savings, and displays a yellow warning banner: > *"Month YYYY-MM has no Ft rate configured: using fallback 0.3972 THB/kWh for preliminary comparison."* Unlike comparison previews, actual invoice calculation and generation strictly refuse with `422` until a verified Ft rate is saved. ::: ![Tariff savings comparison modal comparing PPA Contract vs PEA Standard TOU with the 0.3972 Ft fallback banner](/screenshots/en/19-billing-tariff-comparison.png) ### 9.2 Parallel Run (`invoice.compare`) Users with `invoice.compare` can open `⋮ → Compare meter data` (`เทียบข้อมูลมิเตอร์`) to inspect a read-only comparison between bills computed from cumulative **readings projection** versus direct **HES 15-minute intervals**, broken down per meter and TOU band along with any unconfirmed or flagged intervals. --- ## Customer Portal Guide Source: https://docs.wattdee.com/en/07-customer-portal-guide ::: warning UAT release This guide describes the upcoming portal update. Some screens or actions may differ in the current UAT portal. ::: # Customer Portal Guide (Off-Taker Experience) The WattDee Customer Portal provides electricity off-takers (**Customer / Off-Taker Tier**) with a focused workspace to track real-time solar energy generation, verify PPA contract savings against PEA utility rates, inspect issued statements, and countersign approved invoices. --- ## 1. Customer Tier Roles & Access Boundaries Access within the Customer Portal depends on your assigned role inside your organization (see [Roles and Permissions](./01-roles-and-permissions) for the complete capability matrix): | Role | Dashboard & 15-Min Charts | Meter Status | View Issued Invoices (`APPROVED`) | Countersign Invoices | Manage Company Users & Profile | | :--- | :---: | :---: | :---: | :---: | :---: | | **Customer Administrator (`ADMIN`)** | Allowed | Allowed (IPs hidden) | Allowed | Allowed | Allowed (manage staff & company signature) | | **Customer Representative (`CUSTOMER`)** | Allowed | Allowed (IPs hidden) | Allowed | Allowed | Restricted | | **Read Only (`READER`)** | Allowed | Allowed (IPs hidden) | Restricted (`/billing` shows `AccessDenied`) | Restricted | Restricted | ::: info Privacy & Working-Paper Isolation - **Approved Invoices Only**: Customers only see **`APPROVED`** (officially issued) invoices. Internal developer `DRAFT`, `CHECKED`, and `REJECTED` records, along with internal Stage 2 verification reports, are never exposed to the customer tier. - **Hidden Network & HES Internals**: For infrastructure security, customer accounts (including Customer `ADMIN`) never receive meter IP addresses, TCP ports, SIM card IDs, DLMS credential status, or backfill triggers. ::: --- ## 2. Customer Dashboard & Meter Monitoring Signing in as a customer user lands on the **Solar Energy & Savings Overview** (`/`): 1. **Header & Date Picker**: - Displays your company name, active **PPA Discount (%)** tag, and site meter health status (`Normal operation` or `X/Y sites online`). - Use the top-right **DatePicker** to inspect any historical date. - Quick shortcuts open **Company overview** or **View all invoices** (`/billing`, visible to `ADMIN` and `CUSTOMER` only). 2. **Latest Statement Quick-Access Banner**: - Highlights the newest `APPROVED` invoice with its `#invoiceNumber`, net payable (incl. 7% VAT), total energy (kWh), and countersignature badge (`Countersigned` or `Pending customer signature`). - Click **Review & Sign Invoice** to jump directly to `/billing`. 3. **4 Customer-Centric KPI Cards**: - **Month-to-Date Solar Energy (`kWh`)**: Cumulative energy with a stacked On-Peak / Off-Peak / Holiday breakdown bar. - **Month-to-Date PPA Net Cost (`THB`)**: Pre-VAT PPA energy cost compared against the crossed-out PEA standard tariff equivalent. - **Month-to-Date Contract Savings (`THB`)**: Net savings versus PEA TOU plus savings earned on the selected day. - **Today's Solar Generation (`kWh`)**: Selected day energy, PPA cost, and today's Peak Power (`kW`). 4. **Daily 15-Minute Solar Generation Curve**: - Color-coded by TOU band (`On-Peak` Mon–Fri `09:00–22:00`, `Off-Peak`, and `Holiday`). - Telemetry outages appear as true **broken gaps (`null`)**, never fabricated as zero. - Click **In-depth Data Analysis** (`/view-data`) for multi-day or multi-month drilldowns. 5. **PPA Contract & Installed Sites Cards**: - Shows installed capacity (`kWp`), meter serial numbers, connection status badge (`Online`, `Communication lost`, `Waiting first connection`, or `Disabled`), **Effective Discounted PPA Rates** vs. PEA base rates (`On-Peak`, `Off-Peak`, `Holiday`), and monthly totals per site. - Click **View meter status** or **Daily/Monthly charts** for per-site details (see [Meter & Telemetry Guide](./05-meter-and-telemetry-guide)). ![Customer dashboard showing monthly savings KPIs, 15-minute TOU load curve, and site PPA cards](/screenshots/en/31-customer-dashboard-and-meter.png) --- ## 3. Viewing Approved Statements & Downloading Documents (`/billing`) Users with **`ADMIN`** or **`CUSTOMER`** roles can open **Electricity Statements & Billing History** (`/billing`): ### 3.1 Filtering & Summary Cards 1. Filter statements using **Billing Year**, **Site** (if your organization has multiple sites), or **Search** (by invoice number, site name, or billing month). 2. Review the 3 top summary tiles: - **Total Issued Invoices** (`approvedCount`) - **Countersigned** (`signedCount`) - **Pending Customer Signature** (`pendingSignCount`) ### 3.2 Inspecting the Spotlight Statement Card Click any row in the **Statement History** table below to load its full breakdown into the Spotlight Card: - **Left Panel (TOU Energy Summary)**: `On-Peak`, `Off-Peak`, `Holiday / Weekend` kWh, `Peak Demand (kW)`, and `Total Energy (kWh)`. - **Right Panel (Financial Breakdown, THB)**: Base energy charge, `Ft` surcharge (with rate per kWh), PPA contract discount deduction (applied to `energy + Ft` per the [Billing & Approval Guide](./06-billing-and-approval-guide)), `VAT 7%`, and `Total Payable`. - **Footer Strip**: Displays countersignature status and the **`Invoice Reference Code`** (`รหัสอ้างอิงใบแจ้งหนี้`, `SIG_AVG_...`) matching the official PDF audit strip. ### 3.3 Previewing & Exporting Documents From the Spotlight Card footer or table action buttons: 1. **Preview Invoice (PDF)**: Opens the A4 viewer where you can toggle between **System PDF** and **Signed PDF** (once uploaded). 2. **Download Invoice (PDF)**: Official bilingual A4 Tax Invoice (includes Page 2 Annex if meters were swapped mid-cycle). 3. **Download Billing Notice (PDF)**: Official `Billing Notice / ใบวางบิล` summary document. 4. **Calculation Sheet (Excel)**: Multi-sheet `.xlsx` workbook containing the full 15-minute interval dataset for independent accounting verification. 5. **Document (Word)**: `.docx` executive summary report. 6. **View Signed PDF**: Downloads the countersigned PDF attached to the invoice. ![Customer billing portal showing spotlight statement breakdown, Invoice Reference Code, and countersign actions](/screenshots/en/32-customer-billing-and-countersign.png) --- ## 4. Countersigning Approved Invoices For any `APPROVED` invoice marked **Pending customer signature**, users holding `invoice.countersign` (`Customer ADMIN` or `CUSTOMER`) can countersign using **either of two methods**: ### Option A: Upload a Countersigned PDF (`อัปโหลด PDF ที่ลงนามแล้ว`) Best when your organization prints/stamps/signs hard copies or applies an external corporate digital signature: 1. Click **Download Invoice (PDF)** and have your authorized signatory sign/stamp the document. 2. Return to `/billing` and click **Upload Signed PDF** (or **Sign** in the history table). 3. Enter the **Authorized Signatory Name**. 4. Select the signed **`.pdf`** file (maximum **15 MB**; validated by `%PDF` magic bytes). 5. Click **Save & Upload**. The statement immediately updates to **Countersigned**. ### Option B: Attach a Customer Signature Image (`แนบลายเซ็นผู้รับซื้อ`) Best for embedding your authorized signature directly into the WattDee-generated invoice PDF: 1. Click **Attach Customer Signature** on the Spotlight Card. 2. Enter the **Authorized Signatory Name**. 3. Upload a signature image (**transparent PNG recommended**; supports `PNG`, `JPEG`, and `WebP` up to **2 MB**). 4. Review the preview (fetched securely over the private authenticated endpoint `/api/invoices/:id/customer-signature`, never via public URLs). 5. Click **Save Signature**. Your signature and signatory name are embedded directly into the **"For / Customer Signature"** box on the PDF invoice. ::: warning Countersignature Immutability (`409 Conflict`) Once a countersigned PDF or customer signature image is saved to an invoice, **customer and developer users cannot overwrite or replace it** (the API returns `409 Conflict`). If an incorrect file was uploaded by mistake, contact a **Platform Super Administrator** to replace it. ::: --- ## 5. Managing Customer Accounts & Changing Your Password - **Customer Administrator (`ADMIN`)**: Open **Settings** to add, edit, or suspend `CUSTOMER` and `READER` users in your company, maintain your legal Tax ID (13 digits) and VAT address, or upload an organization-wide signature image. - **Any User**: Click your profile card at the bottom-left of the sidebar and select **Change password** (`เปลี่ยนรหัสผ่าน`) to update your own password anytime (automatically signs out all other active devices). Need help with access restrictions, login errors, or billing rules? See the [Troubleshooting, FAQ & AI Integration Guide](./08-troubleshooting-faq). --- ## Troubleshooting, FAQ & AI Assistant Integration Source: https://docs.wattdee.com/en/08-troubleshooting-faq ::: warning UAT release This guide describes the upcoming portal update. Some screens or actions may differ in the current UAT portal. ::: # Troubleshooting, FAQ & AI Assistant Integration This guide covers common billing errors, role restrictions, sign-in and password recovery, meter connectivity diagnostics, and how to connect AI assistants and agents to the WattDee documentation. --- ## 1. Error `422`: Missing Ft Rate When Generating an Invoice ### Symptom - Calculation or invoice generation fails with HTTP **`422`**: `No Ft (Fuel Adjustment Tariff) rate is on record for YYYY-MM. Refusing to generate: billing would require inventing a rate.` - A yellow banner at the top of `/billing` (or in the Dashboard Action Queue) prompts **Ft verification required**. ### Cause 1. Real invoices write financial amounts to the ledger, so the billing engine strictly refuses to invent an Energy Regulatory Commission (ERC) Ft rate when no verified record exists for `YYYY-MM`. 2. Only a **Platform Administrator** (`ftrate.write` capability) can set or update Ft rates. Developer `ADMIN` and `ACCOUNTING` users cannot configure Ft rates themselves. ### Step-by-Step Resolution 1. Ask a **Platform Administrator** to sign in, open `/billing`, and click **Verify Ft rate** in the warning banner (or go to **Settings → Billing & tariffs**). 2. Confirm the target `YYYY-MM` billing month and enter the official **Ft rate (THB/kWh)** (valid range: `-2.0000` to `10.0000`). 3. Click **Confirm**, then retry invoice generation in `/billing` (see [Billing & Approval Guide](./06-billing-and-approval-guide)). ::: tip Why Does "Compare PPA rate with utility" Still Work Without an Ft Rate? The **Tariff Savings Comparison** report (`/api/billing/rate-comparison`) is an exploratory comparison tool. When `YYYY-MM` has no configured Ft rate, it falls back to **`0.3972 THB/kWh`** and displays a yellow warning banner so users know the savings preview is provisional. ![Tariff savings comparison modal displaying the 0.3972 THB/kWh Ft fallback warning banner](/screenshots/en/19-billing-tariff-comparison.png) ::: --- ## 2. Error `422`: Billing Period Has Not Ended Yet (`Open Period` vs. `invoice.issueEarly`) ### Symptom - Clicking **Create bill** before the billing cut-off date fails with HTTP **`422`**: `Billing period YYYY-MM has not ended (X/Y days elapsed)...` or a message stating the period has not finished yet. ### Cause - Under business rule BL-1, monthly invoices are generated **after the billing cycle closes** (`endDate <= now`, honoring `billingCycleDay` in `Asia/Bangkok UTC+7`). - Only users holding **`invoice.issueEarly`** (`Developer ADMIN` or `Platform ADMIN`) can confirm early issuance. `Developer ACCOUNTING` users cannot issue before cut-off, and future periods that have not started are blocked for everyone. ### Step-by-Step Resolution 1. Wait until after `00:00` Bangkok time on the site's cut-off date (`cycleDay`) to issue the full-month invoice. 2. If an early mid-cycle bill is genuinely required, ask a **Developer ADMIN** or **Platform ADMIN** to generate the bill and confirm the **Billing period has not ended** dialog (**Issue early**). --- ## 3. Why `CHECKED` and `APPROVED` Must Be Done by Two Different People (`checker ≠ approver`) ### Symptom - The approval button displays **`SoD restriction`** (`ติดเงื่อนไข SoD`) with a shield-lock icon, or the API returns: `Segregation of duties violation: The accounting approver cannot be the same user who performed the technical service check.` ### Cause WattDee enforces strict **Dual Control / Segregation of Duties (SoD)**: 1. The user recorded in `checkedByServiceUserId` (Stage 2) **cannot** perform Stage 3 final approval (`APPROVED`) on the same invoice, even if that person holds an `ADMIN` account with both capabilities. 2. Invoices also cannot jump directly from `DRAFT` to `APPROVED` without passing Stage 2 `CHECKED`. ### Step-by-Step Resolution 1. Have an O&M engineer (`SERVICE`) or a first administrator perform Stage 2 technical verification (`DRAFT → CHECKED`). 2. Have an **Accounting** user (`ACCOUNTING`) or a **second, different administrator** sign in with their own account to perform Stage 3 approval (`CHECKED → APPROVED`). --- ## 4. Locked Billing Periods & Late Intervals (`late_intervals`) ### Symptom - The Dashboard **Action Queue** alerts that energy arrived after a billing period closed (`พลังงานเข้ามาหลังปิดรอบบิล X ไซต์ / Y kWh ยังไม่อยู่ในใบแจ้งหนี้`), or re-projecting/swapping meters is blocked for an invoiced month. ### Cause 1. Once an invoice moves into **`CHECKED`** or **`APPROVED`**, its billing period (`[billingPeriodStart, billingPeriodEnd)`) is **locked (`Period Lock`)** so `load_profile_15min` cannot change underneath an audited or issued invoice. 2. If HES later backfills missing intervals after a cellular/VPN outage, or modifies interval values inside that locked window, the projection worker refuses to overwrite `load_profile_15min` and instead stores the new/changed intervals (or withdrawals) in **`late_intervals`**, surfaced via `GET /api/billing/late-intervals` and the Dashboard **Action Queue**. ### Step-by-Step Resolution 1. Inspect the pending unbilled kWh (broken down by TOU period and peak demand) in the Action Queue or `/api/billing/late-intervals`. 2. Act based on the invoice status: - **If `CHECKED` (not yet `APPROVED`)**: Recalculate the draft or return it to `DRAFT`; pending `late_intervals` automatically replay into `load_profile_15min` in the same transaction, then re-check and approve. - **If already `APPROVED`**: If the unbilled energy warrants correction, **Void (`REJECTED`)** the invoice with a reason (automatically replaying `late_intervals` in the same transaction), then click **Reissue** to generate a replacement invoice with the recovered telemetry. --- ## 5. Why `READER` and `OPERATOR` Cannot Open `/billing` (`AccessDenied`) & Why `READER` Cannot See Meter IPs ### Why `/billing` Shows `AccessDenied` Permissions in WattDee follow **Organization Tier × Role**, never role name alone (see [Roles and Permissions](./01-roles-and-permissions)): - Accessing `/billing` requires the **`invoice.view`** capability. - **Customer `READER` (`Read only`)**: Holds zero billing capabilities, and is intended strictly for viewing site energy charts and operational meter status. - **Developer `OPERATOR` (`System operator`)**: Focuses on real-time meter monitoring, test connections (`meter.command`), network diagnostics (`meter.network.read`), and alarm triage, not billing. - Navigating directly to `/billing` with either role displays the **`AccessDenied`** page (and the Billing link is hidden in the sidebar). ### Why `READER` (and All Customer Users) Cannot See Meter IP Addresses - Viewing IP addresses, TCP ports, SIM card IDs, and HES gateway error details requires **`meter.network.read`**. - All customer-tier roles (`Customer ADMIN`, `CUSTOMER`, `READER`), as well as Developer `ACCOUNTING`, do **not** have `meter.network.read`. - Both the backend API (`stripMeterNetworkFields`) and the SPA omit `ipAddress`, `port`, `simCardId`, and gateway `lastError` from customer responses to protect site network infrastructure. ### Resolution Ask your Organization Administrator to assign the appropriate role (`CUSTOMER` or `Customer ADMIN` to view and countersign issued invoices; Developer `SERVICE`/`OPERATOR`/`ADMIN` for meter network diagnostics). --- ## 6. Sign-In Rate Limit (`429 Too Many Requests`) & Forgotten Password Reset ![WattDee login screen where rate-limit and credential errors appear](/screenshots/en/01-login-page.png) ### `429 Too Many Requests` ("Too many sign-in attempts") - **Cause**: In production, BetterAuth enforces an anti-brute-force rate limit of approximately **3 sign-in attempts per 10 seconds per IP address**. - **Resolution**: 1. Wait **10–15 seconds** before attempting to sign in again. 2. Double-check Caps Lock, keyboard layout, and email spelling. ### Forgotten Password (No Self-Signup or "Forgot Password" Link) - **Cause**: WattDee disables public sign-up (`disableSignUp: true`) and unauthenticated self-resets to maintain strict multi-tenant security. Account provisioning and password resets are managed by organization administrators. - **Step-by-Step Admin Password Reset**: 1. Contact your **Company Administrator** (`Customer ADMIN`, `Developer ADMIN`) or **Platform Administrator**. 2. The administrator navigates to **Settings → Company → People & access**, clicks **Edit** on your user account, and locates **Reset password**. 3. The administrator can either enter a policy-compliant password (minimum 8 characters, including uppercase, lowercase, digit, and special character `!@#$%&*`) or **leave the password blank to generate a one-time temporary password**, then click **Reset password**. 4. Resetting immediately signs the user out of all active sessions. After signing in with the temporary password, open the bottom-left **User Menu → Change password** to set your own private password. --- ## 7. Meter Shows `Offline` / `Communication Lost` (`VPN` & `Test Connection` Checks) A meter transitions to **`Offline`** when no readings arrive for more than **1 hour (`60 minutes`)** or when HES reports `commLostAt` / `verification_failed` / `inactive`. Follow this diagnostic checklist (requires `meter.command`, `meter.network.read`, or `vpn.manage`; see also [Meter & Telemetry Guide](./05-meter-and-telemetry-guide)): 1. **Check HES Activation Status**: - Under **Settings → Site → Meters**, verify the meter is active (`isActive = true`) and HES status is **`HES is polling` (`active`)** rather than `Disabled in HES` or `verification pending`. Remember that testing or editing does not automatically activate HES polling. Use **Activate in HES** when ready. 2. **Verify Managed VPN Tunnel (if using `VPN (Mikrotik)`)**: - Ask a `Platform ADMIN` to open **Settings → Developer Company → VPN profiles** and click **Refresh status**. - Confirm the VPN status tag reads **`Tunnel established` (`tunnel_up`)** rather than `controller_offline`, `runner_error`, `pending`, or `disabled`. - Confirm the meter is assigned to the correct VPN profile and its IP address falls within `allowed_ips`. 3. **Run `Test connection`**: - Open the meter's **Diagnostics** panel (`/meter` side panel or **Settings → Site → Meters**) and click **Test connection**. Review the returned diagnostic: - `config_error` / missing LLS password: Configure the DLMS LLS password on the HES host and restart HES. - `auth_failed`: The meter rejected the LLS password; verify the HES host secret matches the physical meter. - `operation was canceled` / session timeout: TCP connected, but the meter did not answer; usually an interface mismatch between **`HDLC`** (4G modem / serial converter) and **`WRAPPER`** (direct Ethernet LAN on the meter). - `connect_failed` / `poll_timeout`: Unreachable IP/port (default `4059`); inspect site power, 4G/APN SIM, Mikrotik VPN tunnel, and firewall rules. - `protocol_error`: Verify the configured meter model (`Saral 305`, `Premier 550`, `Prometer 100`) and interface. 4. **Recover Outage Gaps**: - Once `Test connection` succeeds, click **Read now** or trigger a **Backfill** (up to 31 days per request) to pull stored 15-minute intervals from the meter's internal memory. --- ## 8. Using WattDee Docs with AI Assistants & Agents The bilingual WattDee User Manual is published at **`https://docs.wattdee.com`** and provides three AI-native integration paths: | Interface | URL / Command | Best For | | :--- | :--- | :--- | | **`/llms.txt` Index** | `https://docs.wattdee.com/llms.txt` | Lightweight structured index of every Thai and English manual page with summaries for fast LLM discovery | | **`/llms-full.txt` Bundle** | `https://docs.wattdee.com/llms-full.txt` | Complete plain-Markdown bundle of both languages for one-shot context injection or RAG indexing (per-language bundles are also published at `/th/llms-full.txt` and `/en/llms-full.txt`) | | **Local MCP Server** | `bun run docs:mcp` | Exposes WattDee documentation directly to MCP-capable AI clients (Claude Desktop, Cursor, Antigravity) with `search_wattdee_manual`, `get_wattdee_guide`, and `get_role_capabilities` | ### Running the `docs:mcp` MCP Server From the root of the AMR repository, launch the documentation MCP server with: ```bash bun run docs:mcp ``` Or register it in your MCP client configuration (replacing `/path/to/AMR` with your local repository path): ```json { "mcpServers": { "wattdee-docs": { "command": "bun", "args": ["run", "docs:mcp"], "cwd": "/path/to/AMR" } } } ``` ::: tip Example Questions to Ask Your AI Assistant - *"Walk me through the WattDee PPA discount and 7% VAT rounding steps with an example."* - *"Why does a Customer READER or Developer OPERATOR hit AccessDenied on /billing?"* - *"How do I replay late_intervals after voiding an APPROVED invoice?"* :::